Implement an identity management solution
Implement initial configuration of Microsoft Entra ID
Introduction
In this module, you learn how to configure and manage a Microsoft Entra tenant. You explore Microsoft Entra roles, custom domains, and company branding options. In addition, you learn how to configure delegation by using administrative units and configure several tenant-wide settings within Microsoft Entra ID.
Configure company brand
.png)
You can add your company logo, colors, and background to the sign-in page so it looks like your own.
-
Needs Entra ID Premium P1/P2 or Office 365 license.
-
Go to Azure Portal → Entra ID → Company Branding to set it up.
| Setting | Description |
|---|---|
| Language | The language is automatically set as your default and can't be changed. |
| Sign-in page background image | Select a .png or .jpg image file for the background of your sign-in pages. The image is anchored to the center of the browser, and scales to the size of the viewable space. You can't select an image larger than 1920x1080 pixels in size or that has a file size more than 300,000 bytes. |
| Banner logo | Select a .png or .jpg version of your logo to appear on the sign-in page after the user enters a username and on the My Apps portal page. |
| Username hint | Type the hint text that appears to users if they forget their username. This text must be Unicode, without links or code, and can't exceed 64 characters. If guests sign in to your app, we suggest not adding this hint. |
| Sign-in page text and formatting | Type the text that appears on the bottom of the sign-in page. You can use this text to communicate additional information, such as the phone number to your help desk or a legal statement. This text must be Unicode and not exceed 1,024 characters. |
Configure and manage Microsoft Entra roles
IT Admins:
-
Control access to apps and data.
-
Set up multi-factor authentication (MFA).
-
Automate user provisioning between on-prem AD and cloud apps.
-
Protect user identities and manage access governance.
-
-
App Developers:
-
Add Single Sign-On (SSO) to apps.
-
Use APIs to create personalized experiences with organizational data.
-
-
Microsoft 365 / Azure / Dynamics users:
-
Already use Entra ID automatically — each tenant includes it.
-
Can manage access to all connected cloud apps.
-
If a user needs to manage Entra resources, assign them a proper role (like Azure roles or Entra roles).
Microsoft Entra roles
Microsoft Entra roles are used to manage resources in your organization’s Entra directory.
They let you do tasks like:
-
Create or edit users
-
Reset passwords
-
Assign licenses
-
Manage domains
-
Delegate admin roles
These roles help control who can do what inside Microsoft Entra ID.
| Microsoft Entra role | Permissions | Notes |
|---|---|---|
| Global Administrator | Manage access to all administrative features in Microsoft Entra ID, and services that federate to Microsoft Entra ID | The person who signs up for the Microsoft Entra tenant becomes the first Global Administrator. |
| Assign administrator roles to others | ||
| Reset the password for any user and all other administrators | ||
| User Administrator | Create and manage all aspects of users and groups | |
| Manage support tickets | ||
| Monitor service health | ||
| Change passwords for users, Helpdesk administrators, and other User Administrators | ||
| Billing Administrator | Make purchases | |
| Manage subscriptions | ||
| Manage support tickets | ||
| Monitors service health |
In the Azure portal, you can see the list of Microsoft Entra roles on the Roles and administrators screen.
Differences between Azure roles and Microsoft Entra roles
At a high level, Azure roles control permissions to manage Azure resources, while Microsoft Entra roles control permissions to manage Microsoft Entra resources. The following table compares some of the differences.
| Azure roles | Microsoft Entra roles |
|---|---|
| Manage access to Azure resources | Manage access to Microsoft Entra resources |
| Supports custom roles | Supports custom roles |
| Scope can be specified at multiple levels (management group, subscription, resource group, resource) | Scope is at the tenant level or can be applied to an Administrative Unit |
| Role information can be accessed in Azure portal, Azure CLI, Azure PowerShell, Azure Resource Manager templates, REST API | Role information can be accessed in Azure admin portal, Microsoft 365 admin center, Microsoft Graph, and PowerShell |
Do Azure roles and Microsoft Entra roles overlap?
Normally, they don’t overlap.
Azure roles manage Azure resources (like VMs, storage, etc.), while Entra roles manage identity-related tasks (like users, groups, and licenses).-
Exception:
If a Global Administrator turns on “Access management for Azure resources” in the Azure portal, they temporarily get the User Access Administrator role in Azure — allowing them to manage access to Azure resources. -
Some Entra roles, like Global Administrator and User Administrator, also apply to Microsoft 365 services (Exchange, SharePoint, etc.), but not to Azure by default.
🔒 Best practice: Avoid using the Global Administrator role often — follow the principle of least privilege.
Assign roles
You can assign roles in different ways, depending on what you need:
-
To a user or group:
-
Go to Entra ID → Roles and administrators → Select a role → + Add assignment
-
-
From a user or group view:
-
Entra ID → Users (or Groups) → Select user/group → Assigned roles → + Add assignment
-
-
To a broader scope (like Subscription, Resource Group, or Management Group):
-
Use Access control (IAM) in that resource’s settings.
-
-
Using PowerShell or Microsoft Graph API
-
For automation or scripting.
-
-
Using Privileged Identity Management (PIM):
-
For just-in-time or temporary admin access.
-
⚠️ Be careful — there are no built-in restrictions. Assigning roles carelessly can give unwanted admin rights or open security risks. Always follow proper identity governance.
Example - using PIM to assign a role
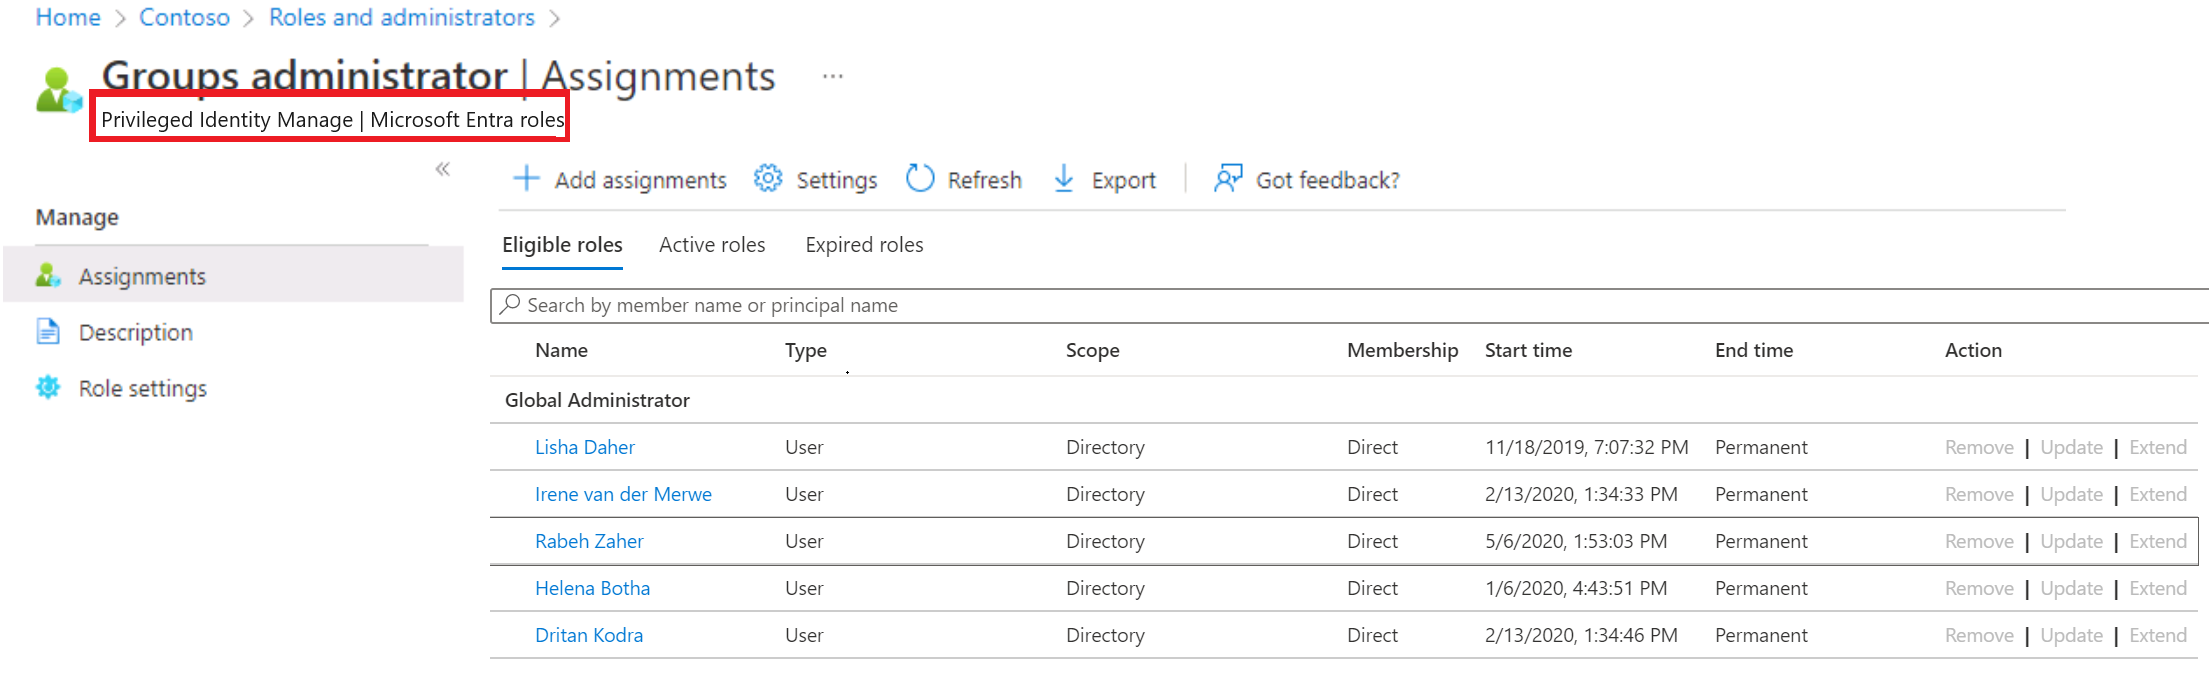
A common way to assign Microsoft Entra roles to a user is on the Assigned roles page for a user. You can also configure the user eligibility to be elevated just-in-time into a role using Privileged Identity Management (PIM).
Note
If you have a Microsoft Entra ID Premium P2 license plan and already use PIM, all role management tasks are performed in the Privileged Identity Management experience. This feature is currently limited to assigning only one role at a time. You can't currently select multiple roles and assign them to a user all at once.
Create and assign a custom role in Microsoft Entra ID
This section describes how to create new custom roles in Microsoft Entra ID. For the basics of custom roles, see the custom roles overview. The role can be assigned either at the directory-level scope or an app registration resource scope only.
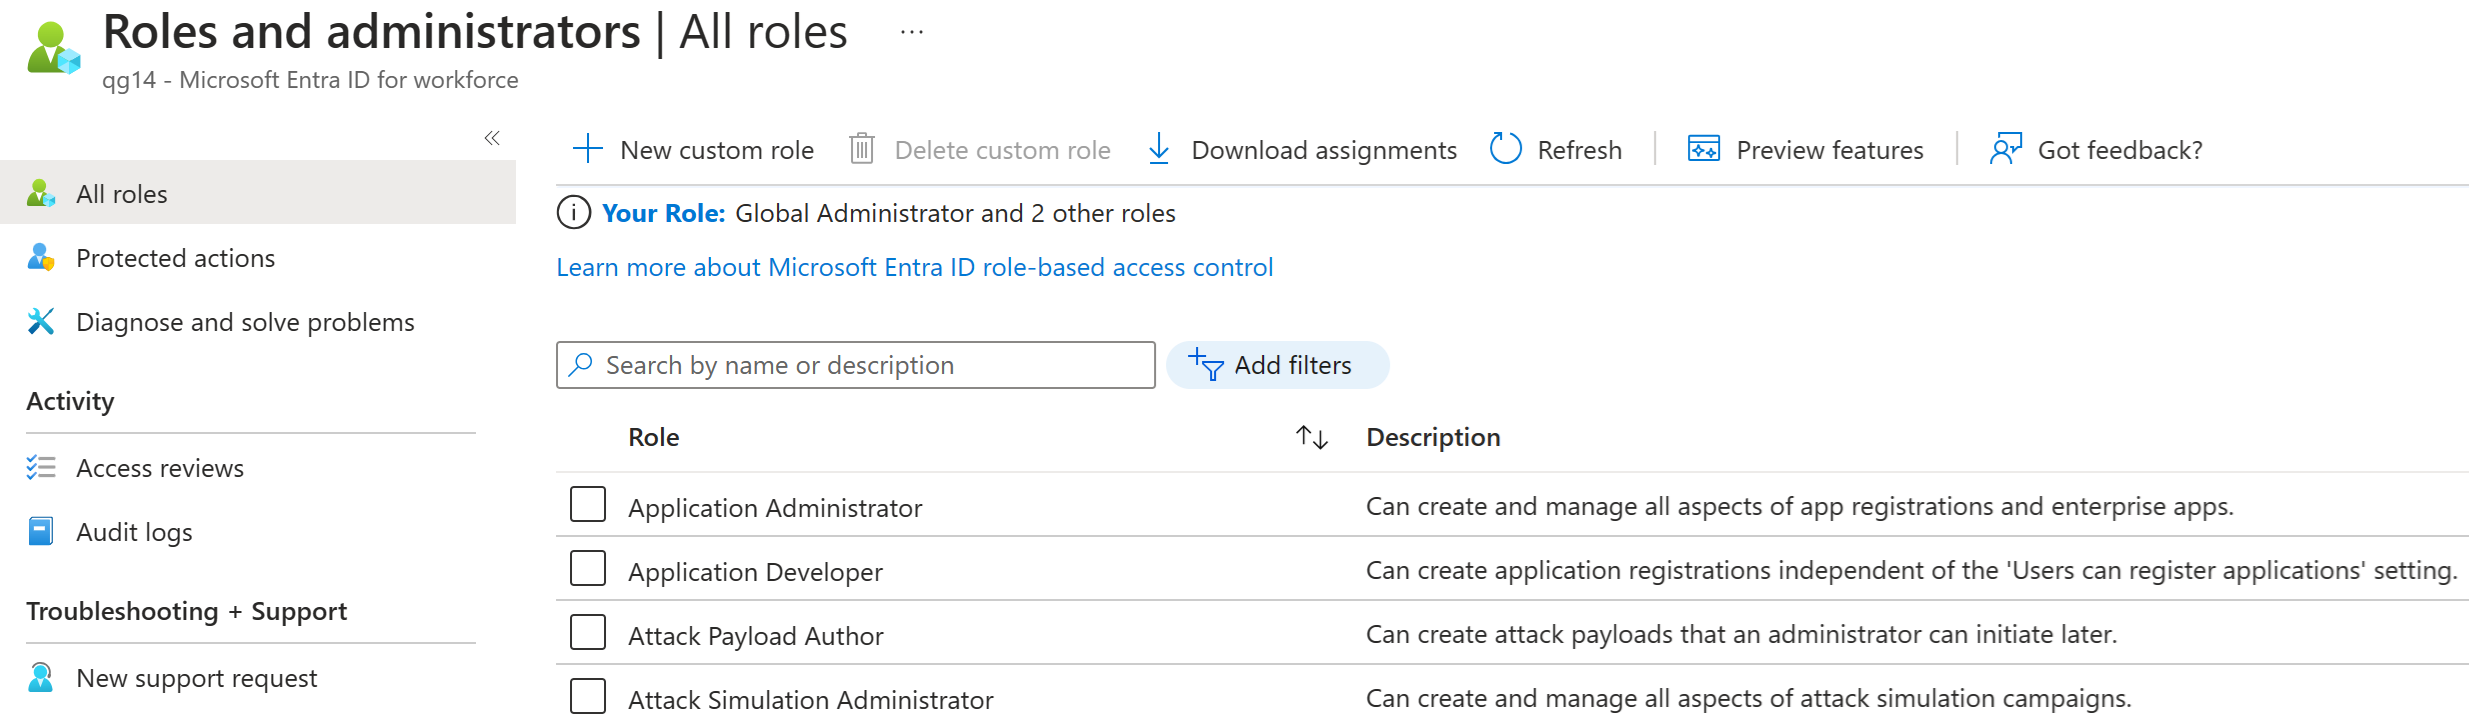
Custom roles can be created in the Roles and administrators tab on the Microsoft Entra ID overview page.
Select Microsoft Entra ID - Roles and administrators - New custom role.
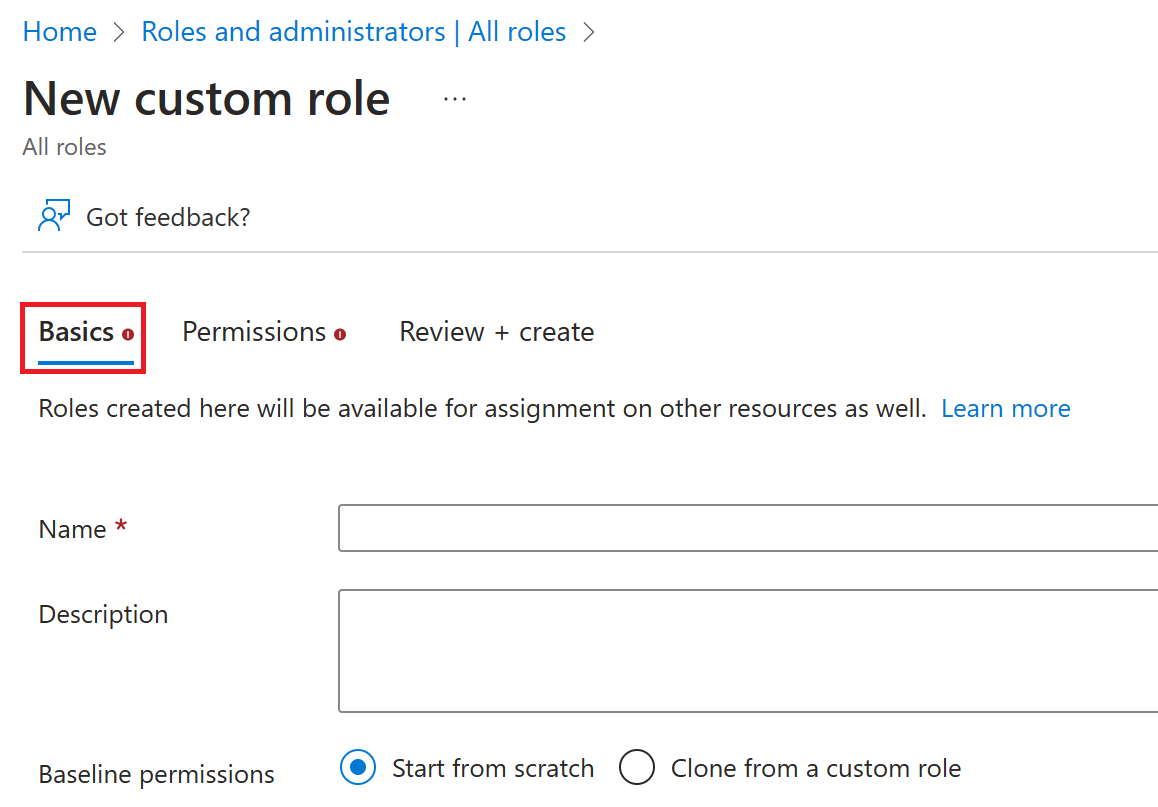
On the Basics tab, provide a name and description for the role and then select Next.
On the Permissions tab, select the permissions necessary to manage basic properties and credential properties of app registrations.
First, enter "credentials" in the search bar and select the
microsoft.directory/applications/credentials/updatepermission.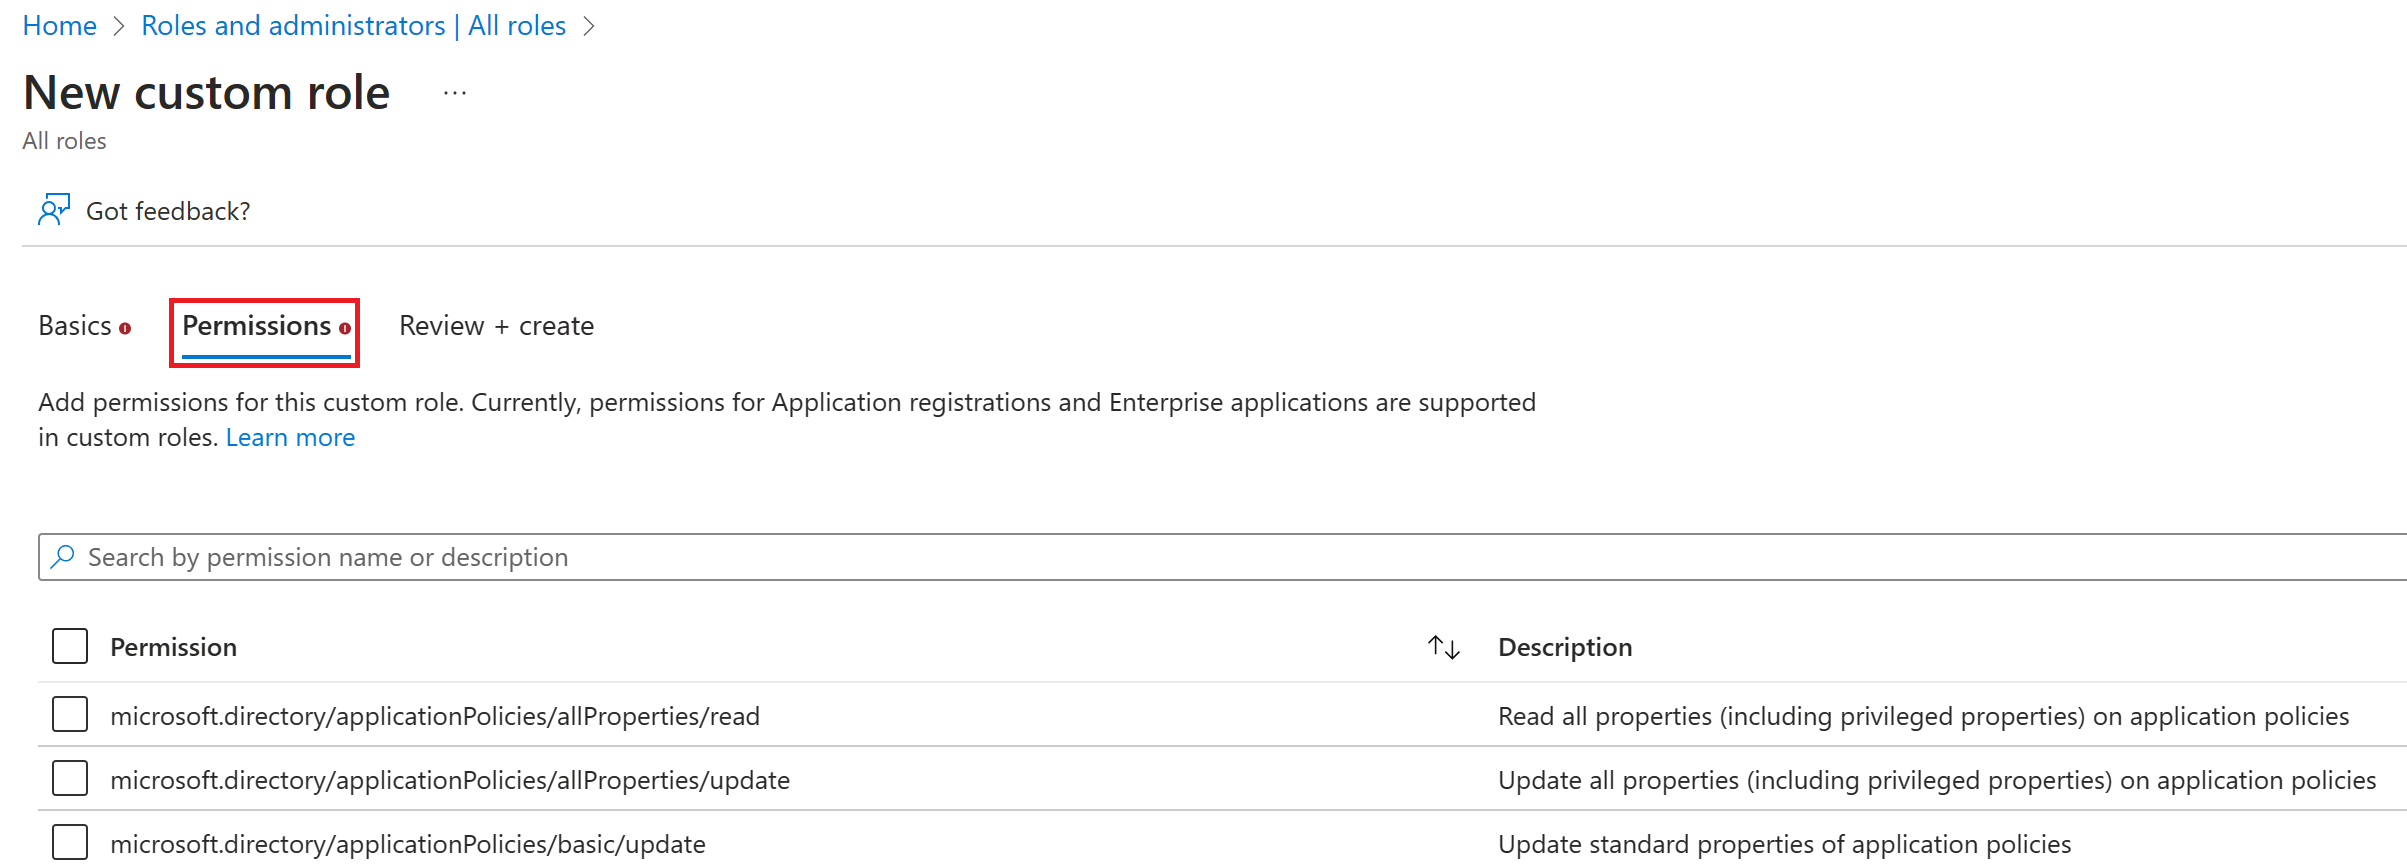
Next, enter "basic" in the search bar, select the
microsoft.directory/applications/basic/updatepermission, and then select Next.On the Review + create tab, review the permissions and select Create.
Your custom role shows up in the list of available roles to assign.
Exercise manage users roles
You need to assign extra permissions to one of your newly created administrators. In this exercise, you'll create a user account to use in the exercises.
Create an Azure account and add Microsoft Entra ID Premium P2 trial licenses
The tasks in this exercise and the exercises in this learning path require you to already have an Azure subscription that you can use or to sign up for an Azure trial account. If you already have your own Azure subscription, you might skip this task and continue to the next.
- In a web browser, go to Azure portal.
- Scroll down through the page to learn more about the benefits and free services available.
- Select Start free.
- Use the wizard to sign up for your Azure trial subscription.
- You need to a Microsoft Entra ID P2 license to complete some of the exercises. In the organization you created, search for and then select Microsoft Entra ID.
- Select Licenses in the menu.
- In the right Quick tasks menu of the Licenses - Overview page, select Get a free trial
- Under Getting started with Microsoft Entra ID, select Get a free trial for Microsoft Entra ID Premium.
- In the Activate pane, under Microsoft Entra ID PREMIUM P2, select Free trial and then select Activate.
- In the navigation menu on the left, select Overview.
- Refresh the browser until you see Microsoft Entra ID Premium P2 under the organization name. It might take a couple of minutes.
- You might need to sign out and sign back into Microsoft Azure if you encounter any problems with expected features not being available.
Add a new user
Now, let's create a user account.
Sign in to the Microsoft Entra admin center as a Global administrator
In the menu on the left expand the Identity section.
In the left navigation menu, under Users, select All Users, then select +New User.
Create a user using the following information:
Setting Value User principal name AdeleV Mail nickname (you might have to uncheck the Derive from user principal name. AdeleV Display name Adele Vance Password Pass@word1 Select Create. The user is now created and registered to your organization.
Assign a role to a user
Using Microsoft Entra ID, you can designate limited administrators to manage identity tasks in less-privileged roles. Administrators can be assigned for such purposes as adding or changing users, assigning administrative roles, resetting user passwords, managing user licenses, and managing domain names.
In Microsoft Entra ID, All users screen, select Adele Vance.
On the user’s profile page, select Assigned roles. The Assigned roles page appears.
Select Add assignments, select the role to assign to the user (for example, Application administrator), and then select Add.

Select + Add Assignment.

The newly assigned Application administrator role appears on the user’s Assigned roles page.
Remove a role assignment
If you need to remove the role assignment from a user, you can also do that from the Assigned roles page.
To remove a role assignment from a user
In Microsoft Entra ID, select Users - All User, and then select the user getting the role assignment removed. For example, Adele Vance.
Select Assigned roles, then select the name of the role your wish to removed -
Application Administrator.On the far right side of the screen, select Remove. Then select Yes option when prompted for confirmation.

The Application administrator role is removed from the user and it no longer appears on the Adele Vance – Assigned roles page.
Configure delegation by using administrative units
What is an administrative unit?
What admin roles are available for an administrative unit?
You can have users in the following roles to manage your administrative unit:
Authentication administrator
Helpdesk administrator
License administrator
Password administrator
User administrator
Note
If you're familiar with on-premises Active Directory, this capability was handled by setting up Organizational Units (OUs) in your directory and adding your users to the OU.
Plan your administrative units
Analyze Microsoft Entra role permissions
What is a permission?
A permission is the authorization to perform a specific action. In Microsoft Entra ID, this ranges from:-
Viewing settings
-
Changing settings
-
Adding or removing users
-
Managing other resources
-
-
Where permissions apply:
-
User level – Directly assigned to a user.
-
Group level – Assigned to a group; inherited by all members.
-
All permissions eventually affect the user, either directly or via group membership. This helps define role capabilities and limits.
Sample of the default permissions for users
| Member Users | Guest Users |
|---|---|
| Enumerate list of users and their contacts | Read own properties |
| Invite guest users | Invite guest users |
| Can create Security and Microsoft 365 Groups | Can search for non-hidden groups by name |
| Register new applications | Read properties of registered and enterprise applications |
Note
This is just a small subset, to show differences. If you want a full list of the Default User Permissions
Controlling permissions - add and restrict
| User settings | Roles and administrators |
|---|---|
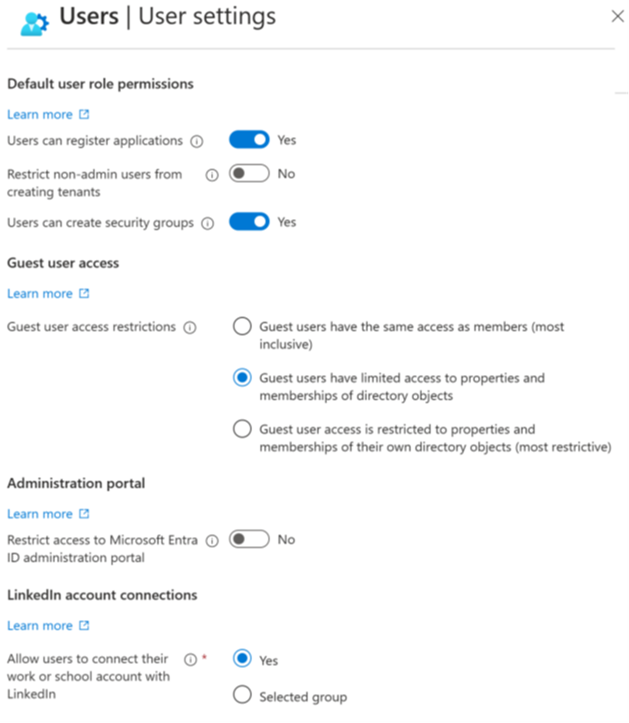 | 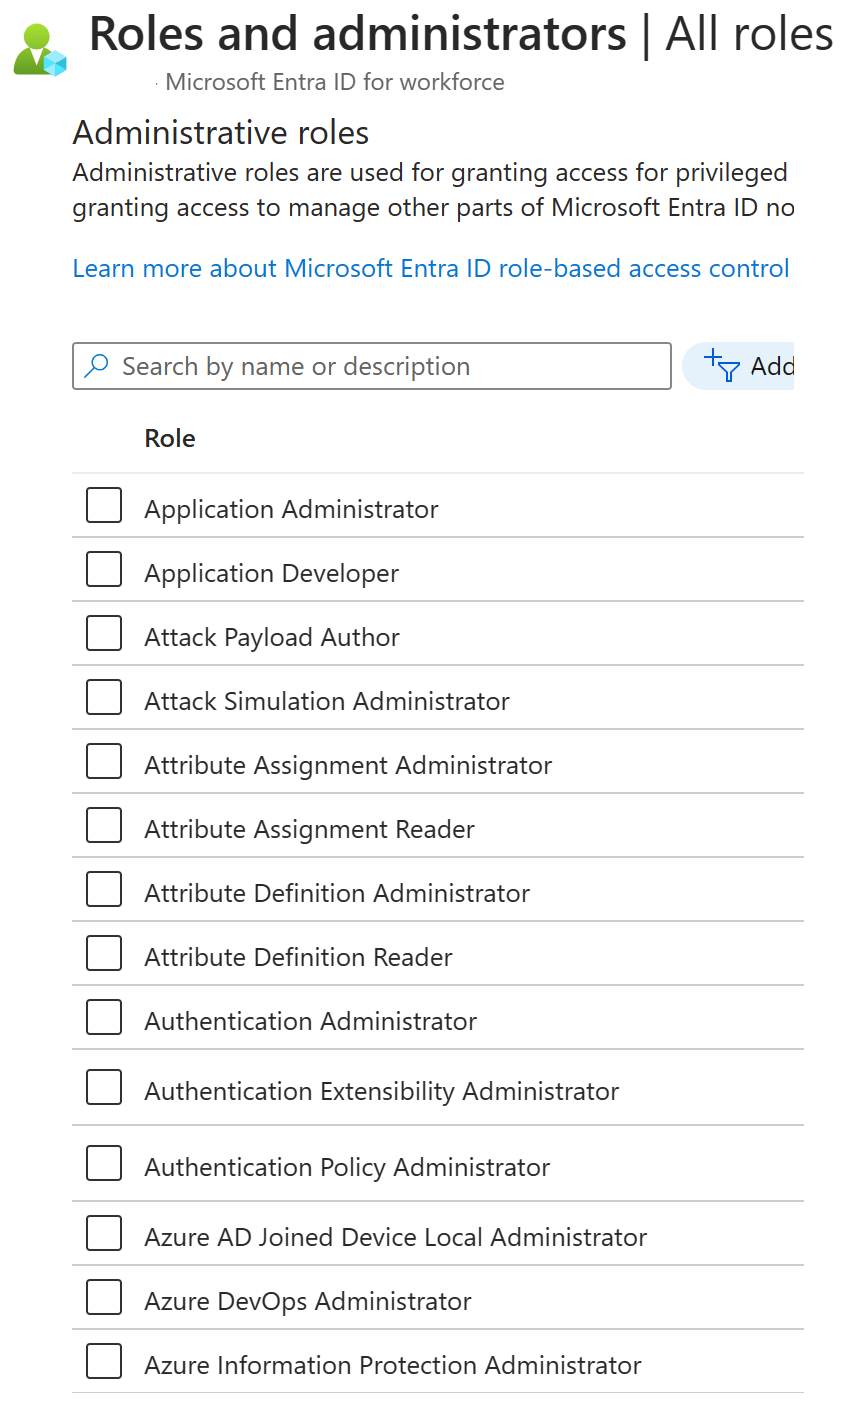 |
You can use the User Settings inside of Microsoft Entra ID – Manage menu to restrict or control the default permissions of the default users. Or you can use Roles and administrators to add new permissions onto your users and group. Always use the concept of Least Privilege and make sure the users only have the rights they need. In User settings you can restrict the user's ability to:
- Register applications
- Access the Azure portal
- Block LinkedIn connections
- Manage settings for external collaboration
By adding roles to a given user account or group, you can add permissions on to member users, guest users, and service principals. Adding roles gives permissions to perform specific activities. Actions are limited, which allows the rule of least privilege.
Exploring available permissions
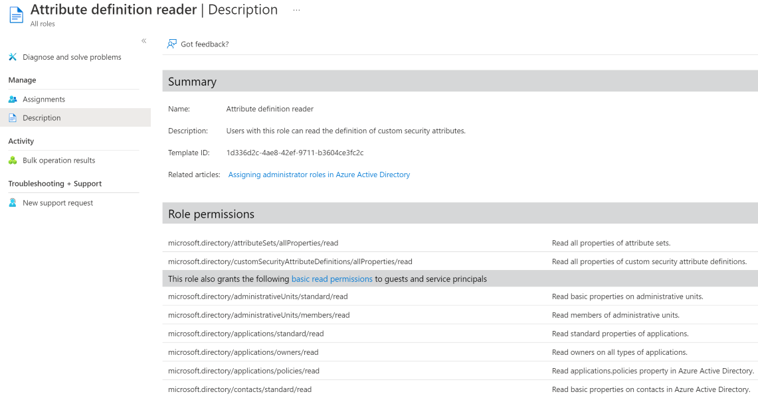
If possible, you only want to grant the minimum permissions a user needs. So be sure to know what all permissions are granted when you assign a role. You can see the list of permissions in the description of each role. To open, launch Microsoft Entra ID, then open the Roles and administrators screen. Next select a role, and open its description page from the ellipsis (...) menu. Depending on the role you chose, you'll see a large or small number of permissions. Two sets of permissions:
- Role permissions
- Guest and service principal basic read permissions
Configure and manage custom domains
Part of usernames/email addresses, group addresses, and sometimes app ID URIs.
-
Must be owned by your organization.
-
Who can manage domains:
-
Only a Global Administrator can add, verify, or manage custom domains in Entra ID.
-
Custom domains help make user identities and resources reflect your organization’s branding.
Set the primary domain name for your Microsoft Entra organization
When your organization is created, the initial domain name, such as ‘contoso.onmicrosoft.com,’ is also the primary domain name.
The person who creates the tenant is automatically the Global administrator for that tenant. The Global administrator can add other administrators to the tenant. When adding new administrators, always use the principle of least privilege.
The primary domain is the default domain name for a new user when you create a new user. Setting a primary domain name streamlines the process for an administrator to create new users in the portal. To change the primary domain name:
Sign in to the Azure portal with an account that's an Administrator for the organization.
Select Microsoft Entra ID.
Select Custom domain names.
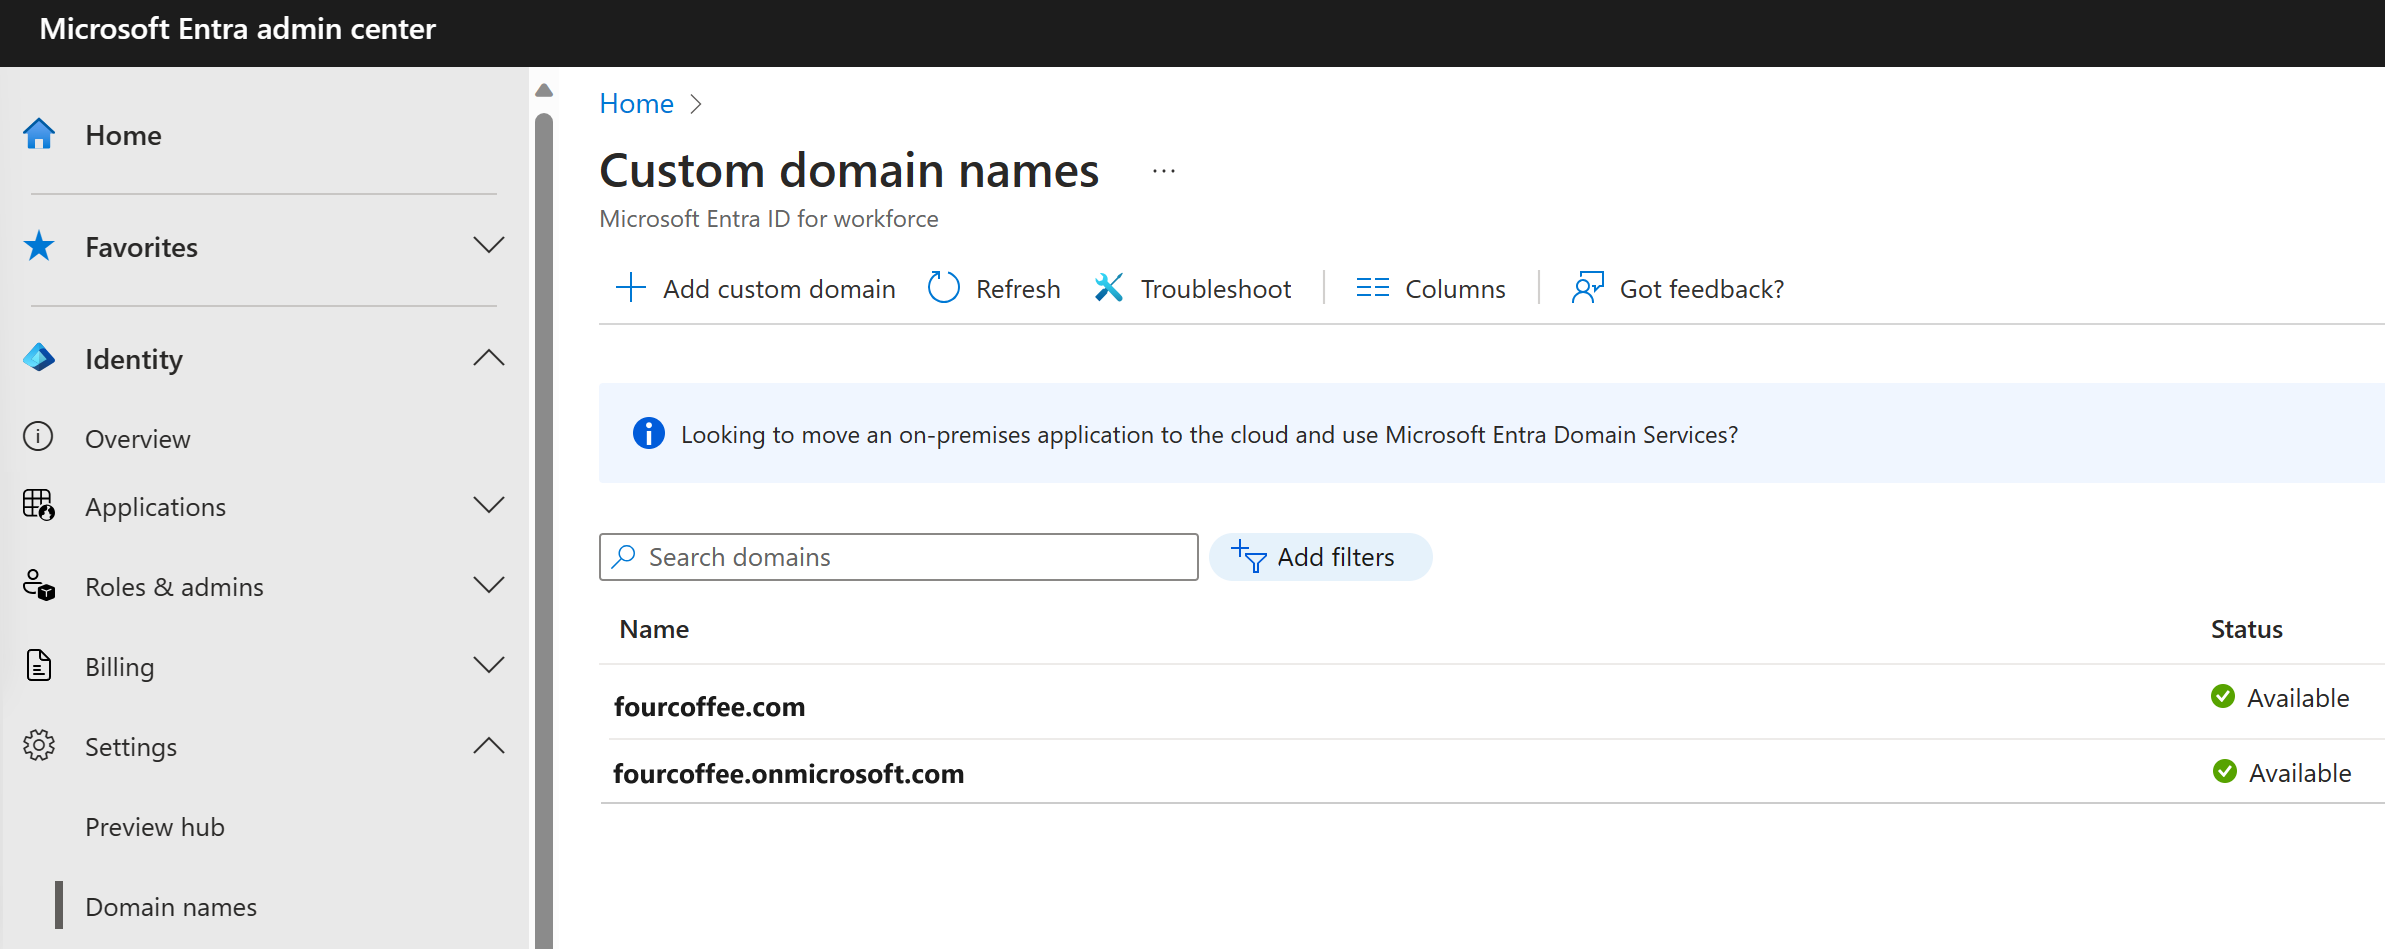
Select the name of the domain that you want to be the primary domain.
Select the Make primary command. Confirm your choice when prompted.
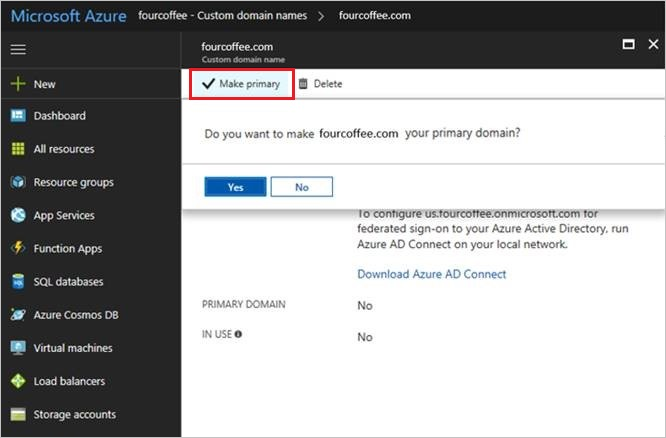
You can change the primary domain name for your organization to be any verified custom domain that isn't federated. Changing the primary domain for your organization won't change the user name for any existing users.
Add custom domain names to your Microsoft Entra organization
You can add up to 900 managed domain names. If you're configuring all your domains for federation with on-premises Active Directory, you can add up to 450 domain names in each organization.
Add subdomains of a custom domain
Adding Subdomains in Microsoft Entra ID
-
Steps to add a subdomain (e.g.,
europe.contoso.com):-
Add and verify the root domain first (e.g.,
contoso.com). -
The subdomain is automatically verified once the root domain is verified.
-
Refresh the domain list in Entra ID to see the added subdomain.
-
-
Note:
-
You can verify a subdomain in a different Entra organization even if the root domain is already added elsewhere.
-
During the process, you may be prompted to add a TXT record in your DNS provider for verification.
-
Subdomains allow flexible identity management across regions or departments
What to do if you change the DNS registrar for your custom domain name
If you change the DNS registrars, there are no additional configuration tasks in Microsoft Entra ID. You can continue using the domain name with Microsoft Entra ID without interruption. If you use your custom domain name with Microsoft 365, Intune, or other services that rely on custom domain names in Microsoft Entra ID, see the documentation for those services.
Delete a custom domain name
When to delete:
-
The domain is no longer used.
-
You want to use the domain in another Entra ID tenant.
-
-
Requirements before deletion:
You cannot delete a domain if it’s still used by:-
Any user (username, email, or proxy address)
-
Any group (email or proxy address)
-
Any application (app ID URI)
-
-
Steps:
-
Remove or update all users, groups, and apps using the domain.
-
Once no resources reference it, delete the domain from Entra ID.
-
Only a Global Administrator can delete custom domains.
Force Delete option
The ForceDelete option allows you to remove a custom domain even if it’s still referenced by users, groups, or applications, by automatically updating all references to the default domain (e.g., user@contoso.onmicrosoft.com).
How it works:
-
Can be used via the Entra admin center or Microsoft Graph API.
-
Updates references for:
-
Users: UPN, EmailAddress, ProxyAddress
-
Groups: EmailAddress
-
Applications: identifierUris
-
Requirements & limitations:
-
Fewer than 1000 objects referencing the domain.
-
Any Exchange references must be updated or removed in the Exchange Admin Center.
-
Cannot be used if:
-
Domain was purchased via Microsoft 365 subscription.
-
You are a partner managing another organization.
-
-
Errors occur if:
-
Objects to rename > 1000
-
An app to rename is multitenant
-
ForceDelete is an asynchronous operation and ensures all domain references are safely renamed to the default domain.
Configure tenant-wide setting
Tenant-wide settings are configurations that apply to all resources in your tenant. They control the look, feel, and behavior of your directory and its users.
Key Tenant-Wide Options:
-
Tenant Properties:
-
Location: Identity → Overview → Properties
-
Purpose: Set the directory name and values like the primary contact.
-
-
User Settings:
-
Location: Identity → Users → User Settings
-
Purpose: Define global rights for users, e.g., who can register applications.
-
-
External Collaboration Settings:
-
Location: Identity → External Identities → User Settings → Manage external collaboration
-
Purpose: Control what external guest users can do, e.g., invite other guests.
-
Tenant-wide settings ensure consistent policies and permissions across your organization.
Configure tenant-wide user settings

In Microsoft Entra ID, all users are granted a set of default permissions. A user’s access consists of the type of user, their role assignments, and their ownership of individual objects. The default user permissions can be changed only in user settings in Microsoft Entra ID.
Member and guest users
Member Users:
-
Native users of the tenant.
-
Default permissions include:
-
Register applications
-
Manage their profile photo and mobile number
-
Change their password
-
Invite B2B guest users
-
Read most directory information
-
-
-
Guest Users:
-
Users invited from another directory (B2B collaboration).
-
Default permissions are restricted:
-
Manage their own profile and password
-
Access limited info about other users, groups, and apps
-
Cannot read the entire directory
-
-
Can be assigned admin roles, gaining full permissions in that role
-
Can invite other guest users
-
Members have broader default rights, while guests are limited by default but can be elevated via roles.
The following default permissions for member users can be restricted in the following ways:
| Permission | Setting explanation |
|---|---|
| Users can register application | By default, member users can register applications. |
| Setting this option to No prevents users from creating application registrations. The ability can then be granted back to specific individuals by adding them to the Application Developer role. | |
| Restrict access to Microsoft Entra administration portal | Setting this option to No lets non-administrators use the Microsoft Entra administration portal to read and manage Microsoft Entra resources. Yes restricts all non-administrators from accessing any Microsoft Entra data in the administration portal. |
| This setting doesn't restrict access to Microsoft Entra data using PowerShell or other clients such as Visual Studio. When set to Yes, to grant a specific non-admin user the ability to use the Microsoft Entra administration portal assign any administrative role such as the Directory Readers role. | |
| This role allows reading basic directory information, which member users have by default (guests and service principals don't). |
Sign in with LinkedIn
LinkedIn, with over 500 million members, can be used to enhance sign-in experiences for your apps and sites.
Benefits:
-
Reduce friction: Let users sign in with LinkedIn instead of creating a new account, increasing sign-ups.
-
Save time and costs: Avoid building your own sign-in, identity, and password management system.
-
Personalization: Access member profiles to tailor experiences in your apps or websites.
Using LinkedIn sign-in leverages a trusted professional identity for smoother and safer user authentication.
Manage security defaults
Security defaults help protect your organization from common identity attacks (password spray, phishing, replay attacks) by providing preconfigured security settings.
Key Features:
-
MFA for all users: Everyone must register for multi-factor authentication.
-
MFA for administrators: Admins must perform MFA for extra protection.
-
Block legacy authentication: Prevents older, less secure protocols.
-
Step-up MFA when needed: Users must perform MFA for high-risk actions.
-
Protect privileged activities: Safeguards access to critical resources like the Azure portal.
Security defaults make it easy to enforce strong security policies without complex configuration.
Availability
Microsoft is making Security Defaults available to everyone. The goal is to ensure that all organizations have a basic level of security enabled at no extra cost.
Configure the external user options

Here you configure the actions that external users can take while using the cloud resources of your tenant.
- Guest user access - Guest users can be given rights to where they operate almost as a full user, to restriction where they can only look at their own content.
- Guest invite settings - Who can invite guests to join the organization; from guest themselves to only admins.
- Guest self-service up - Allow guest to partake in self-service options for users.
Configure tenant properties for the directory

Set the basic values that define the look at feel of your tenant within Microsoft Entra ID.
- Name - friendly name for your tenant, for use in the Azure portal
- Country or region - location of your primary company and the Azure datacenters being used
- Notification language - language used for sending notifications and alerts
- Tenant ID - unique identifier for your tenant, used programatically
- Technical contact - primary contact for the tenant (defaults to the user who created the tenant)
- Global privacy contact - user or alias to contact for privacy concerns or issues
- Privacy statement URL - link to a PDF or webpage containing the privacy rules for your cloud solutions
Exercise - setting tenant-wide properties
Your goal is to change the tenant display name.
Browse to the Azure portal and sign in using an Administrator account for the directory.
Select the Show portal menu hamburger icon and then select Microsoft Entra ID.
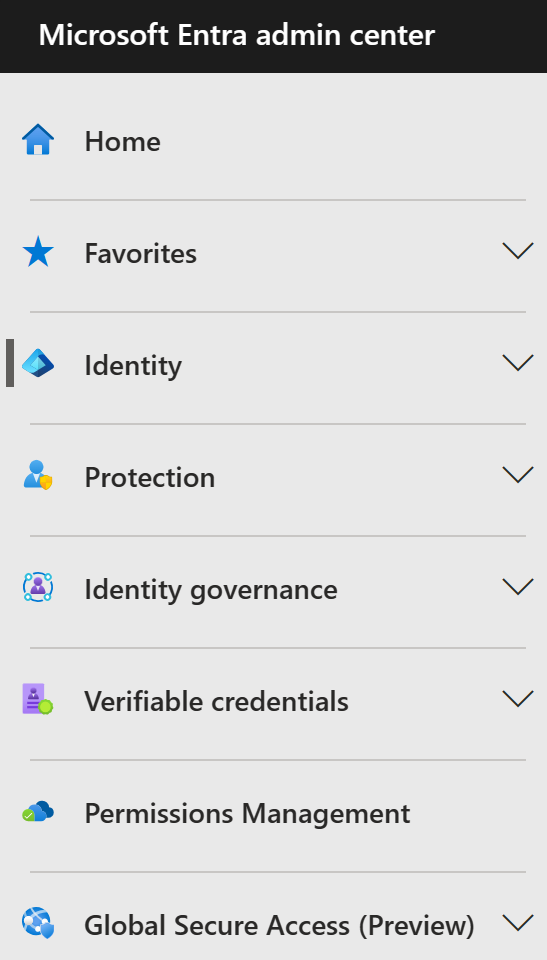
In the left navigation, in the Manage section, select Properties.
In the Name box, change the tenant name. For example, Contoso Marketing Company can be changed to Contoso Marketing Company 2.
Select Save to update the tenant properties.
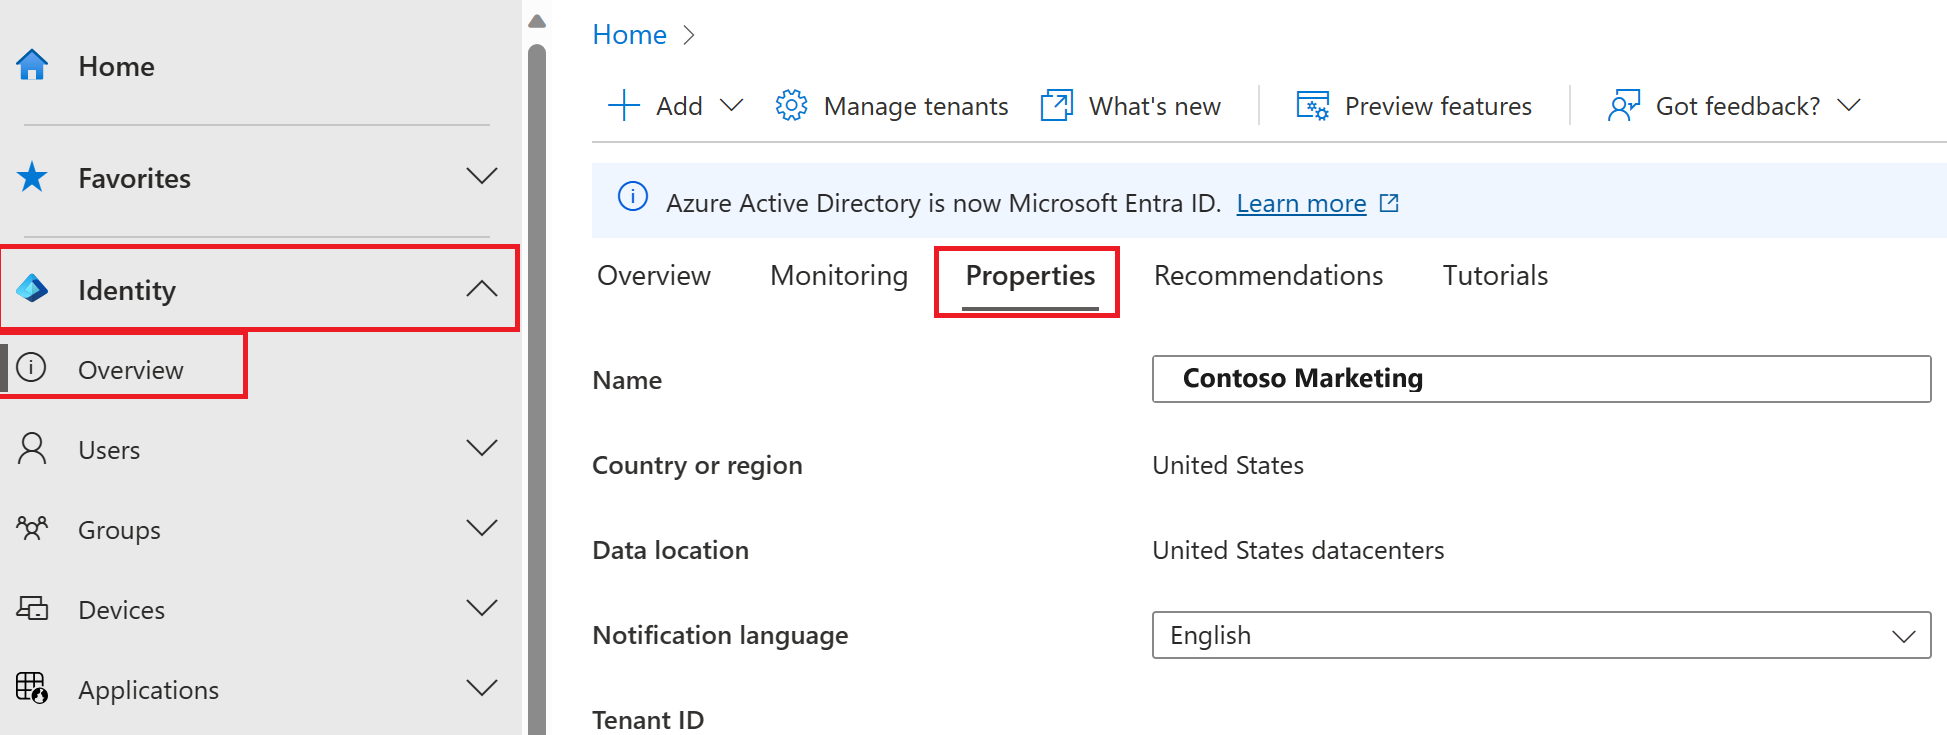
Find the Country / region associated with your tenant
In the Microsoft Entra ID screen, in the Manage section, select Properties.
Under Tenant properties, locate Country / region and review the information.
Important
When the tenant is created, the Country / region is specified at that time. This setting can't be changed later.
Find the location associated with your tenant
Just as the Country / region is found in the Microsoft Entra ID Properties dialog, so is the location information.
In the Properties screen, under Tenant properties, locate Location and review the information.
Find the tenant ID
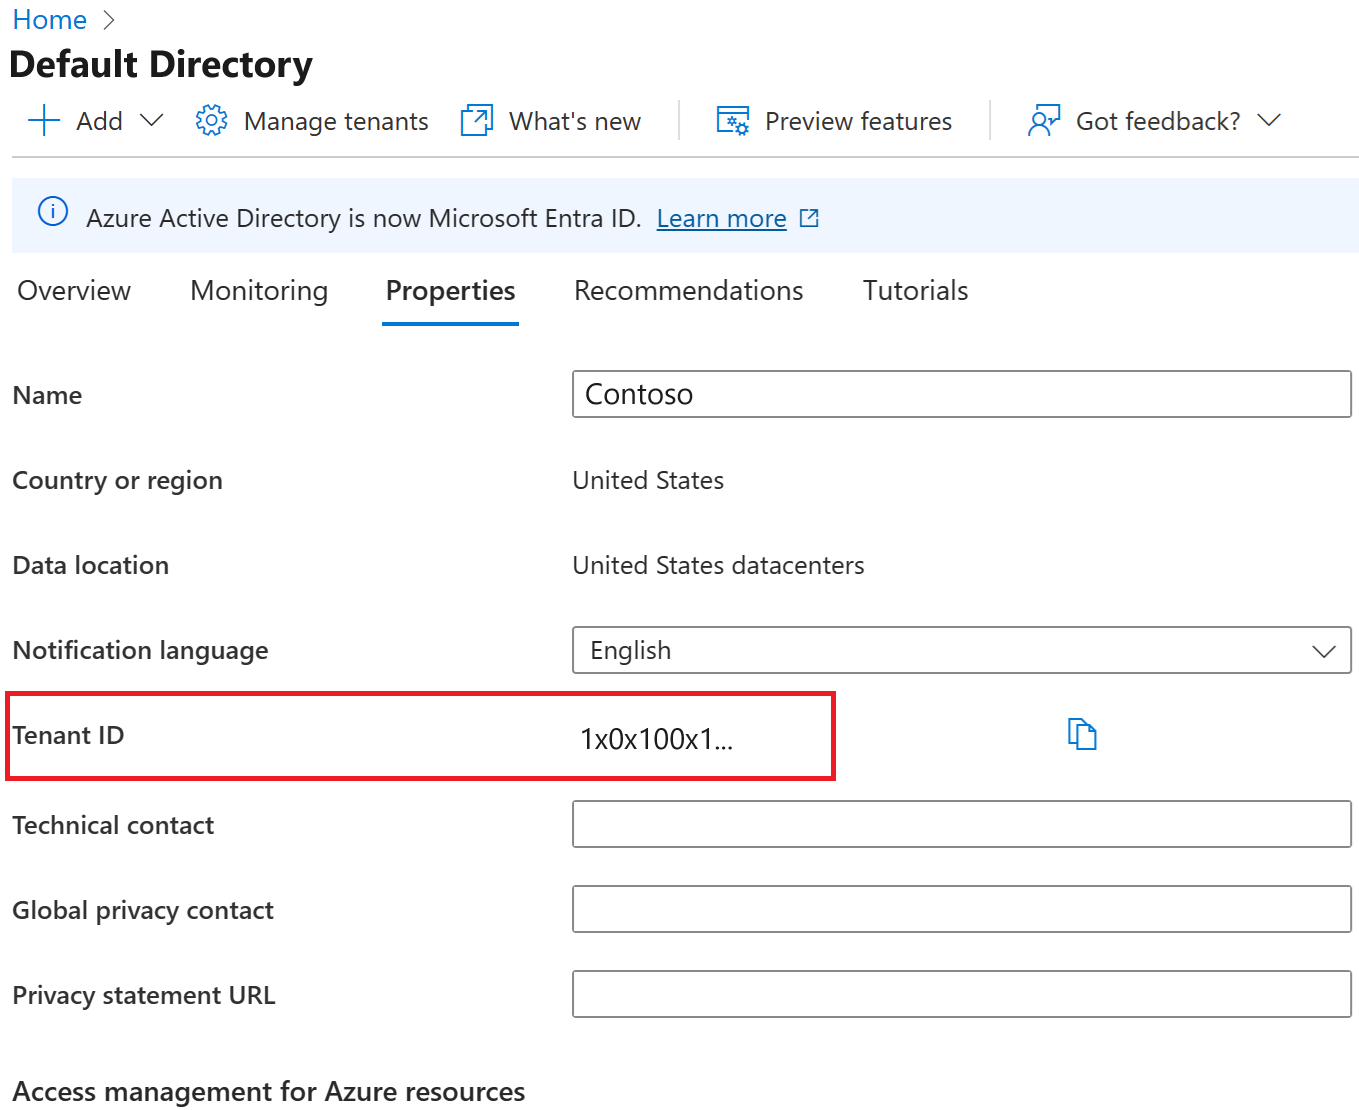
Azure subscriptions have a trust relationship with Microsoft Entra ID. Microsoft Entra ID is trusted to authenticate users, services, and devices for the subscription. Each subscription has a tenant ID associated with it, and there are a few ways you can find the tenant ID for your subscription.
In the Microsoft Entra ID screen, in the Manage section, select Properties.
Under Tenant properties, locate Tenant ID. Tenant ID is your unique tenant identifier.
Change the Technical contact, add your privacy info, Global privacy contact, and Privacy statement URL
Microsoft strongly recommends you add both your global privacy contact and your organization's privacy statement, so your internal employees and external guests can review your policies. Because privacy statements are uniquely created and tailored for each business, we strongly recommend you contact a lawyer for assistance.
Note
For information about viewing or deleting personal data, see Azure Data Subject Requests. For more information, see the Service Trust portal.
You add your organization's privacy information in the Properties area of Microsoft Entra ID. To access the Properties area and add your privacy information:
- In the Microsoft Entra ID screen, in the Manage section, select Properties.
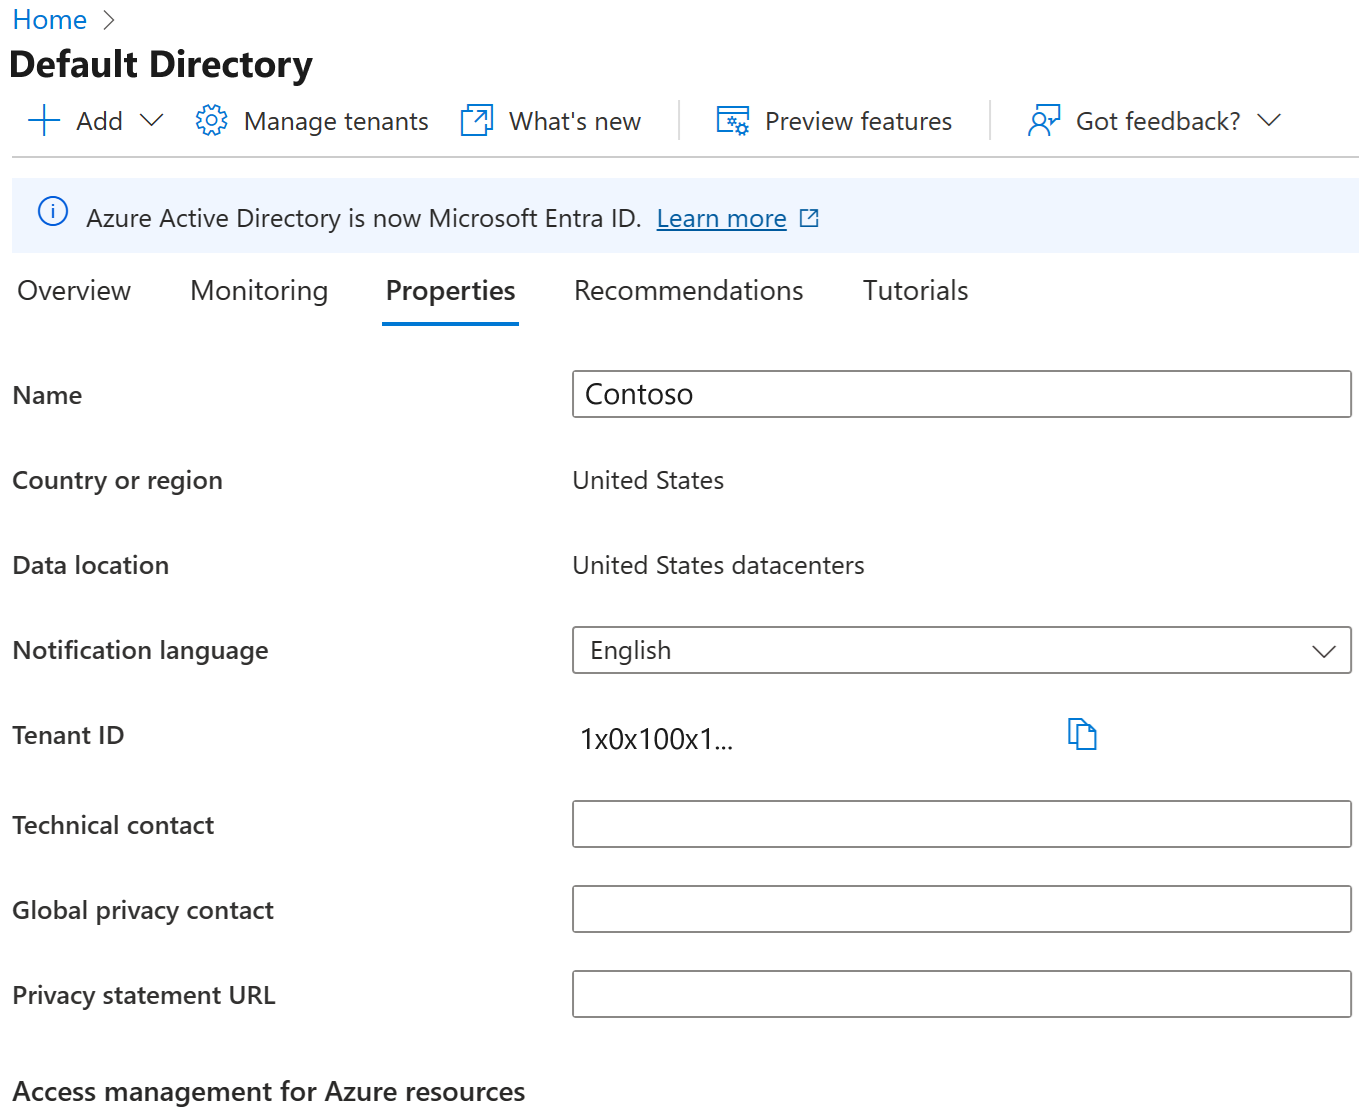
- Add your privacy info for your employees:
Technical contact. Type the email address for the person to contact for technical support within your organization.
Global privacy contact. Type the email address for the person to contact for inquiries about personal data privacy. This person is also who Microsoft contacts if there's a data breach. If there's no person listed here, Microsoft contacts the administrator who owns the tenant.
Privacy statement URL. Type the link to your organization's document that describes how your organization handles both internal and external guest's data privacy.
- Select Save.
When companies move their workloads (servers, apps, data) to the cloud, it’s not just about moving them. They must also secure those resources:
-
Define authorized users – who can access.
-
Limit access – users should only see and use what they need.
-
Control actions – users should only be able to do tasks they are allowed to do.
Cloud access is managed in two main ways:
-
Identity – each user has one verified identity used for all services.
-
Access control – employees and vendors get just enough access to do their jobs.
Azure Entra ID (Microsoft’s cloud identity and access management service) helps with this by providing:
-
Identity management (for users and groups).
-
Single sign-on (SSO) – one login for multiple apps.
-
Multifactor authentication (MFA) – extra security for logins.
-
License management – assign licenses to users.
👉 In short: Entra ID makes it easier to manage who can access what in the cloud securely.
Create, configure, and manage users
To access Azure resources, every user needs an Azure user account.
-
A user account stores details used to:
-
Authenticate – verify the user’s identity during sign-in.
-
Authorize – Microsoft Entra ID creates an access token that decides:
-
What resources the user can access.
-
What actions they can perform.
-
-
Where to manage users
-
Use the Microsoft Entra ID dashboard in the Azure portal.
-
You can only manage one directory at a time.
-
To work with another directory, use:
-
Directory + Subscription panel, or
-
Switch directory button on the toolbar.
-
👉 In short: User accounts in Entra ID control who can sign in and what they can do in Azure, and you manage them through the dashboard.
View users
To view the Microsoft Entra users, select the Users entry under Identity - then open the All Users view. Take a minute to access the portal and view your users. Notice the User Type column to see members and guests, as the following figure depicts.

3 Types of Users in Microsoft Entra ID
-
Cloud identities
-
Created and stored only in Microsoft Entra ID.
-
Examples: Admin accounts, users managed directly in Azure.
-
Source: Microsoft Entra ID (or another Entra directory).
-
If deleted from the main directory → the account is removed completely.
-
-
Directory-synchronized identities
-
Users that exist in on-premises Active Directory (AD).
-
Brought into Azure via Microsoft Entra Connect.
-
Source: Windows Server Active Directory (AD).
-
-
Guest users
-
Users from outside Azure.
-
Examples: Vendors, contractors, accounts from Microsoft (like Xbox Live) or other cloud providers.
-
Source: Invited user.
-
Can be easily removed once their work is done.
-
👉 In short:
-
Cloud identities = Local to Entra ID.
-
Directory-synced identities = From on-prem AD via Entra Connect.
-
Guest users = External accounts invited for temporary access.
Exercise - assign licenses to users
Create a new user in Microsoft Entra ID
Browse to the Identity menu in the Microsoft Entra admin center.
In the left navigation, under select Users, then All Users.
Within the Users page, on the menu, select + New user and Create new user.
Create a user using the following information:
Setting Value User principal name ChrisG Name Chris Green First name Chris Last name Green Password make up a unique password When complete, verify the account for Chris Green is shown in the All users list
Create a security group in Microsoft Entra ID
Browse to the Microsoft Entra admin center screen.
In the left navigation, under Identity, select Groups and then All groups.
In the Groups screen, on the menu, select New group.
Create a group using the following information:
Setting Value Group type Security Group name Marketing Membership type Assigned Owners Assign your own administrator account as the group owner Members Chris Green 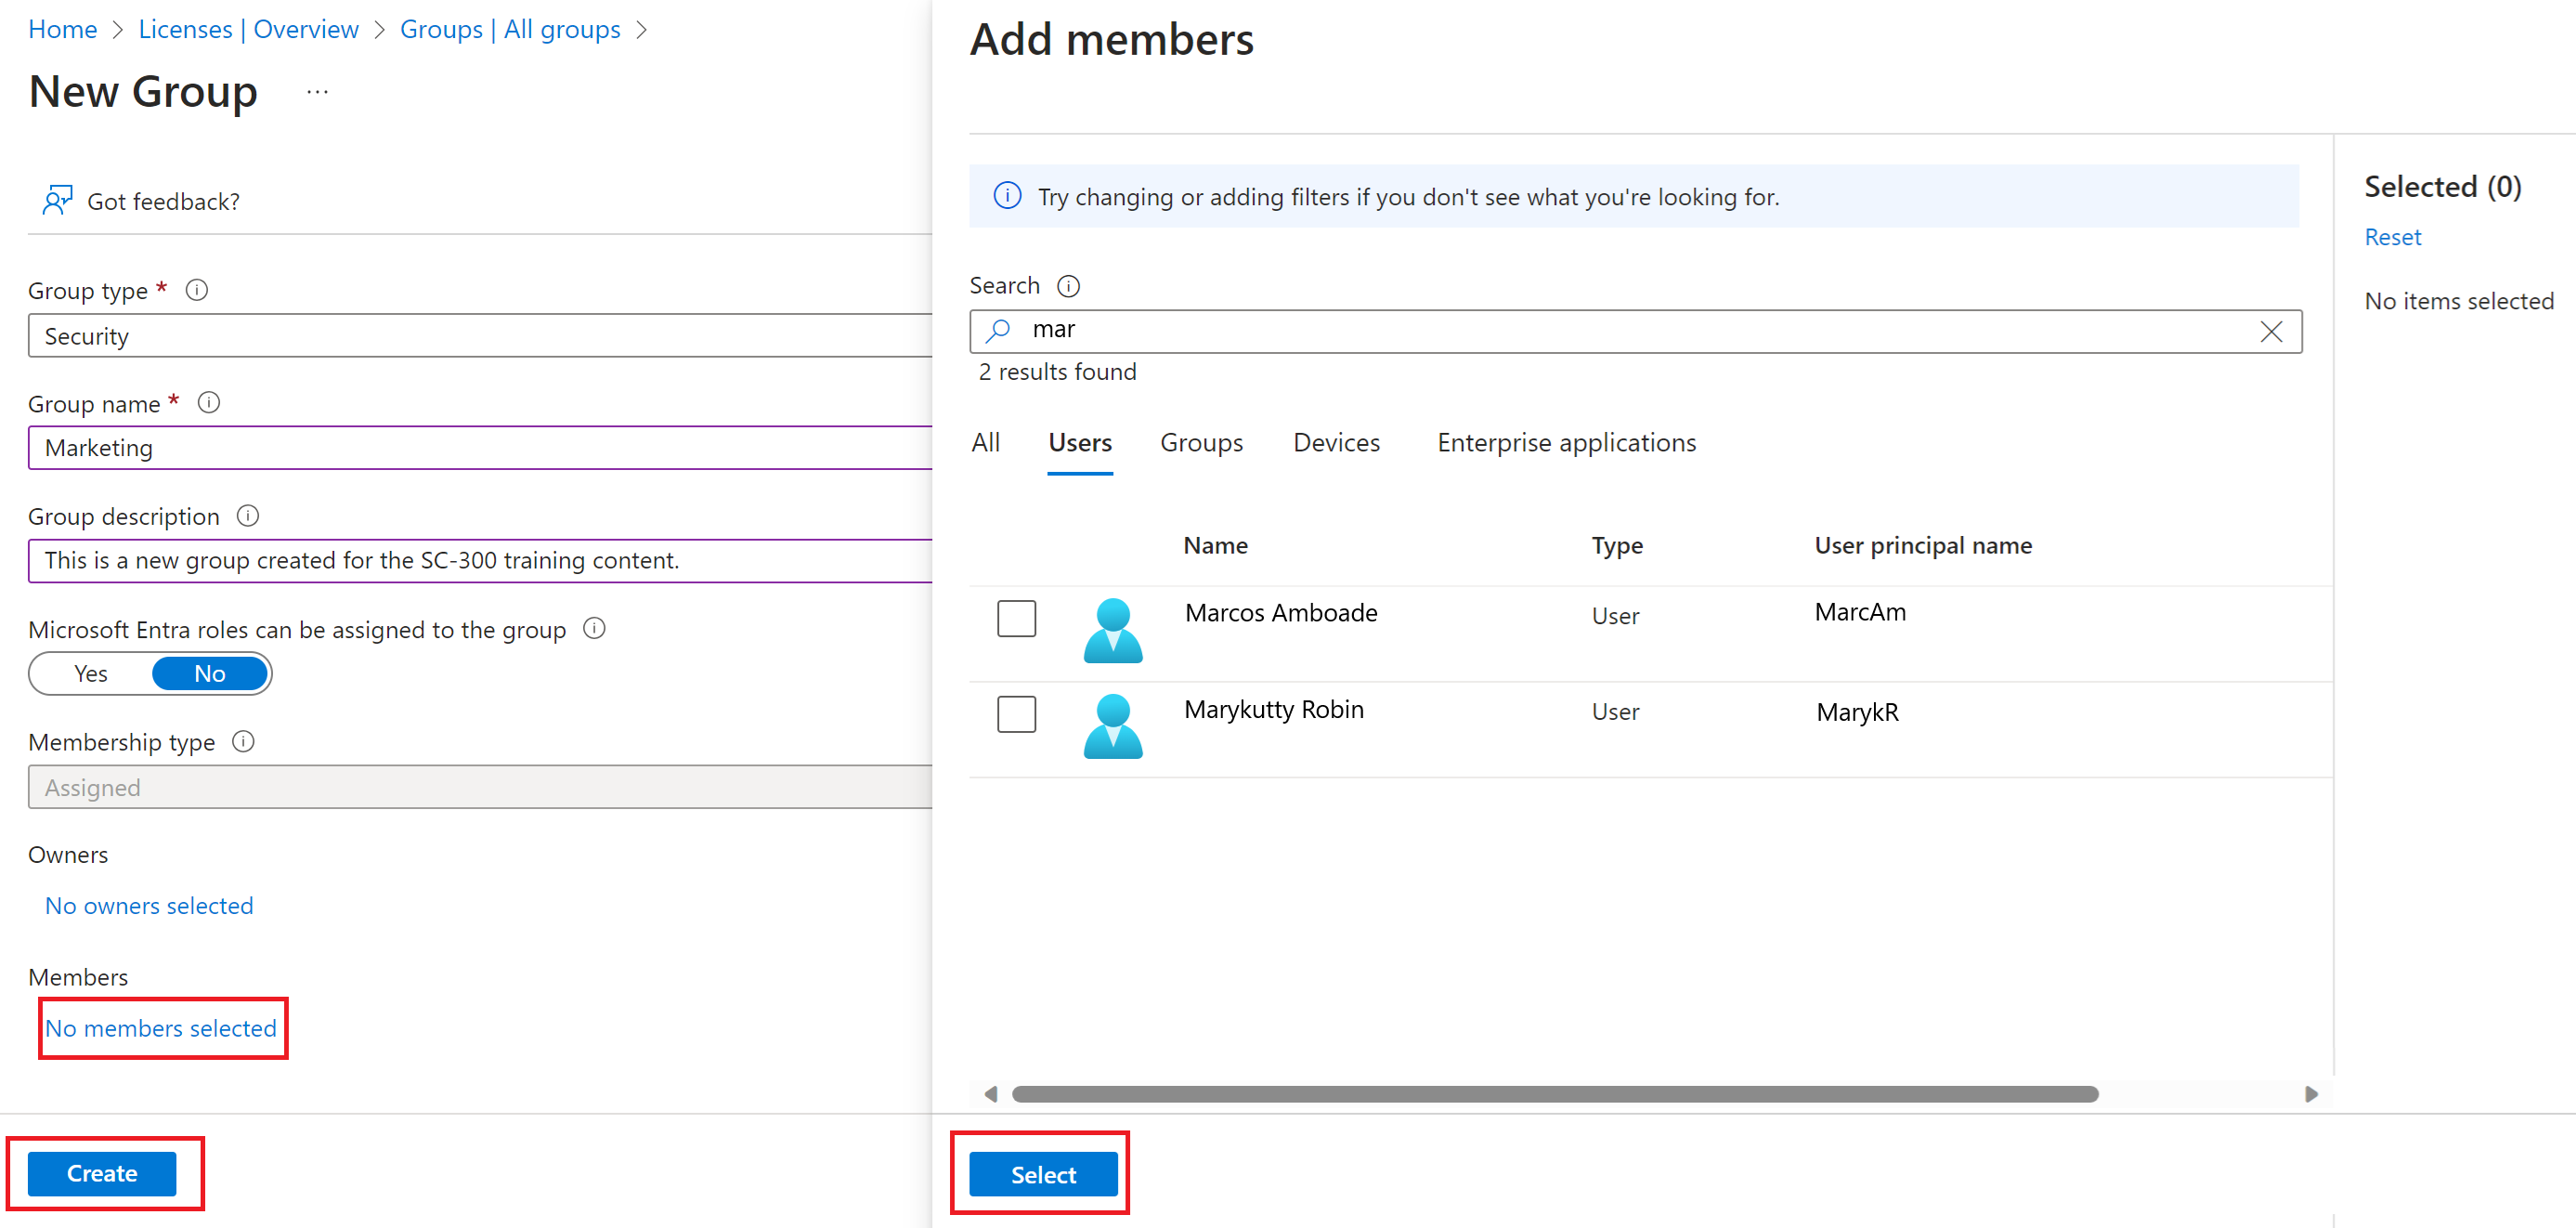
When complete, verify the group named Marketing is shown in the All groups list.
Assign a license to a group
- In the All groups list, select Marketing.
- In the Marketing window, under Manage, select Licenses.
- Notices that no licenses are currently assigned to this group.
- Open a new tab in your browser.
- Go to the Microsoft 365 admin center at http://admin.microsoft.com.
- Select Billing from the menu on the left.
- Select Licenses.
- From the list of licenses you have available, select one.
- Next you select Groups from the list near the top of the screen.
- On the Groups page, select + Assign license.
- Search for and select the Marketing group we created earlier.
- Select the Assign button at the bottom of the dialog.
- You should get a message that licenses were successfully assigned.
Restore or remove a recently deleted user with Microsoft Entra ID
After you delete a user, the account remains in a suspended state for 30 days. During that 30-day window, the user account can be restored, along with all its properties. After that 30-day window passes, the permanent deletion process is automatically started.
You can view your restorable users, restore a deleted user, or permanently delete a user using Microsoft Entra ID user interface.
restore or remove deleted users
Exercise environment needs - this lab assumes you have a basic Microsoft Entra tenant with at least User Administrator rights to complete it.
Remove a user from Microsoft Entra ID
Browse to the Microsoft Entra admin center.
In the left navigation, under Identity, select Users.
In the Users list, select the check box for a user to delete. For example, select Chris Green.
Tip
Selecting users from the list allows you to manage multiple users at the same time. If you select the user, to open that user’s page, you'll only be managing that individual user.
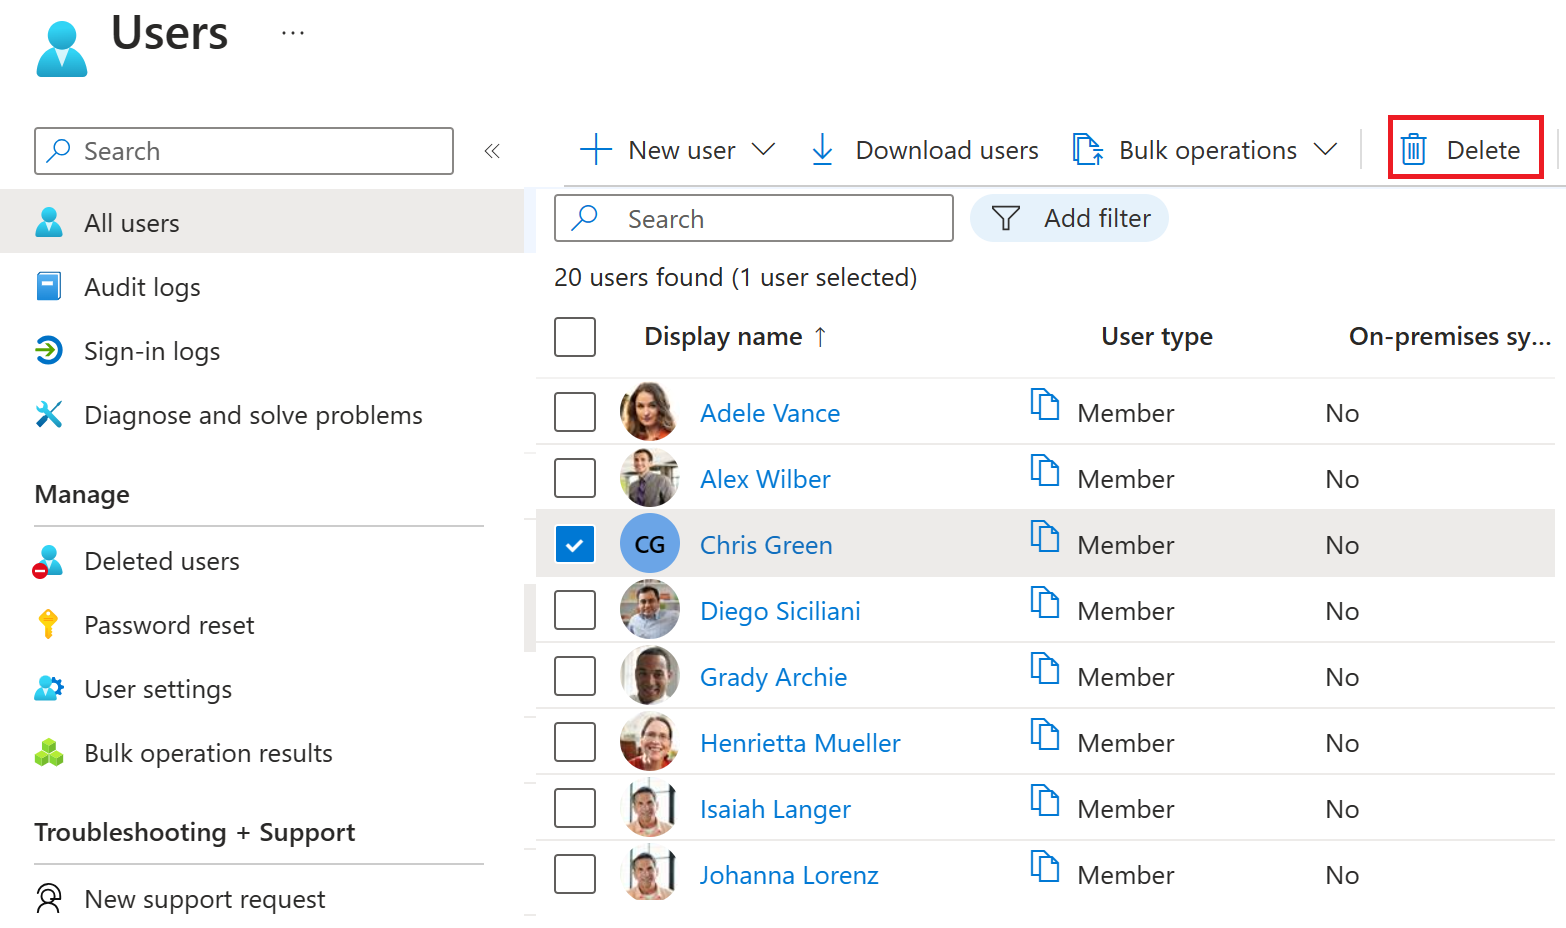
With the user account selected, on the menu, select Delete user.
Review the dialog box and then select OK.
Restore a deleted user
You can see all the users that were deleted less than 30 days ago. These users can be restored.
In the Users page, in the left navigation, select Deleted users.
Review the list of deleted users and select the user you deleted.
Important
By default, deleted user accounts are permanently removed from Microsoft Entra ID automatically after 30 days.
On the menu, select Restore user.
Review the dialog box and then select OK.
In the left navigation, select All users.
Verify the user was restored.
Create, configure, and manage groups
Groups in Microsoft Entra ID help organize users so that access and permissions can be managed more efficiently.
Instead of assigning permissions to each user one by one, you assign them to a group, and all members inherit those permissions.
Groups act as a security boundary that makes it easier to grant or deny access with minimal effort.
💡 Bonus: You can also set up dynamic membership rules (e.g., based on a user’s department or job title), so users are automatically added/removed from groups.
Types of Groups in Entra ID
-
Security Groups
-
Used to control access to resources (apps, files, devices, etc.).
-
Best for applying permissions and security policies.
-
Managed only by Entra administrators.
-
Example: A group for “Finance Team” that gets access to financial applications.
-
-
Microsoft 365 Groups
-
Focused on collaboration.
-
Provides shared mailbox, calendar, SharePoint site, OneDrive files, Teams integration, etc.
-
Can include external users as well.
-
Can be created by both admins and regular users.
-
✅ Key Point:
-
Use Security groups for access control.
-
Use Microsoft 365 groups for team collaboration.
View available groups
You can view all groups through the Groups item under Identity in the Microsoft Entra admin center. A new Microsoft Entra ID deployment won't have any groups defined.
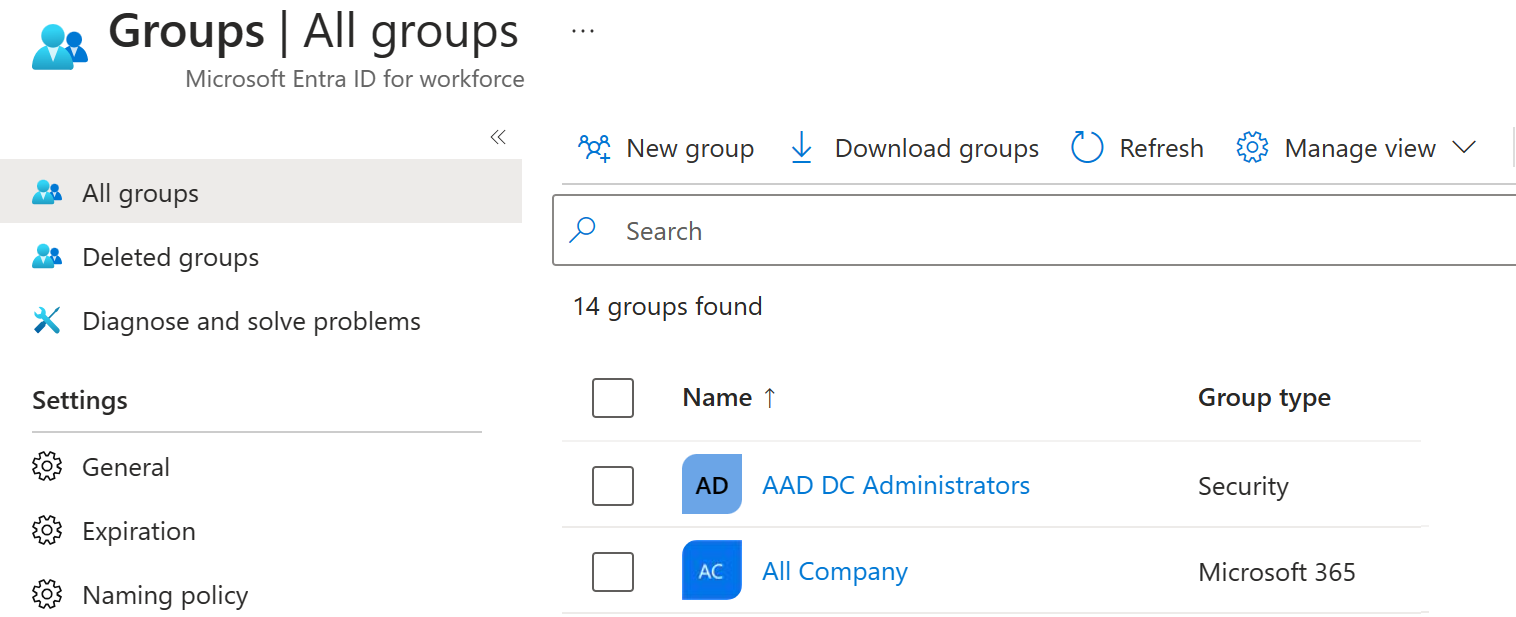
The second characteristic of a group that you need to be aware of is the Membership Type. This specifies how individuals members are added to the group. The two types are:
- Assigned - members are added and maintained manually.
- Dynamic - members are added based on rules, creating a Dynamic Group. These groups are still either a security group or Microsoft 365 group, just their members are controlled by rule.
Dynamic groups
Dynamic Group in Microsoft Entra ID automatically adds or removes members based on rules (like department, job title, or device type). If a user’s attributes change and match the rule, they join the group automatically. This saves manual effort but requires clean, consistent account data to avoid mistakes.
👉 In short: Dynamic groups = auto-updated membership based on rules.
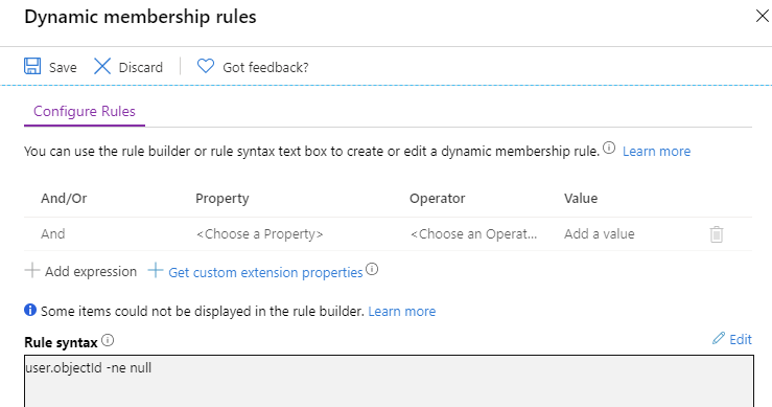
This dynamic group would consist of all valid members of the Microsoft Entra ID
Exercise - add groups in Microsoft Entra ID
Exercise environment needs - this lab assumes you have a basic Microsoft Entra tenant with at least User Administrator rights to complete it.
Create a Microsoft 365 group in Microsoft Entra ID
Browse to the Microsoft Entra admin center - Identity page in the Microsoft Entra admin center.
In the left navigation, under select Groups.
In the Groups blade, on the menu, select New group.
Create a group using the following information:
Setting Value Group type Microsoft 365 Group name Northwest Sales Membership type Assigned Owners Assign your own administrator account as the group owner Members Assign a member of this group 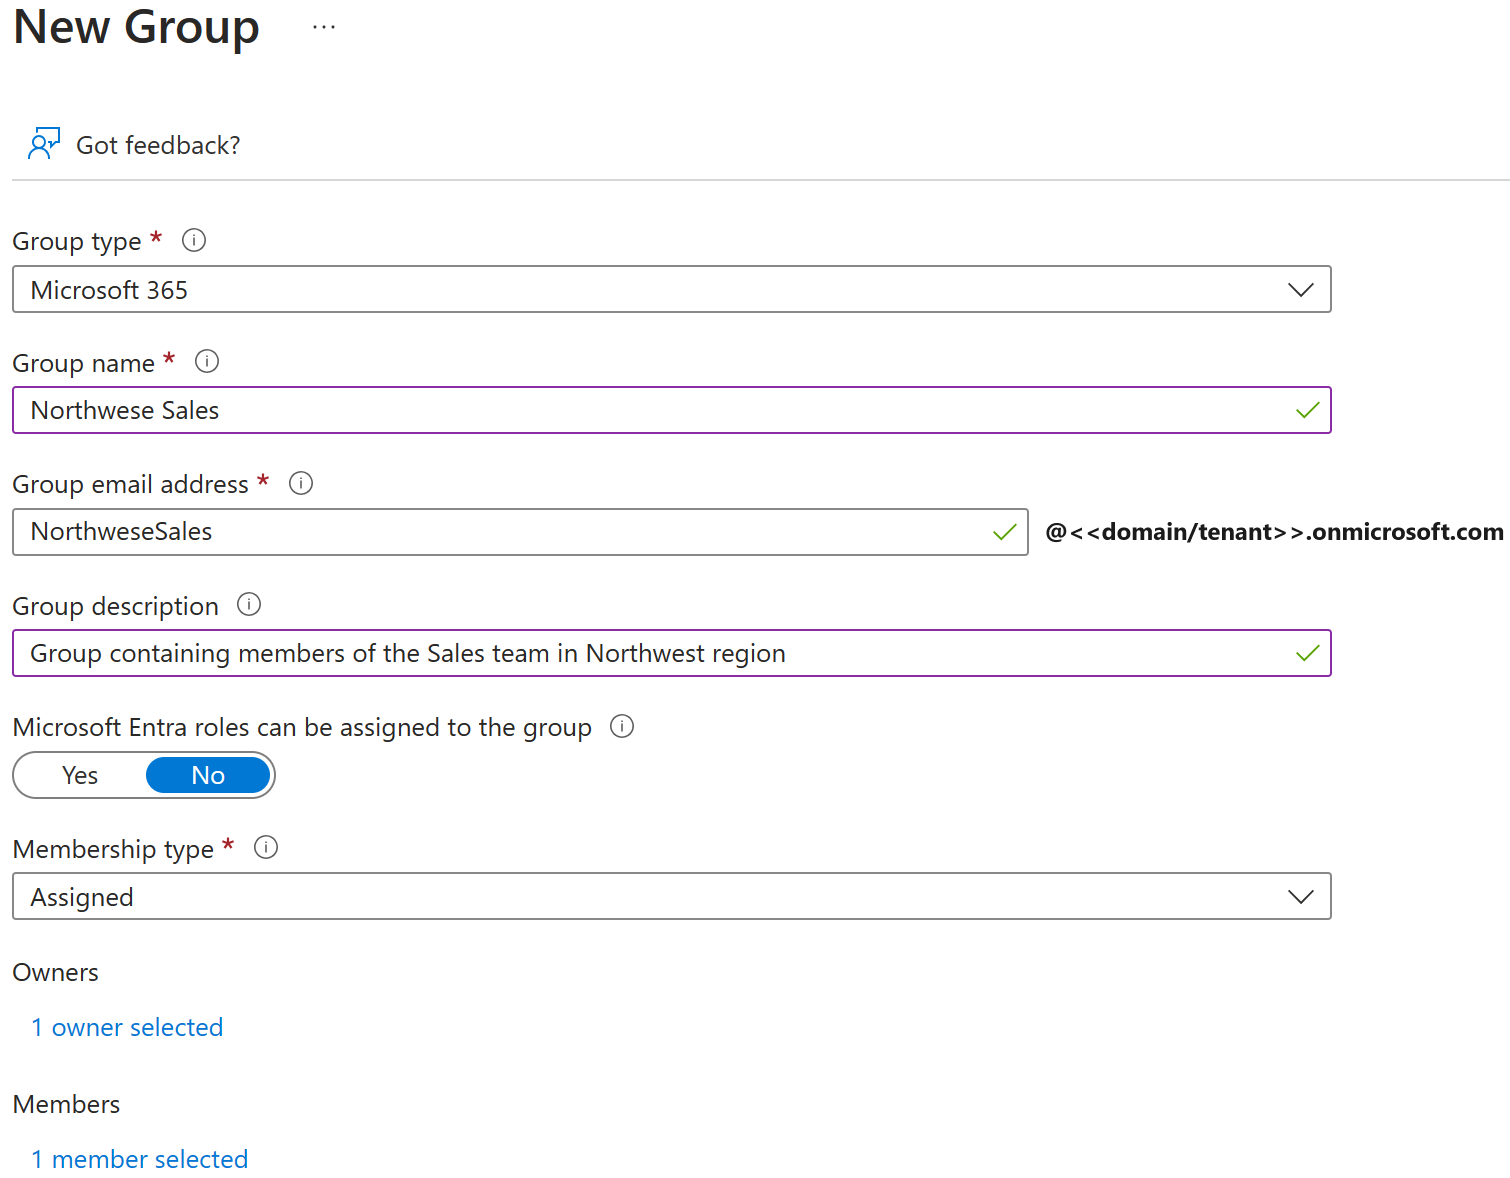
When complete, verify the group named Northwest sales is shown in the All groups list.
You have to refresh the All groups a couple of times for the new group to show up.
Configure and manage device registration
Employees want to work from any device, anywhere (BYOD).
-
Organizations must protect their data and systems.
-
The solution is to register devices in Microsoft Entra ID.
-
Once registered:
-
Users get easy access to apps and resources with single sign-on (SSO).
-
IT staff can use tools like Intune to enforce security and compliance policies.
-
👉 It balances user productivity and organizational security.
Microsoft Entra registered devices
The goal of Microsoft Entra registered devices is to provide your users with support for the BYOD or mobile device scenarios. In these scenarios, a user can access your organization’s Microsoft Entra ID controlled resources using a personal device.
| Microsoft Entra registered | Description |
|---|---|
| Definition | Registered to Microsoft Entra ID without requiring organizational account to sign in to the device |
| Primary audience | Applicable to Bring your own device (BYOD), and Mobile devices |
| Device ownership | User or Organization |
| Operating systems | Windows 10, Windows 11, iOS, Android, and macOS |
| Device sign in options | End-user local credentials, Password, Windows Hello, PIN Biometrics |
| Device management | Mobile Device Management (example: Microsoft Intune) |
| Key capabilities | SSO to cloud resources, Conditional Access |
Scenarios for registered devices
Sign-in: Users sign in with their organizational Microsoft Entra account.
-
Access control: Conditional Access policies can restrict what resources the device can access.
-
Management: IT can use MDM tools like Intune or Configuration Manager to:
-
Enforce encryption and password rules
-
Manage software installations and updates
-
Make organizational apps available to devices
-
-
Enrollment options: Devices can be joined via Out of Box Experience (OOBE), bulk enrollment, or Windows Autopilot.
-
Single Sign-On (SSO): Devices still get SSO to on-premises resources like file shares and printers when on the company network.
✅ Entra joined devices are fully managed, secure, and provide seamless access to both cloud and on-premises resources.
Scenarios for joined devices
Best for organizations moving to cloud-based infrastructure without on-premises Active Directory.
-
Useful when:
-
You want to manage devices using Entra ID and Intune.
-
On-premises domain join isn’t possible (e.g., mobile devices like tablets or phones).
-
Users mainly access Microsoft 365 or SaaS apps.
-
Managing temporary or remote users (contractors, seasonal workers, students).
-
Remote offices have limited on-premises infrastructure.
-
-
Device support: All Windows 10 editions except Windows 10 Home.
-
Goals:
-
Simplify deployment of work-owned devices.
-
Provide easy access to apps and resources.
-
Enable cloud-based management.
-
Let users sign in with Entra ID or synced AD accounts.
-
-
Deployment methods: Multiple options including OOBE, bulk enrollment, or Windows Autopilot.
✅ Entra joined devices make cloud-first device management easy for work-owned Windows devices and remote or temporary users.
Hybrid Microsoft Entra joined devices
Hybrid Microsoft Entra joined devices are for organizations that already use on-premises Active Directory (AD).
-
Traditionally, AD lets IT:
-
Manage work-owned devices centrally
-
Allow users to sign in with AD work or school accounts
-
Use imaging, Configuration Manager, or Group Policy for management
-
-
Hybrid Entra Join adds Microsoft Entra ID to these devices, so they are both joined to on-premises AD and registered in Entra ID.
-
Benefit: Combines on-premises management with cloud capabilities like Conditional Access and Intune management.
✅ Hybrid join bridges on-premises AD and cloud-based Entra management for a unified device management approach
| Hybrid Microsoft Entra joined | Description |
|---|---|
| Definition | Joined to on-premises AD and Microsoft Entra ID requiring organizational account to sign in to the device |
| Primary audience | Suitable for hybrid organizations with existing on-premises AD infrastructure |
| Device ownership | Organization |
| Operating systems | Windows 11, 10, 8.1 and 7, along with Windows Server 2008/R2, 2012/R2, 2016 and 2019 |
| Device sign in options | Password or Windows Hello for Business |
| Device management | Group Policy, Configuration Manager standalone or co-management with Microsoft Intune |
| Key capabilities | SSO to both cloud and on-premises resources, Conditional Access, Self-service Password Reset and Windows Hello PIN reset |
Scenarios for hybrid joined
Use Microsoft Entra hybrid joined devices if:
- You have Win32 apps deployed to these devices that rely on Active Directory machine authentication.
- You want to continue to use Group Policy to manage device configuration.
- You want to continue to use existing imaging solutions to deploy and configure devices.
- You must support down-level Windows 7 and 8.1 devices in addition to Windows 10.
Device Writeback
Purpose: Device writeback lets devices registered in Microsoft Entra ID appear in on-premises Active Directory (AD).
-
Why needed: On-premises applications cannot see cloud-only devices, so conditional access on-premises isn’t possible without it.
-
How it works:
-
Device objects are copied to the “Registered Devices” container in AD.
-
On-premises services like ADFS can check the “is managed” claim to allow access only from registered devices.
-
-
Use case: Control access to on-premises applications based on device compliance.
-
Requirement: Windows Hello for Business (WHFB) needs device writeback to function in hybrid or federated environments.
✅ Device writeback connects cloud-registered devices to on-prem AD, enabling hybrid security and conditional access.
Manage licenses
e’s a simplified summary in points:
-
Problem: Some Microsoft services are not available in all locations due to local laws.
-
Requirement: Each user must have a Usage location specified before a license can be assigned.
-
Error scenario: If a user’s location isn’t supported, group license assignment fails and an error is recorded.
-
Solution:
-
Remove users from unsupported locations from the licensed group, or
-
Update the user’s Usage location to a supported region.
-
-
PowerShell indicator: Error reported as ProhibitedInUsageLocationViolation.
-
Note: Users without a usage location inherit the directory’s default location. It’s recommended to set correct usage locations before using group-based licensing.
✅ In short: Always set correct usage locations for users to ensure licenses are assigned legally and successfully.
Duplicate proxy addresses
If you use Exchange Online, some users in your organization might be incorrectly configured with the same proxy address value. When group-based licensing tries to assign a license to such a user, it fails and shows “Proxy address is already being used.”
After you resolve any proxy address problems for the affected users, make sure to force license processing on the group to ensure that the licenses can now be applied.
Microsoft Entra Mail and ProxyAddresses attribute change
Problem: While updating license assignment on a user or a group, you might see that the Microsoft Entra Mail and ProxyAddresses attribute of some users are changed.
Updating license assignment on a user causes the proxy address calculation to be triggered, which can change user attributes.
License Assignment Attribute Concurrency Exception in audit logs
Problem:
LicenseAssignmentAttributeConcurrencyExceptionappears in audit logs during license assignment.-
Cause: Happens when a user is in multiple groups with the same assigned license, leading to concurrent license assignment attempts.
-
Behavior: Microsoft Entra ID automatically retries processing and resolves the issue.
-
Action needed: No action required from administrators or customers.
✅ In short: This error is temporary and self-resolving when duplicate group license assignments occur
More than one product license assigned to a group
Multiple licenses per group: A group can have more than one product license assigned (e.g., Office 365 E3 + EMS).
-
Assignment behavior: Entra ID tries to assign all licenses in the group to each user.
-
Failure case: If one license fails (e.g., not enough licenses, conflicting services), then none of the licenses in the group are assigned.
-
Admin visibility: You can check which users failed and see which products caused the issue in the admin portal.
✅ In short: A group can hold multiple licenses, but all must succeed for assignment to work. If one fails, the entire group assignment fails.
When a licensed group is deleted
Before deleting a licensed group: You must first remove all licenses assigned to that group.
-
Processing time: Removing licenses from all users can take time and may face issues if dependent licenses exist.
-
Dependency handling:
-
If a user has another license that depends on the group license being removed, Entra ID converts the group license to a direct license for that user (so dependency isn’t broken).
-
-
Example:
-
Group has Office 365 E3/E5 with Skype for Business enabled.
-
Some users also have Audio Conferencing (which depends on Skype for Business).
-
When the group is deleted, Entra ID tries to remove E3/E5.
-
For affected users, E3/E5 is converted to a direct license instead of being removed.
-
✅ In short: When deleting a licensed group, licenses are removed, but if dependencies exist, they are converted to direct assignments to avoid breaking services.
Manage licenses for products with prerequisites
Add-ons need prerequisites: Some Microsoft products (like Workplace Analytics) are add-ons and require a prerequisite service plan to be enabled first.
-
Example prerequisite: Workplace Analytics requires Exchange Online (Plan 1 or Plan 2) to work.
-
Error if missing: If you assign only the add-on to a group, you’ll get an error:
“License operation failed. Make sure that the group has necessary services before adding or removing a dependent service.” -
Solution: Add both the prerequisite service plan and the add-on in the same group.
Ways to assign correctly:
-
Update an existing group – Example: Add Workplace Analytics to a group that already has Office 365 E3 (which includes Exchange Online Plan 2).
-
Create a standalone group – Contain only the minimum required products:
-
Office 365 E3 (with only Exchange Online Plan 2 enabled)
-
Workplace Analytics
-
-
License consumption rule:
-
Users consume 1 license for the base product (e.g., E3) and 1 for the add-on.
-
Even if they’re also in another group with full E3, they still consume only one E3 license total.
-
-
Flexibility tip: You can create multiple groups for prerequisites (e.g., one with E1 + Workplace Analytics, another with E3 + Workplace Analytics) to assign add-ons without using extra licenses.
✅ In short: Always pair add-ons with their required base service in the same group to avoid errors and ensure proper licensing.
Force the group license process to resolve errors
Sometimes, even after fixing licensing issues (like freeing up licenses or resolving conflicts), user states don’t update automatically.
-
In such cases, you need to manually trigger the group license reprocessing.
-
Example: If you remove direct licenses from users to free them up, groups that failed earlier may still show errors until reprocessed.
-
Steps to reprocess a group:
-
Go to the Group pane in Microsoft Entra.
-
Open Licenses.
-
Select the Reprocess button on the toolbar.
-
-
This action forces Microsoft Entra ID to retry license assignment and update the user’s state.
⚡ In short: Reprocess the group whenever you’ve fixed errors (like conflicts or insufficient licenses) to make sure all users are properly updated.
Force the user license process to resolve errors
Sometimes, after fixing licensing issues, a user’s state doesn’t update automatically.
-
In such cases, you need to manually trigger user reprocessing.
-
Example: If you fix a duplicate proxy address problem for a user, their license state may still show errors until reprocessed.
-
Steps to reprocess a user:
-
Go to the User pane in Microsoft Entra.
-
Open Licenses.
-
Select the Reprocess button on the toolbar.
-
-
This forces Microsoft Entra ID to retry license assignment for that user and update their status.
⚡ In short: Use Reprocess (user) when you’ve resolved an error for an individual user but their license state still hasn’t updated.
How to migrate users with individual licenses to group licenses
you may have existing licenses deployed to users in the organizations via direct assignment; that is, using PowerShell scripts or other tools to assign individual user licenses. Before you begin using group-based licensing to manage licenses in your organization, you can use this migration plan to seamlessly replace existing solutions with group-based licensing.
Keep in mind that you should avoid a situation in which migrating to group-based licensing will result in users temporarily losing their currently assigned licenses. Any process that may result in removal of licenses should be avoided to remove the risk of users losing access to services and their data.
Recommended migration process
Keep existing automation running
-
Don’t stop your current license assignment scripts (PowerShell or others) yet.
-
This ensures users won’t lose licenses during migration.
-
-
Create or choose licensing groups
-
Set up new security groups (or reuse existing ones).
-
Add all required users into these groups.
-
-
Assign required licenses to groups
-
Apply the same product licenses that your existing automation is currently assigning.
-
Make sure service plan settings match your organization’s needs.
-
-
Verify license application
-
Check group processing state in the Microsoft Entra admin center.
-
Review Audit Logs to confirm assignments are applied.
-
Do random checks on a few user accounts → users should now have licenses shown as both Direct and Inherited.
-
-
Confirm no duplicate license consumption
-
Even if a user has the same license assigned directly and via a group, only one license is consumed.
-
This ensures no extra licenses are needed during migration.
-
-
Check for errors
-
Look for any users in a licensing error state within the group settings.
-
Fix issues (like insufficient licenses, conflicts, or usage location restrictions).
-
-
Remove direct license assignments (gradually)
-
Start with a small subset of users → remove their direct licenses.
-
Verify that they still retain group-based licenses.
-
If everything works fine, repeat for all users.
-
This step prevents users from keeping extra licenses after leaving the licensed group.
-
✅ Key benefit: Migration is seamless, with no service disruption and no need to buy extra licenses.
An example
An organization has 1,000 users. All users require Office 365 Enterprise E3 licenses. Currently the organization has a PowerShell script running on premises, adding and removing licenses from users as they come and go. However, the organization wants to replace the script with group-based licensing so licenses can be managed automatically by Microsoft Entra ID.
Here is what the migration process could look like:
Using the Azure portal, assign the Office 365 E3 license to the All users group in Microsoft Entra ID.
Confirm that license assignment has completed for all users. Go to the overview page for the group, select Licenses, and check the processing status at the top of the Licenses page.
Look for “Latest license changes have been applied to all users" to confirm processing has completed.
Look for a notification on top about any users for whom licenses may have not been successfully assigned. Did we run out of licenses for some users? Do some users have conflicting license plans that prevent them from inheriting group licenses?
You need to check a few users to verify that they have both the direct and group licenses applied. Go to the profile page for a user, select Licenses, and examine the state of licenses.
This is the expected user state during migration:
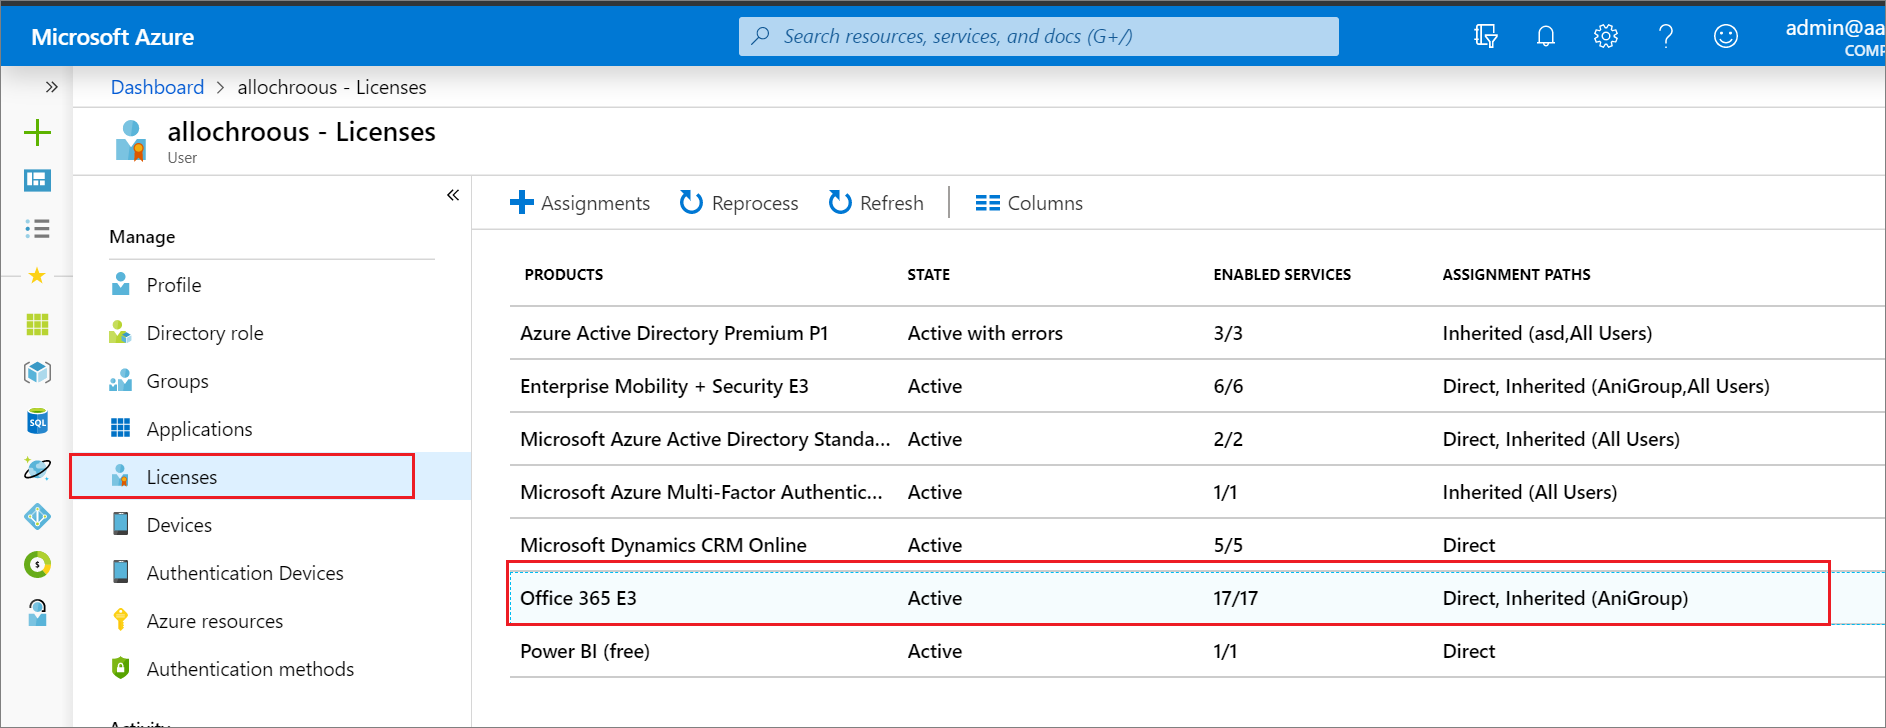
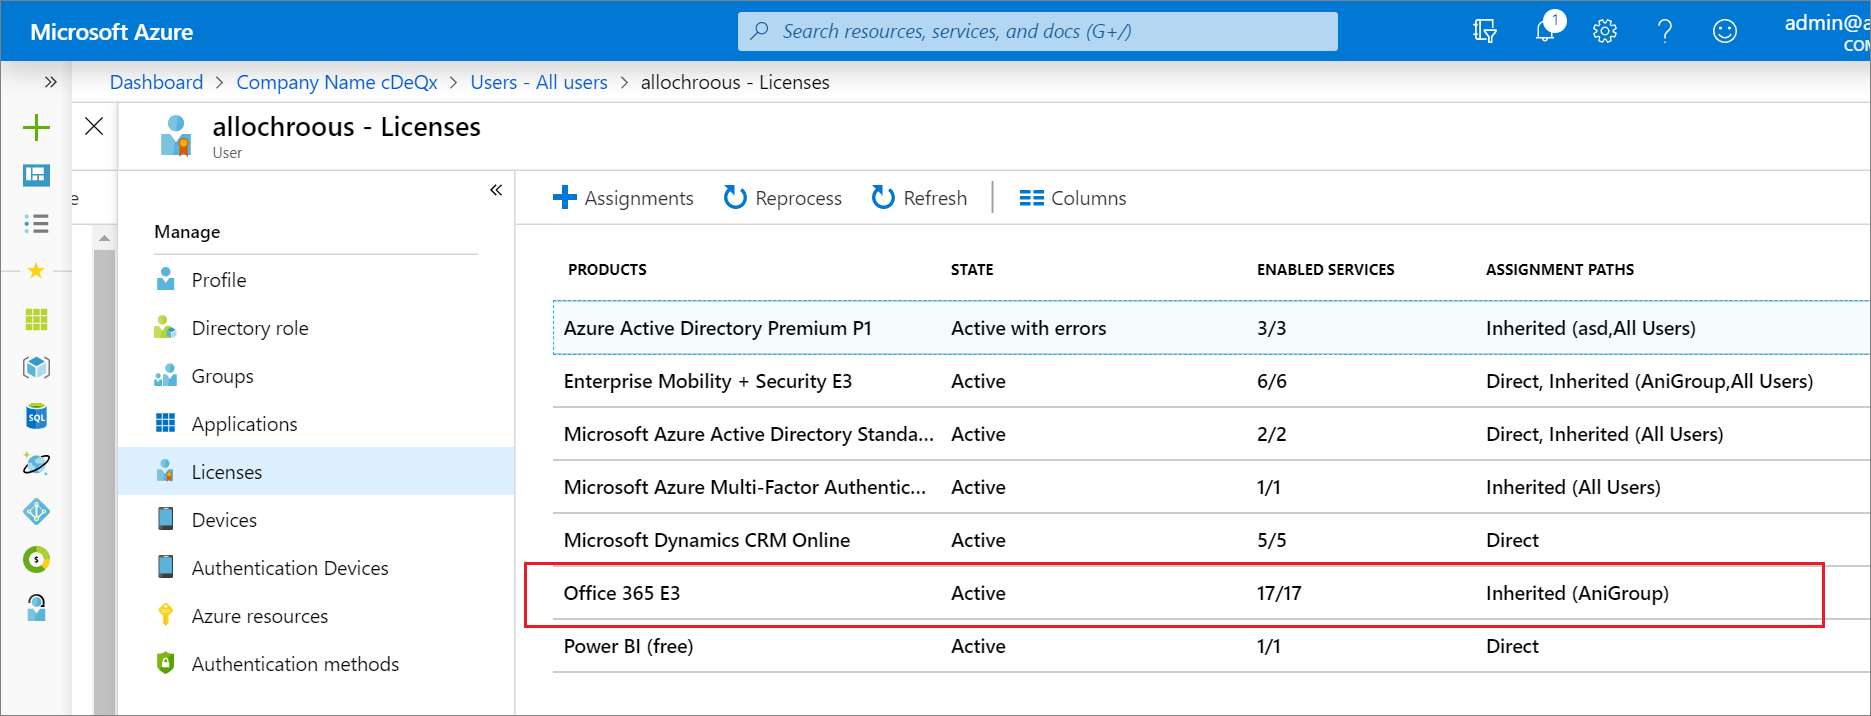
- After confirming that both direct and group licenses are equivalent, you can start removing direct licenses from users. You can test this by removing them for individual users in the portal and then run automation scripts to have them removed in bulk. Here is an example of the same user with the direct licenses removed through the portal. Notice that the license state remains unchanged, but we no longer see direct assignments.
Change license assignments for a user or group in Microsoft Entra ID
how to change license assignments for a user or group in Microsoft Entra ID without causing service disruption:
🔹 Goal
-
Seamlessly move users/groups from one license plan to another (e.g., Office 365 E1 → Office 365 E3) without loss of service or data.
-
Microsoft Entra ID applies removals and new assignments simultaneously, so users don’t experience downtime or conflicts.
Seamlessly move users/groups from one license plan to another (e.g., Office 365 E1 → Office 365 E3) without loss of service or data.
Microsoft Entra ID applies removals and new assignments simultaneously, so users don’t experience downtime or conflicts.
🔹 Key Assumptions to Verify Before License Change
-
Current license type
-
Users must have their current license plan assigned through a group (inherited), not as a direct assignment.
-
Sufficient licenses available
-
Ensure enough licenses for the new plan (E3 in example).
-
If not, some users won’t be upgraded.
-
Check for conflicts or dependencies
-
Confirm users don’t have service licenses that conflict or depend on the old license.
-
Example: Workplace Analytics or Project Online requires Exchange Online, so removing the base license could cause failures.
-
Group management method
-
On-premises groups (via Microsoft Entra Connect): Add/remove users from your on-prem system → sync to Entra.
-
Dynamic groups in Entra: Update user attributes (like department, location) → Entra automatically adjusts membership.
Current license type
-
Users must have their current license plan assigned through a group (inherited), not as a direct assignment.
Sufficient licenses available
-
Ensure enough licenses for the new plan (E3 in example).
-
If not, some users won’t be upgraded.
Check for conflicts or dependencies
-
Confirm users don’t have service licenses that conflict or depend on the old license.
-
Example: Workplace Analytics or Project Online requires Exchange Online, so removing the base license could cause failures.
Group management method
-
On-premises groups (via Microsoft Entra Connect): Add/remove users from your on-prem system → sync to Entra.
-
Dynamic groups in Entra: Update user attributes (like department, location) → Entra automatically adjusts membership.
🔹 Process Summary
-
Assign the new license plan (e.g., E3) to the group.
-
Remove the old license plan (e.g., E1) from the group.
-
Entra applies changes simultaneously → ensuring users switch seamlessly, without downtime.
Assign the new license plan (e.g., E3) to the group.
Remove the old license plan (e.g., E1) from the group.
Entra applies changes simultaneously → ensuring users switch seamlessly, without downtime.
✅ Result: Users are smoothly moved to the new license plan, keeping full service access with no interruptions.
Exercise - change user license assignments
Create a new user in Microsoft Entra ID
Browse to the Identity - Users page of the Microsoft Entra admin center.
In the left navigation, under select Users.
In the Users blade, on the menu, select New user.
Create a user using the following information:
Setting Value User name DominiqueK Name Dominique Koch First name Dominique Last name Koch Password Make a unique password for the user Usage location Select your preferred usage location When complete, open Microsoft Entra ID and click on Users to verify the account for Dominique Koch is shown in the list of all users.
Update user license assignments
Browse to the Microsoft Entra admin center.
In the left navigation, under Identity, select Users.
In the Users screen, select Dominique Koch.
In the left navigation, select Licenses.
On the Update license assignments blade, select the check box for a single or multiple licenses.
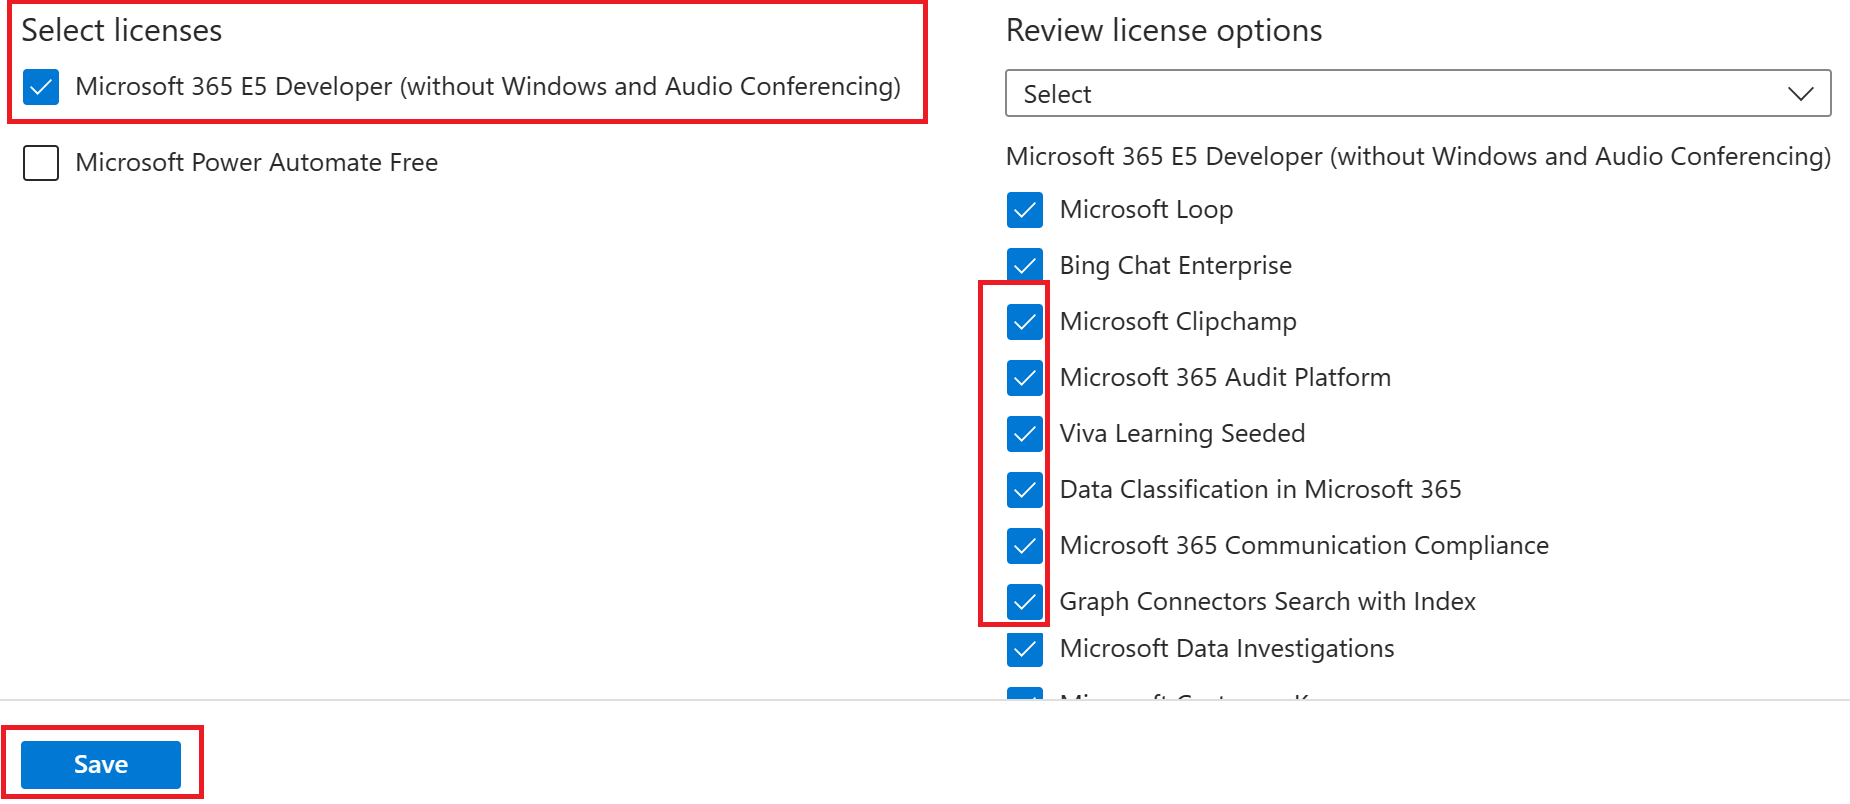
When complete, select Save.
Create custom security attributes
What is a custom security attribute?
Custom security attributes in Microsoft Entra ID are business-specific attributes (key-value pairs) that you can define and assign to Microsoft Entra objects. These attributes can be used to store information, categorize objects, or enforce fine-grained access control over specific Azure resources.
Why use custom security attributes?
- Extend user profiles, such as add Employee Hire Date and Hourly Salary to all my employees.
- Ensure only administrators can see the Hourly Salary attribute in my employees' profiles.
- Categorize hundreds or thousands of applications to easily create a filterable inventory for auditing.
- Grant users access to the Azure Storage blobs belonging to a project.
What can I do with custom security attributes?
- Define business-specific information (attributes) for your tenant.
- Add a set of custom security attributes on users, applications, Microsoft Entra resources, or Azure resources.
- Manage Microsoft Entra objects using custom security attributes with queries and filters.
- Provide attribute governance so attributes determine who can get access.
Features of custom security attributes
- Available tenant-wide
- Include a description
- Support different data types: Boolean, integer, string
- Support single value or multiple values
- Support user-defined free-form values or predefined values
- Assign custom security attributes to directory synced users from an on-premises Active Directory
Explore automatic user creation
Components of SCIM (System for Cross-Domain Identity Management)
HCM system → HR system that manages employee data (like hiring, roles, exit).
-
Microsoft Entra Provisioning Service → Connects apps using SCIM 2.0 to automatically create/update/remove users and groups.
-
Microsoft Entra ID → Main identity store (where user accounts and permissions are managed).
-
Target system → The app or system that receives user/group data through its SCIM endpoint.
👉 In short: HR system → Entra ID → Provisioning Service → Target system (users are created/updated automatically).
Why use SCIM?
Automation → No need to manually create or remove user accounts; it happens automatically.
-
Consistency → User details (name, role, department, etc.) stay the same across all connected systems.
-
Security → When someone leaves the company or changes roles, access is removed/updated quickly, reducing risk of data breaches.
-
Standardization → SCIM is an open standard, so it works across different systems and apps without custom connectors.
👉 In short: SCIM saves time, reduces errors, and improves security by keeping user identities in sync automatically.
M0dule 3
introduction of a Microsoft Entra ID (Azure AD) module on external collaboration (B2B).
You can securely invite external users (partners, vendors, contractors, customers) to access your Azure resources.
👉 Basically, it’s about securely enabling and managing external user access to your organization’s resources.
Describe guest access and Business to Business accounts
A guest user in Microsoft Entra ID (via B2B collaboration) is an external person (like a partner, vendor, contractor, or customer) who is invited to use your organization’s applications and resources.
They are not employees of your organization.
-
They log in with their own identity (Gmail, Microsoft account, other ID providers).
-
You (the host organization) control what resources they can access.
-
This lets you share apps, data, and services securely without giving them a full internal account.
👉 Example: A company working with a marketing agency can invite the agency’s staff as guest users so they can access SharePoint files or Teams meetings, but still keep corporate data secure.
How guest users join your Microsoft Entra tenant
1 . Invitation & Redemption Process
-
An admin or user with rights sends an invitation to the external person.
-
The guest clicks the invitation link and signs in with their own credentials (like Gmail, Microsoft account, or their company’s ID).
-
Once accepted, they’re added to your Microsoft Entra directory as a guest user object.
2. Self-Service Sign-up
-
Instead of waiting for an invite, you can enable a sign-up flow.
-
External users can register themselves for specific apps or resources.
3. How They Appear in the Directory
-
They’re represented as a user object in Entra ID.
-
User type is “Guest” (not “Member”).
-
Their username (UPN) often contains
#EXT#to show it’s an external account.
4. For Developers
-
Microsoft provides B2B APIs to:
-
Automate invitations.
-
Customize the guest onboarding flow.
-
Build self-service portals for external users.
-
👉 In short: Guest users can join either through an invitation link or a self-service sign-up, and once inside, they’re tracked as guest accounts in your tenant.
B2B collaboration
B2B collaboration = A feature that lets your organization work securely with external users/partners by giving them controlled access to your apps and resources.
-
External users sign in with their own accounts (Google, Microsoft, company login, etc.).
-
When they’re invited, a user object is created in your directory (same as employees, but marked as a guest).
-
By default, guest users have limited privileges (not the same rights as internal employees).
-
You can still manage them like employees:
-
Add to groups
-
Assign roles
-
Grant or restrict access
-
👉 Example: A supplier can log in with their Gmail, get added as a guest, and access only the SharePoint site you shared—nothing else.
Manage external collaboration
Microsoft Entra External Identities allows people outside your organization (partners, suppliers, vendors, distributors, etc.) to access your apps/resources.
-
These external users can bring their own identity – meaning they don’t need a new username/password from you. They can log in with:
-
Corporate/government-issued identity
-
Social accounts (Google, Facebook, etc.)
-
-
Their identity provider (Google, Microsoft, etc.) handles their login/authentication.
-
You manage their access using Microsoft Entra ID (permissions, roles, groups, policies).
-
This keeps your resources protected while making collaboration easy.
👉 In short: They control their identity, you control the access.
Invitation redemption flow
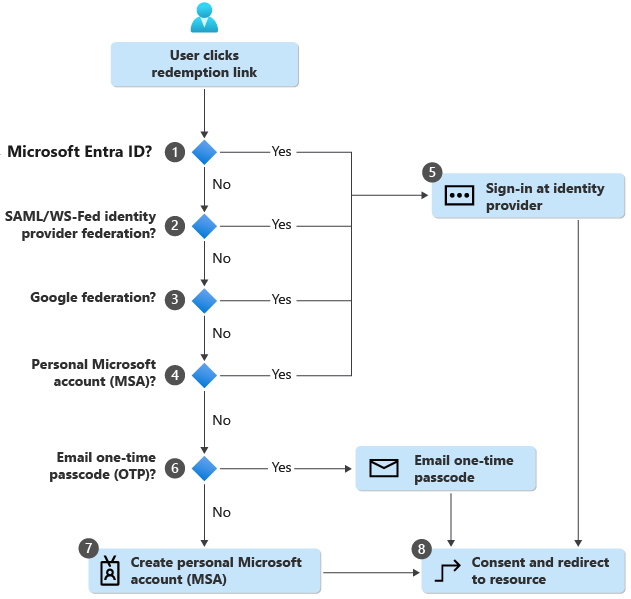
1. User discovery
-
Microsoft Entra ID checks if the invited email already belongs to an existing managed account in Entra.
-
If the same email matches both a work account and a personal Microsoft account (MSA), the user is asked to choose which one to use.
🔹 2. Federation scenarios
-
If the admin has set up SAML/WS-Fed federation, Entra checks the user’s domain (like
@company.com) and redirects them to the company’s identity provider (IdP) for login. -
If Google federation is enabled and the domain is
gmail.comorgooglemail.com, Entra redirects the user to Google for authentication.
🔹 3. MSA (Microsoft Account) check
-
If the invited user already has a personal Microsoft Account (MSA), they just sign in with it.
🔹 4. If no home directory found
-
If the email doesn’t belong to any managed tenant or MSA, two options exist:
-
Email one-time passcode (OTP) enabled → Entra sends a code to their email, and the user enters it to sign in.
-
OTP disabled → User is prompted to create a new MSA with that invited email (even if it’s a work email in an unverified domain).
-
🔹 5. Consent experience
-
Once the correct identity provider authenticates the user, they are redirected back to Microsoft Entra ID to complete the consent flow (agreeing to share certain info and accessing the shared resources).
👉 The redemption process ensures that no matter what kind of account the guest user has (work, personal, Google, or none), Microsoft Entra ID finds a way to authenticate them and then brings them into your tenant securely.
External identities scenarios
This section explains External Identities scenarios and how you manage external collaboration in Microsoft Entra ID.
🔹 External Identities Concept
-
Focus is not on who the user is to your org, but on how they sign in.
-
Supports many login types: work, school, social identities (Google, Facebook), or SAML/WS-Fed providers.
🔹 B2B Collaboration Scenario
-
Primary use case → Working with external partners (suppliers, vendors, contractors, customers).
-
Users are invited as guest users and can use their own credentials.
-
Redemption process: They sign in with their work, school, or social identity → appear in your directory as a guest.
-
Can use entitlement management or self-service sign-up flows to automate/manage access.
-
You can also collect extra information at sign-up (e.g., company, department).
🔹 Key Capabilities of B2B Collaboration
-
Apps supported → Microsoft 365 (Teams, SharePoint, etc.), your SaaS apps (Salesforce, Workday), and custom apps.
-
Identity Providers → Work/School accounts, Gmail, Facebook, SAML/WS-Fed providers.
-
External User Management → Guests are in the same directory as employees but marked as guest users.
-
Can be added to groups, assigned roles, managed like employees.
-
-
Single Sign-On (SSO) → Guests can use one login to access all apps connected to Entra.
-
Security & Compliance → Controlled by you (host org) via Conditional Access, MFA, policies.
-
Branding → Guests see your org’s branding (logos, themes).
🔹 Managing External Collaboration Settings
-
Who can invite guests → By default, all users (including guests) can invite guests, even without admin rights.
-
You can:
-
Allow/deny guest invitations for different roles.
-
Delegate invitation rights to specific people (via roles).
-
-
Guest Permissions (by default):
-
Guests have limited access.
-
Cannot list all users, groups, or directory resources.
-
Can see membership of groups they’re in (unless hidden).
-
-
Admins can restrict guest access further, so they only see their own profile.
👉External Identities let partners, vendors, and customers log in with their own identity. You (the host) decide who can invite them, what they can access, and how much they can see inside your directory.
Configure business-to-business external collaboration settings
With Microsoft Entra B2B (Business to Business) collaboration, a tenant admin can set the following invitation policies:
- Turn off invitations (no external users can be invited)
- Only admins and users in the Guest Inviter role can invite (only admins and users in the Guest Inviter role can invite)
- Admins, the Guest Inviter role, and members can invite (same as above setting, but invited members can also invite external users)
- All users, including guests, can invite (as the name implies, all users in the tenant can invite external users)
By default, all users, including guests, can invite guest users.
Exercise - configure external collaboration
Configure external collaboration settings
- Sign in to the Microsoft Entra admin center as a tenant administrator.
- Select Identity.
- Select External Identities - External collaboration settings.
- Under Guest user access, review access levels that are available and then select Guest user access is restricted to properties and memberships of their own directory objects (most restrictive).
Note
- Guest users have the same access as members (most inclusive): This option gives guests the same access to Microsoft Entra resources and directory data as member users.
- Guest users access limited to properties and memberships of directory objects: (Default) This setting blocks guest users from certain directory tasks, like enumerating users, groups, or other directory resources. Guests can see membership of all nonhidden groups.
- Guest user access is restricted to properties and memberships of their own directory objects (most restrictive): With this setting, guests can access only their own profiles. Guests aren't allowed to see other users' profiles, groups, or group memberships.
- Under Guest invite settings, mark Only user assigned to specific admin roles can invite guest users.
- Inviting guests to collaborate moves the least restrictive option, where anyone can invite guests, to the most restrictive where no one can invite guests.
- Anyone in the organization can invite guests: Set to allow anyone to invite guest users, including users, admins, and even other guest users.
- Member users and users assigned to specific admin roles: Set to allow only full members of the organization or members of admin groups to invite guests.
- Only users assigned specific admin roles: Set to allow only those people included in specific admin roles to invite guests.
- No one in organization can invite guests: Set to restrict all guest user invites by members.
- Users in the Guest Inviter role can invite guests, if admin users can invite guest.
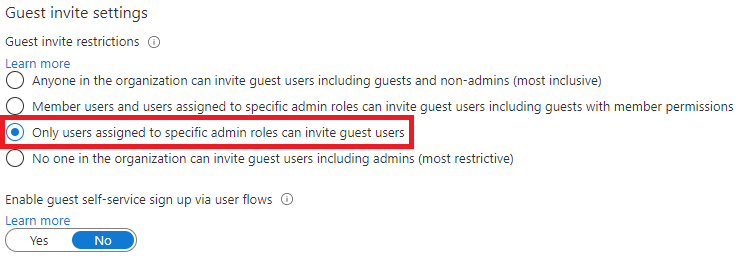
12. Under Collaboration restrictions, review the available options and accept the default settings.
- When finished, save your changes.
Invite external users - individually and in bulk
B2B guest users in Microsoft Entra ID:
-
Who can invite → Users with limited admin roles or any user (if allowed by external collaboration settings).
-
How to invite → You can invite a guest to:
-
The directory
-
A group
-
An application
-
-
After invitation →
-
Guest account is created in Entra ID with user type = Guest.
-
Guest must redeem the invitation to access resources.
-
-
Accessing resources →
-
Guest can use a direct app link or the redemption URL from the invitation email.
-
-
Policy note → By default, all users/admins can invite guests, but your organization might restrict who can invite based on external collaboration settings.
In short: Invite → Guest added → Guest redeems → Access granted.
How users in your organization can invite guest users to an app
users can invite guest users to an app in Microsoft Entra ID:
1. Direct Invitation
-
After a guest is in the directory, an application owner can send them a direct link to the app.
2. Self-Service App Management
-
Admins can enable self-service management for gallery or SAML-based apps.
-
This lets application owners manage guest access without adding them manually to the directory first.
3. Steps for Self-Service Setup
-
Enable self-service group management in the tenant.
-
Create a group for the app and make the application owner a group owner.
-
Configure the app for self-service and assign the group to the app.
-
After this, the app owner can invite guests via the Access Panel or add them to the app group.
In short:
Admin sets up self-service → App owner manages group → Guest invited → Guest accesses the app.
How to bulk invite Microsoft Entra B2B collaboration users
If you use Microsoft Entra B2B collaboration to work with external partners, you can invite multiple guest users to your organization at the same time. Specifically, you do the following:
- Use Bulk invite users to prepare a comma-separated value (.csv) file with the user information and invitation preferences
- Upload the .csv file to Microsoft Entra ID
- Verify the users were added to the directory
Understand the CSV template
Download and fill in the bulk upload CSV template to help you successfully invite Microsoft Entra ID guest users in bulk. The CSV template you download might look like this example:
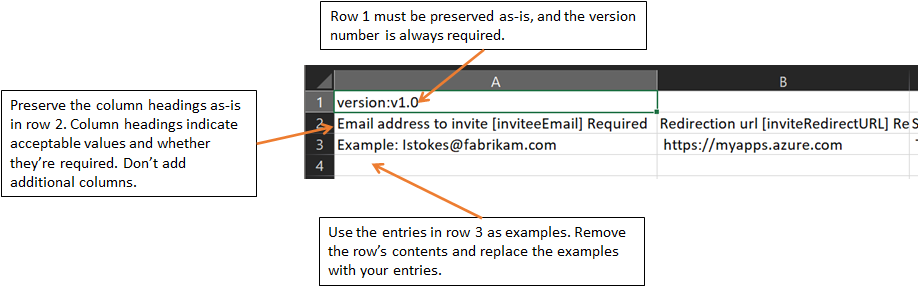
CSV template structure
This CSV template will always open with two rows of existing data. The rows in a downloaded CSV template are as follows:
- Version number: The first row containing the version number must be included in the upload CSV.
- Column headings: The format of the column headings is Item name
[PropertyName]Required or blank. For example,Email address to invite [inviteeEmail] Required. Some older versions of the template might have slight variations. - Examples row: We have included in the template a row of examples of acceptable values for each column. You must remove the examples row and replace it with your own entries.
Additional guidance
- The first two rows of the upload template must not be removed or modified, or the upload can't be processed.
- The required columns are listed first.
- We don't recommend adding new columns to the template. Any additional columns you add are ignored and not processed.
- We recommend that you download the latest version of the CSV template as often as possible.
Exercise - add guest users to directory
In this exercise, you need to add guest users to the directory.
- Sign in to the Microsoft Entra admin center as a user who is assigned a limited administrator directory role or the Guest Inviter role.
- Select Identity
- Under Users, select All Users.
- Select New user - Invite external user.

- On the New user page, select Invite user and then add your information as the guest user.
- Group email addresses are not supported; enter the email address for an individual. Also, some email providers allow users to add a plus symbol (+) and additional text to their email addresses to help with things like inbox filtering. However, Microsoft Entra ID does not currently support plus symbols in email addresses. To avoid delivery issues, omit the plus symbol and any characters following it up to the @ symbol.
- When complete, select Invite.
- On the Users screen, verify your account is listed and, in the User type column, verify Guest is shown.
After you send the invitation, the user account is automatically added to the directory as a guest.
Exercise - invite guest users bulk
Use this exercise to learn to invite guest users in bulk.
Sign in to the Microsoft Entra admin center with an account that is a User administrator in the organization.
In the navigation pane, select Identity.
Under Users, select All Users.
On the All users screen, on the menu, select Bulk operations - Bulk invite.
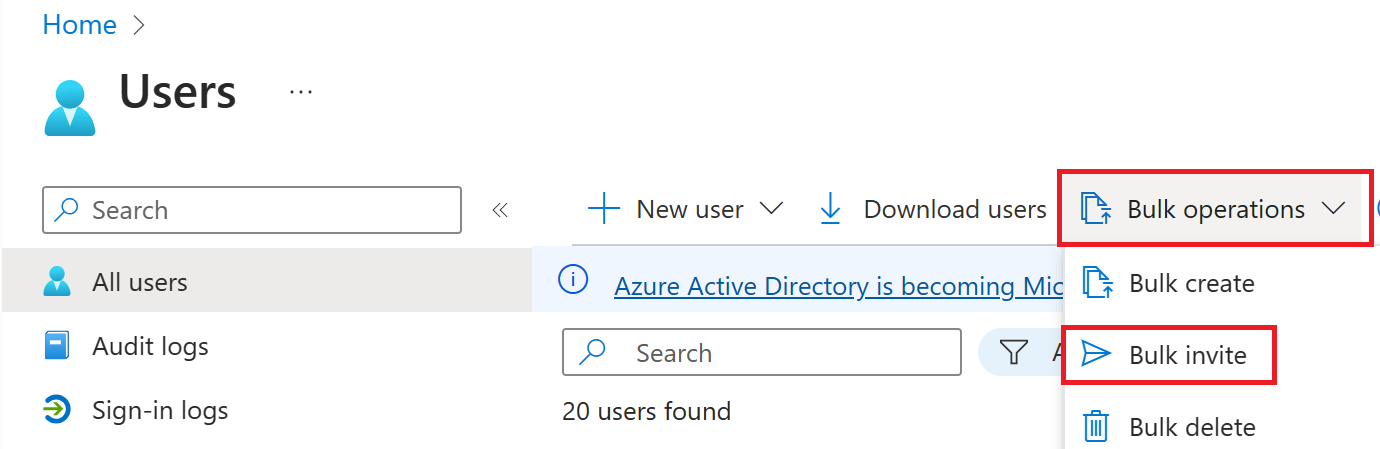
In the Bulk invite users pane, select Download to a sample CSV template with invitation properties.
Using an editor to view the CSV file, review the template.
Note
- Email address to invite - The user who will receive an invitation.
- Redirection url - The URL to which the invited user is forwarded after accepting the invitation.
Open the .csv template and add a line for each guest user. Required values are:

Save the file.
On the Bulk invite users page, under Upload your csv file, browse to the file. When you select the file, validation of the .csv file starts.
After the file contents are validated, you'll see File uploaded successfully. If there are errors, you must fix them before you can submit the job.
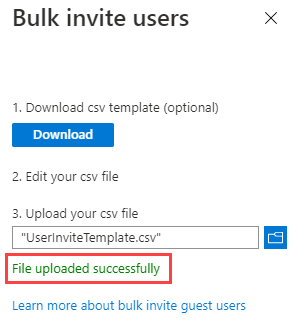
When your file passes validation, select Submit to start the Azure bulk operation that adds the invitations.
To view the job status, select view the status of each operation. Or, you can select Bulk operation results in the Activity section. For details about each line item within the bulk operation, select the values under the # Success, # Failure, or Total Requests columns. If failures occurred, the reasons for failure will be listed.
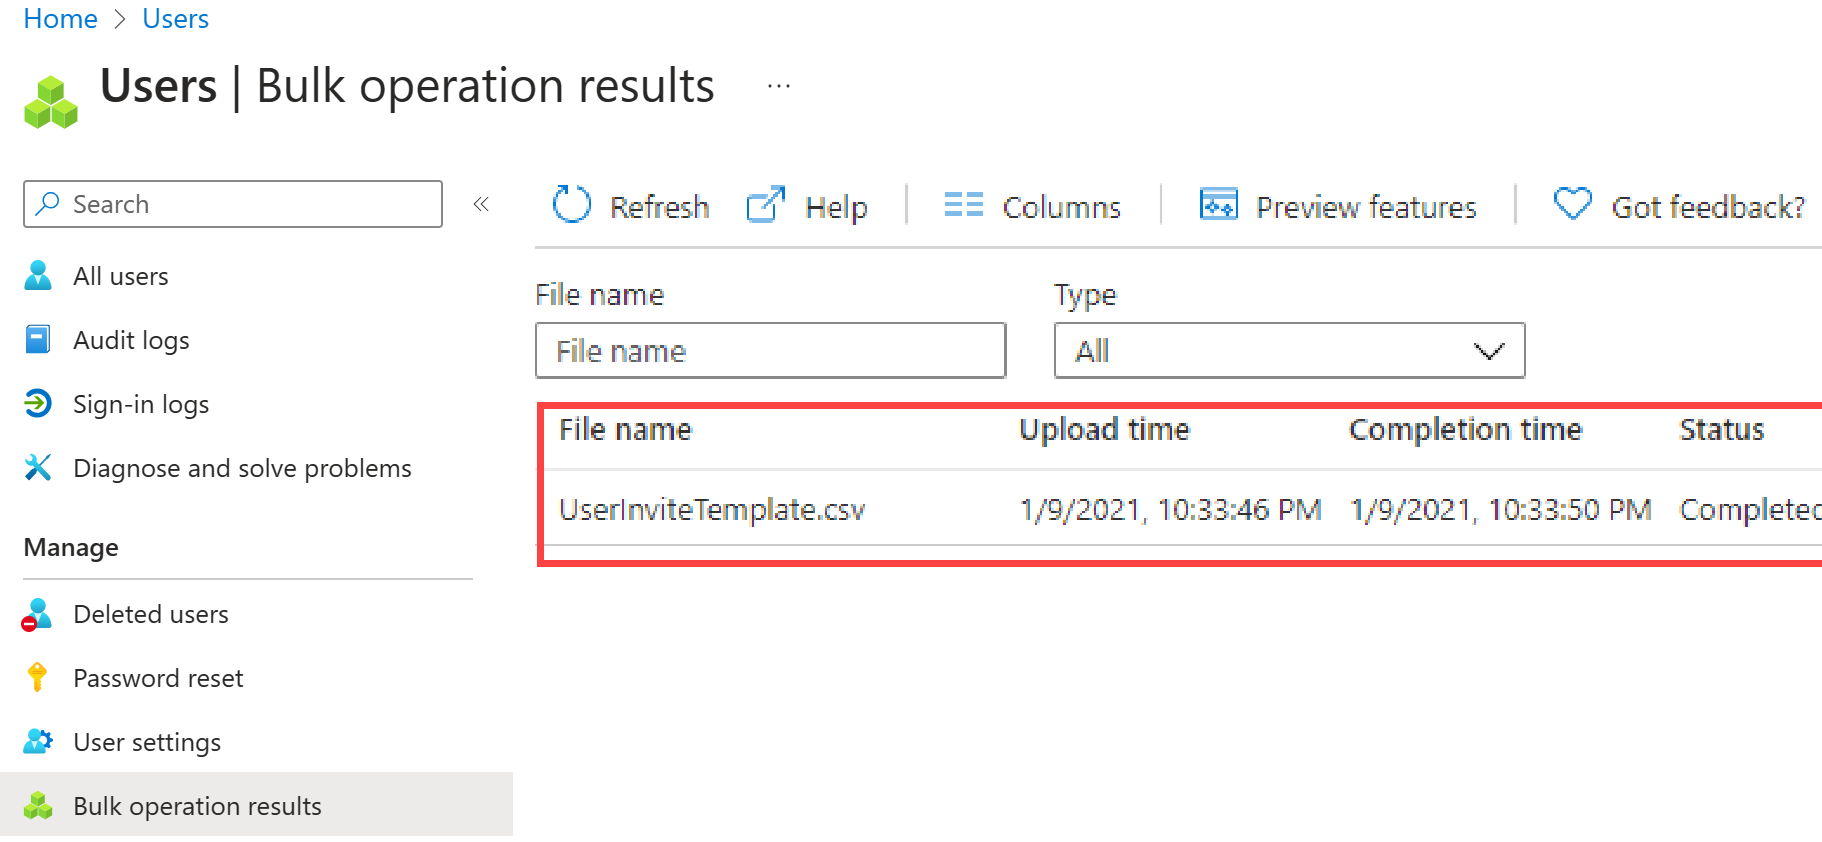
When the job completes, you'll see a notification that the bulk operation succeeded.
Demo - manage guest users in Microsoft Entra ID
In this interactive guide, you’ll learn how to manage guest user access in Microsoft Entra ID for business-to-business (B2B) collaboration. You’ll see how to invite external users to collaborate, assign resources to guest users, and create Conditional Access policies to keep data secure.
Manage external user accounts in Microsoft Entra ID
Microsoft Entra B2B collaboration users are added as guest users to the directory, and guest permissions in the directory are restricted by default. Your business might need some guest users to fill higher-privilege roles in your organization. To support defining higher-privilege roles, guest users can be added to any roles you desire, based on your organization's needs.
Add a B2B user to a role
Microsoft recommends that organizations use the rule of least privilege. You can use Privileged Identity Management (PIM) to grant access for B2B/guest users.
Key properties of the Microsoft Entra B2B collaboration user
UserType
This property indicates the relationship of the user to the host tenancy. This property can have two values:
Member: This value indicates an employee of the host organization and a user in the organization's payroll. For example, this user expects to have access to internal-only sites. This user isn't considered an external collaborator.
Guest: This value indicates a user who isn't considered internal to the company, such as an external collaborator, partner, or customer. Such a user isn't expected to receive a CEO's internal memo or receive company benefits, for example.
Note
The UserType has no relation to how the user signs in, the directory role of the user, and so on. This property simply indicates the user's relationship to the host organization and allows the organization to enforce policies that depend on this property.
Identities
This property indicates the user’s primary identity provider. A user can have several identity providers, which can be viewed by selecting the link next to Identities in the user’s profile or by querying the identities property via the Microsoft Graph API.
| Identities property value | Sign-in state |
|---|---|
| External Microsoft Entra tenant | This user is homed in an external organization and authenticates by using a Microsoft Entra account that belongs to the other organization. |
| Microsoft account | This user is homed in a Microsoft account and authenticates by using a Microsoft account. |
| {host’s domain} | This user authenticates by using a Microsoft Entra account that belongs to this organization. |
| google.com | This user has a Gmail account and has signed up by using self-service to the other organization. |
| facebook.com | This user has a Facebook account and has signed up by using self-service to the other organization. |
| This user has signed up by using Microsoft Entra Email one-time passcode (OTP). | |
| {issuer URI} | This user is homed in an external organization that doesn't use Microsoft Entra ID as their identity provider, but instead uses a SAML/WS-Fed-based identity provider. |
Can Microsoft Entra B2B users be added as members instead of guests?
Typically, a Microsoft Entra B2B user and guest user are synonymous. Therefore, a Microsoft Entra B2B collaboration user is added as a user with UserType = Guest by default. However, in some cases, the partner organization is a member of a larger organization to which the host organization also belongs. If so, the host organization might want to treat users in the partner organization as members instead of guests. Use the Microsoft Entra user properties to change a guest into a member.
Filter for guest users in the directory
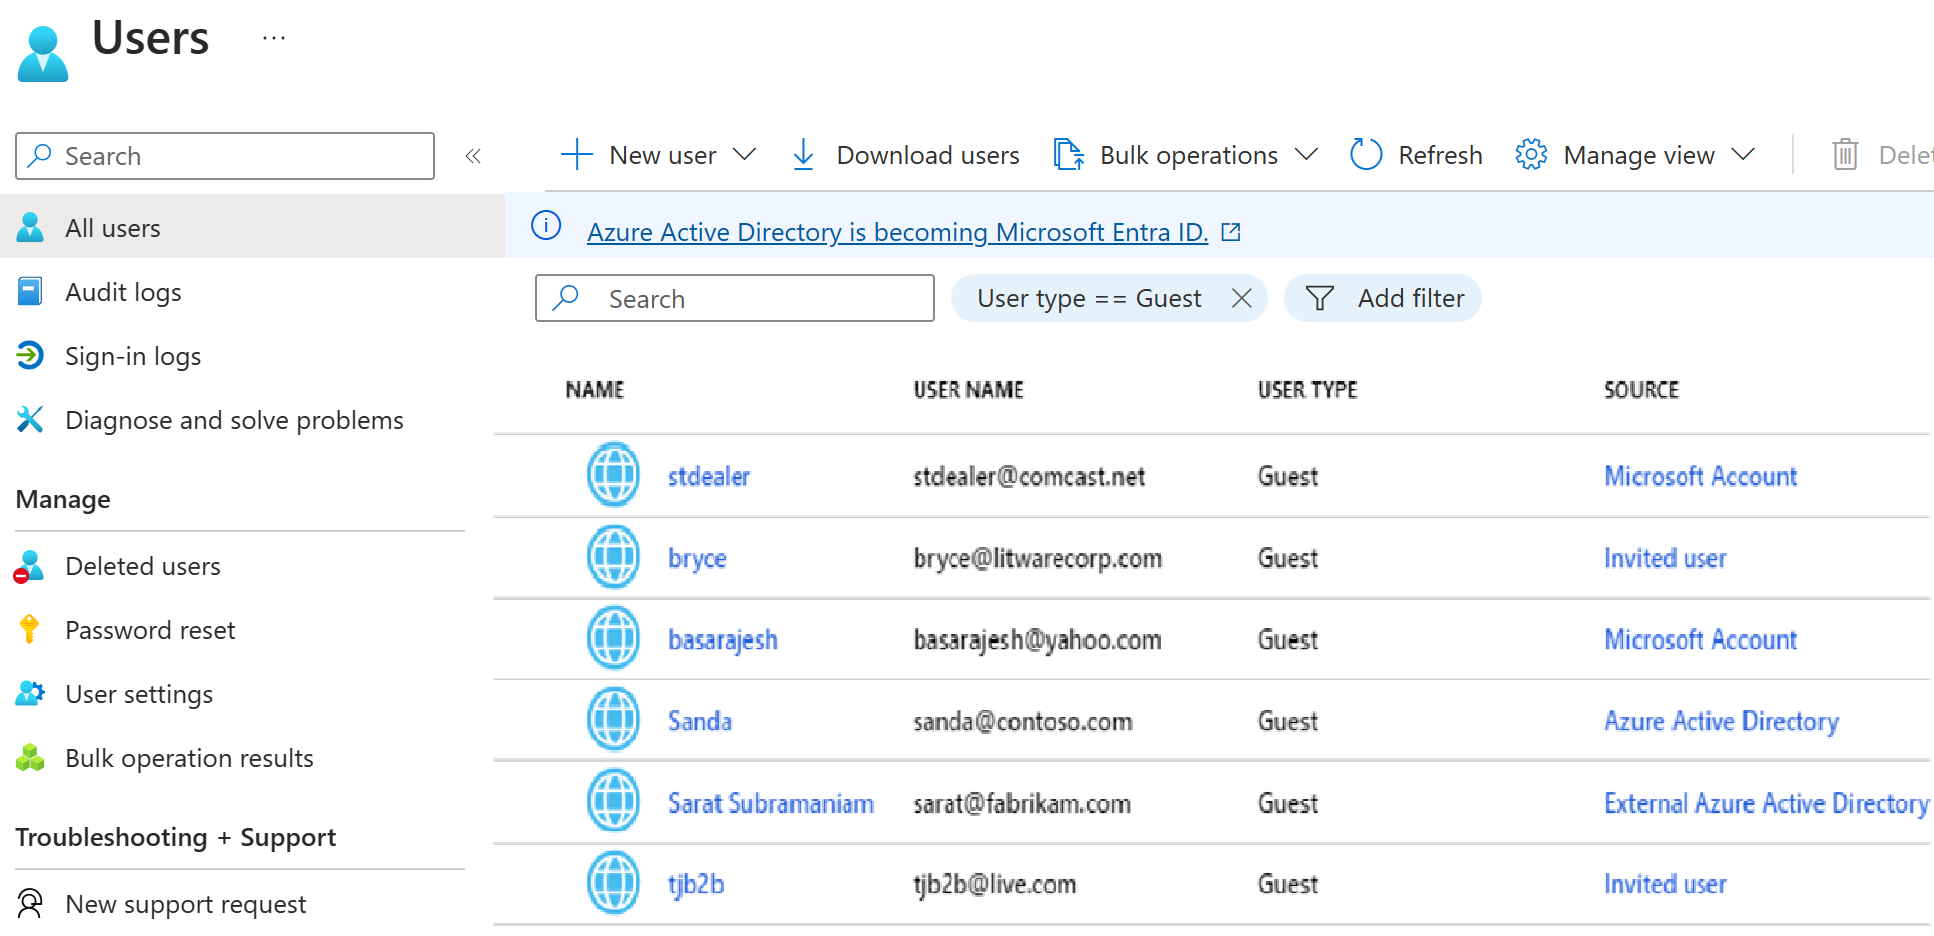
UserType (Member ↔ Guest) if their relationship with the organization changes, and plan for UPN, access, and mailbox implications; avoid doing it as a standalone action.Remove guest user limitations
You can give guest users higher privileges by adding them to roles.
-
You can remove default guest restrictions so they have the same permissions as members.
-
This is done in the user settings within Microsoft Entra ID.
In short: Guests can be elevated to member-level privileges if needed.
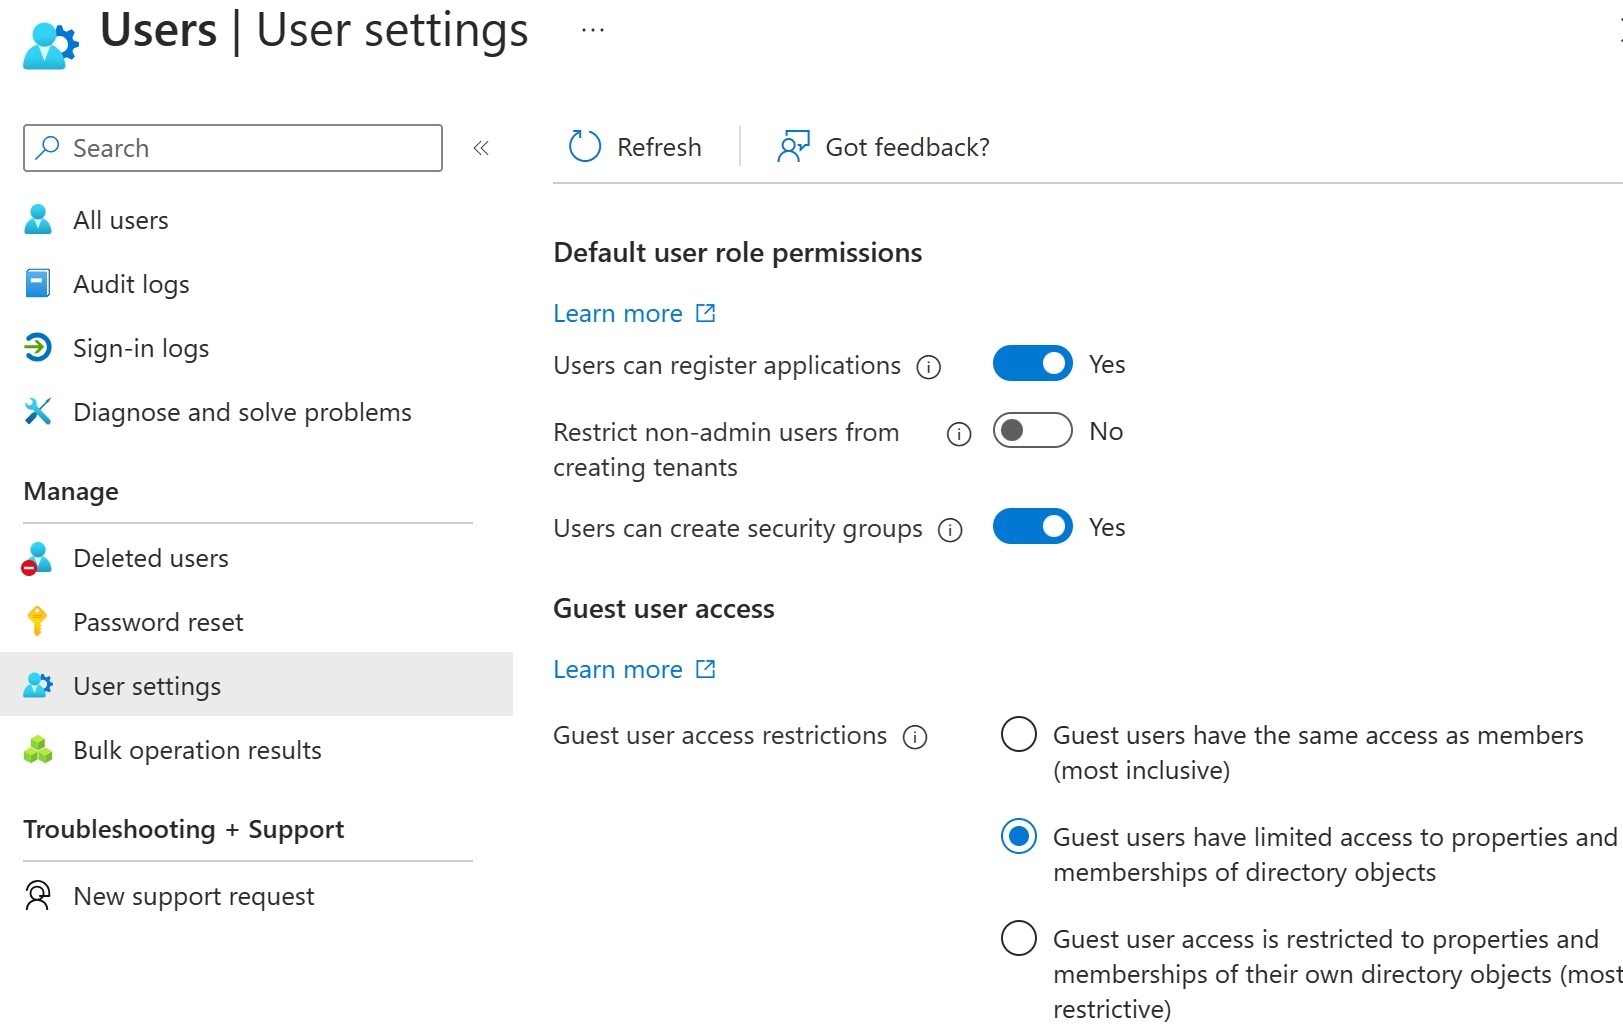 What are dynamic groups?
 What They Are
Dynamic groups automatically manage membership based on user attributes (like userType, department, or country).
Members are added or removed automatically when their attributes change.
Uses
Grant access to applications or cloud resources (SharePoint sites, apps, documents).
Assign licenses automatically to group members.
Requirements
Microsoft Entra ID Premium P1 or P2 license is needed.
Manage external users in Microsoft 365 workloads
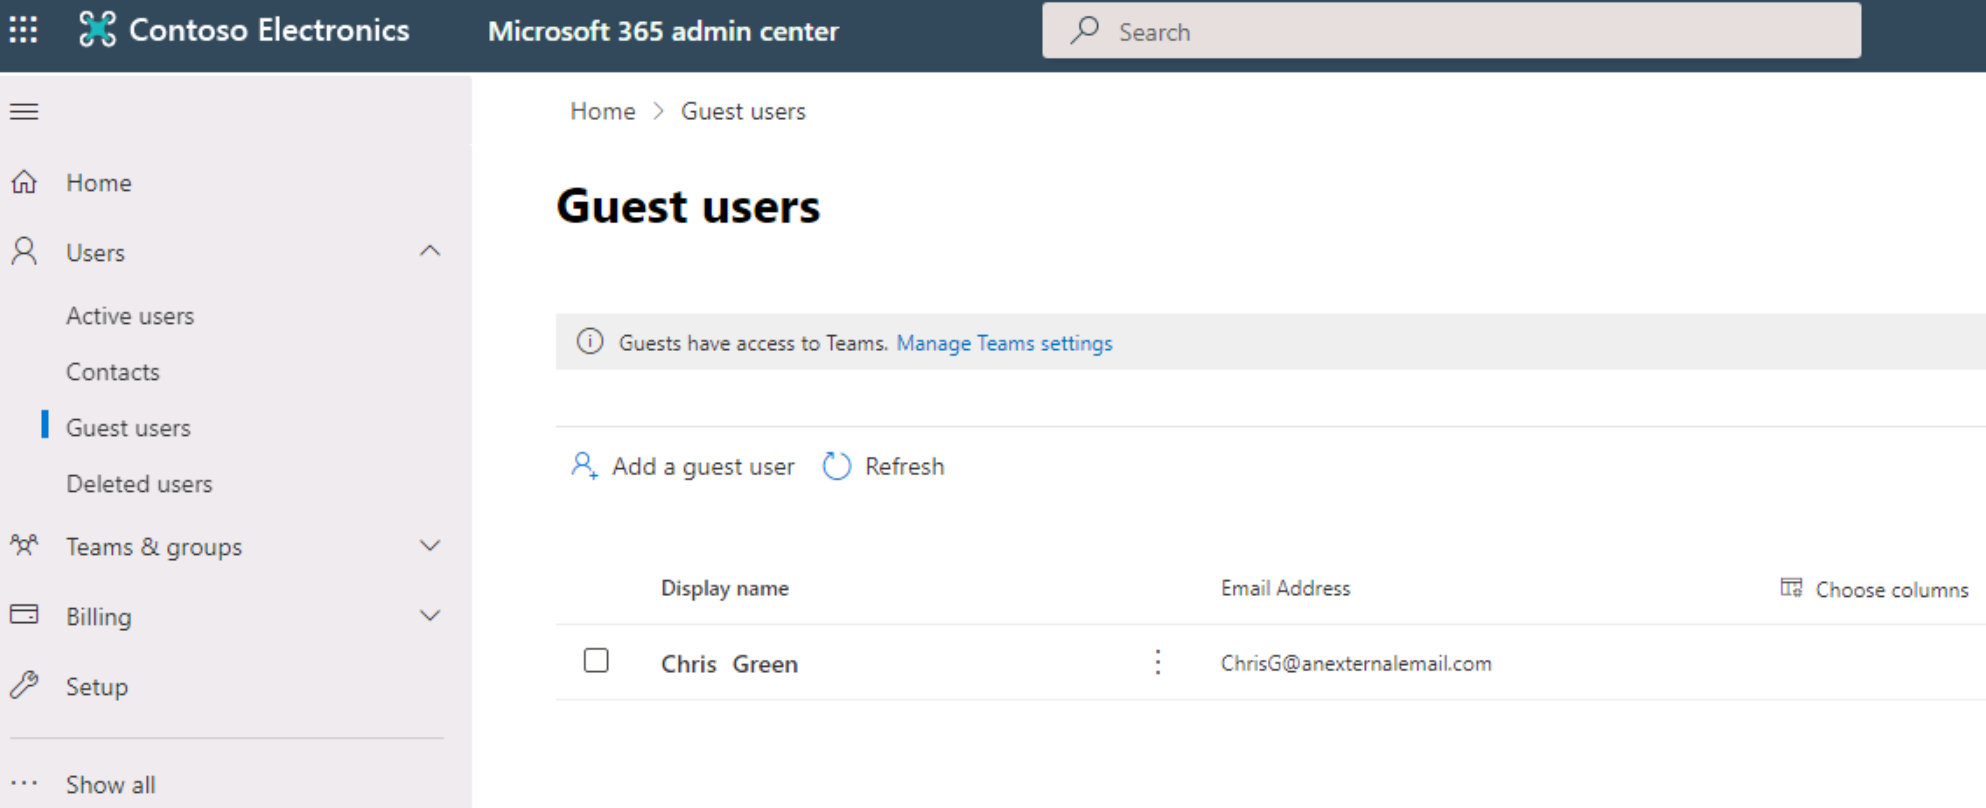
Similar to Microsoft Entra ID, Microsoft 365 can invite guest users into the directory for collaboration purposes. Those users show in the user list as external, and have limited to no rights in Microsoft 365. However, they can be assigned collaboration rights to any Microsoft 365 workload. Guest users can even be given licenses to allow them to perform specific operations.
External collaboration options in Microsoft 365
With Microsoft 365, your users can collaborate with people outside your organization in a variety of ways. Users can share files, invite guests to teams, have meetings with external participants, and chat with people from other organizations. The following table shows the primary ways people from outside your organization can access your Microsoft 365 resources:
| Activity | Account type | Default setting |
|---|---|---|
| Authenticated file and folder sharing | Guest account | Enabled |
| Site sharing | Guest account | Enabled |
| Team sharing | Guest account | Enabled |
| Shared channel in Teams | Existing Microsoft 365 external account | Disabled |
| External chat and meetings | Existing Microsoft 365 external account | Enabled |
| Anonymous meeting join | None | Enabled |
| Unauthenticated file and folder sharing | None | Enabled |
People outside your organization do not have access unless a user in your organization initiates one of these activities. You can disable any of these settings if you don't want to allow that activity in your organization.
Governance and management
As with any account in Microsoft Entra ID, you need to review and manage them regularly. Set up procedures to validate all users accounts, especially guest users, regularly. If an account does not need a capability, then remove it. If a user, guest or member, no longer needs a license or access then remove it.
Tools to manage Microsoft 365 guest users:
- Microsoft 365 admin center:
https://admin.microsoft.com - Microsoft Entra admin center:
https://entra.microsoft.com - Microsoft Entra ID within the Azure portal
- By script in Microsoft Graph, PowerShell, or CLI
- Within most of the Microsoft 365 workloads
Exercise - explore dynamic groups
The goal of this exercise is to create a dynamic group with all users as members.
- Sign in to the Microsoft Entra admin center with an account that is assigned the User administrator role in the tenant.
- Select Identity.
- Under Groups, select All Groups, and then select New group.
- On the New Group page, under Group type, select Security.
- In the Group name box, enter All company users dynamic group.
- Select the Membership type menu and then select Dynamic User.
- Under Dynamic user members, select Add dynamic query.
- On the right above the Rule syntax box, select Edit.
- In the Edit rule syntax pane, enter the following expression in the Rule syntax box: user.objectId -ne null
- Select OK. The rule appears in the Rule syntax box.

- Select Save. The new dynamic group will now include B2B guest users as well as member users.
- On the New group page, select Create to create the group.
Implement and manage Microsoft Entra Verified ID
What is Entra Verified ID?
Purpose: Provides a secure, decentralized way to issue and verify digital credentials.
-
For issuers: Organizations can create and issue verifiable credentials (like diplomas, licenses, ID cards).
-
For verifiers: Apps and services can request and validate credentials via a free REST API.
-
How it works:
-
Credentials are data objects with claims about a user.
-
Each claim is signed by the issuer using a digital identity (DID), ensuring authenticity.
-
-
Goal: Enable trusted online identity verification while protecting privacy, similar to how passports or driver’s licenses work in real life.
In short: Verified ID lets organizations issue and verify digital credentials securely, giving users control over their identity.
Deploying the Microsoft Entra Verified ID service
To deploy Microsoft Entra Verified ID, you will need:
- An Azure tenant with a subscription
- A Microsoft Entra ID premium license
- Logged in as the global administrator
- A configured Azure Key Vault instance
To set up Microsoft Entra Verified ID, follow these steps:
In the Azure portal, search for verifiable credentials. Then, select Verifiable Credentials (Preview).
From the left menu, select Getting started.
Set up your organization by providing the following information:
Setting Description of value to enter Organization name Enter a name to reference your business within Verifiable Credentials. Your customers don't see this name. Domain Enter a domain that's added to a service endpoint in your decentralized identity (DID) document. The domain is what binds your DID to something tangible that the user might know about your business. Microsoft Authenticator and other digital wallets use this information to validate that your DID is linked to your domain. If the wallet can verify the DID, it displays a verified symbol. If the wallet can't verify the DID, it informs the user that the credential was issued by an organization it couldn't validate. Key vault Enter the name of the key vault you have in your tenant. Select Save and create credential.
Note that these are just the general steps needed to deploy the Microsoft Entra Verified ID service. Follow the article list above for more details.
Configure identity providers
when a guest user is authenticated with SAML/WS-Fed IdP federation:
-
After you set up federation with a partner’s SAML/WS-Fed IdP, new guest users you invite will authenticate with that IdP.
-
Existing guest users (who already accepted an invitation before federation was set up) keep using their original authentication method.
Key scenarios:
-
Federation set up after users joined → Existing guests continue with their old authentication.
-
Partner later moves to Microsoft Entra ID → Existing guests still use the federated IdP as long as the federation policy exists.
-
Federation deleted → Guests who were using the SAML/WS-Fed IdP can’t sign in anymore.
👉 If you need to switch an existing guest to the new federation method, you must reset their redemption status.
End-user experience
Sign-in: Guest users use their own organizational account (not a separate Microsoft Entra account).
-
Redirection: When accessing resources, they are redirected to their organization’s IdP to sign in.
-
Return: After successful sign-in, they’re sent back to Microsoft Entra ID to access the shared resource.
Session behavior
-
If the Microsoft Entra session expires:
-
If the IdP session is still valid (SSO enabled) → user is signed in automatically (no prompt).
-
If the IdP session expired → user is redirected back to their IdP to sign in again.
-
👉 In short:
Guests always log in through their own company’s IdP, and SSO ensures fewer sign-ins if their session is still valid.
Security Assertion Markup Language 2.0 configuration
Microsoft Entra B2B can be configured to federate with identity providers that use the SAML protocol with specific requirements listed below.
Note
The target domain for direct federation must not be DNS-verified on Microsoft Entra ID.
Required Security Assertion Markup Language 2.0 attributes and claims
The following tables show requirements for specific attributes and claims that must be configured at the third-party identity provider. To set up direct federation, the following attributes must be received in the SAML 2.0 response from the identity provider. These attributes can be configured by linking to the online security token service XML file or by entering them manually.
Required attributes for the SAML 2.0 response from the IdP:
| Attribute | Value |
|---|---|
| AssertionConsumerService | https://login.microsoftonline.com/login.srf |
| Audience | urn:federation:MicrosoftOnline |
| Issuer | The issuer URI of the partner IdP, for example https://www.example.com/exk10l6w90DHM0yi... |
Required claims for the SAML 2.0 token issued by the IdP:
| Attribute | Value |
|---|---|
| NameID Format | urn:oasis:names:tc:SAML:2.0:nameid-format:persistent |
| emailaddress | https://schemas.xmlsoap.org/ws/2005/05/identity/claims/emailaddress |
WS-Federation configuration
WS-Fed federation in Microsoft Entra B2B
-
Microsoft Entra B2B supports federation with WS-Fed identity providers (with specific requirements).
-
Tested WS-Fed providers that work with Microsoft Entra ID:
-
AD FS
-
Shibboleth
-
Key requirements
-
Target domain (the partner org’s domain you want to federate with) must not already be DNS-verified in Microsoft Entra ID.
-
If it’s verified, you can’t use it for federation.
-
-
The authentication URL domain must match either:
-
The target domain (e.g.,
contoso.com) -
Or the domain of a supported IdP (e.g.,
adfs.contoso.com).
-
👉 In short:
You can federate Microsoft Entra B2B with WS-Fed IdPs like AD FS or Shibboleth, but only if the target domain isn’t already claimed in Entra ID, and the auth URL domain matches the target or IdP domain.
Required WS-Federation attributes and claims
When configuring WS-Fed federation in Microsoft Entra B2B, the third-party IdP (like AD FS or Shibboleth) must send certain attributes/claims in the WS-Fed token.
These claims can be configured at the IdP either:
-
By importing the federation metadata XML (security token service file).
-
Or by manually mapping the claims in the IdP settings.
-
-
The values must align with what Microsoft Entra ID expects.
-
Missing or incorrect claims → guest authentication will fail.
👉 In short: For WS-Fed federation to work, the IdP must send NameID, Email, Display Name, Given Name, and Surname in the WS-Fed token.
Required attributes in the WS-Fed message from the IdP:
| Attribute | Value |
|---|---|
| PassiveRequestorEndpoint | https://login.microsoftonline.com/login.srf |
| Audience | urn:federation:MicrosoftOnline |
| Issuer | The issuer URI of the partner IdP, for example https://www.example.com/exk10l6w90DHM0yi... |
Required claims for the WS-Fed token issued by the IdP:
| Attribute | Value |
|---|---|
| ImmutableID | https://schemas.microsoft.com/LiveID/Federation/2008/05/ImmutableID |
| emailaddress | https://schemas.xmlsoap.org/ws/2005/05/identity/claims/emailaddress |
Add Google as an identity provider for B2B guest users
By setting up federation with Google, you can allow invited users to sign in to your shared apps and resources with their own Gmail accounts, without having to create Microsoft accounts.
Note
Google federation is designed specifically for Gmail users. To federate with G Suite domains, use direct federation.
What is the experience for the Google user?
When you send an invitation to Google Gmail users, the guest users should access your shared apps or resources by using a link that includes the tenant context. Their experience varies depending on whether they're already signed in to Google:
- Guest users who aren't signed in to Google will be prompted to do so.
- Guest users who are already signed in to Google will be prompted to choose the account they want to use. They must choose the account you used to invite them.
Guest users who see a header too long error can clear their cookies or open a private or incognito window and try to sign in again.

Deprecation of WebView sign-in support
Google is deprecating embedded web-view sign-in support (Starting September 30, 2021). If your apps authenticate users with an embedded web-view and you're using Google federation with Microsoft Entra B2C or Microsoft Entra B2B for external user invitations or self-service sign-up, Google Gmail users won't be able to authenticate.
The following are known scenarios that will affect Gmail users:
- Microsoft apps (e.g. Teams and Power Apps) on Windows.
- Windows apps that use the WebView control, WebView2, or the older WebBrowser control, for authentication. These apps should migrate to using the Web Account Manager (WAM) flow.
- Android applications using the WebView UI element.
- iOS applications using UIWebView/WKWebview.
- Apps using Microsoft Authentication Library.
This change doesn't affect:
- Web apps
- Microsoft 365 services that are accessed through a website (for example, SharePoint Online, Office web apps, and Teams web app)
- Mobile apps using system web-views for authentication (SFSafariViewController on iOS, Custom Tabs on Android).
- Google Workspace identities, for example when you’re using SAML-based federation with Google Workspace.
- Windows apps that use the Web Account Manager (WAM) or Web Authentication Broker (WAB).
Sign-in endpoints
Teams fully supports Google guest users on all devices. Google users can sign in to Teams from a common endpoint like https://teams.microsoft.com.
Other applications' common endpoints might not support Google users. Google guest users must sign in by using a link that includes your tenant information. Following are examples:
https://myapps.microsoft.com/?tenantid= your tenant IDhttps://portal.azure.com/ your tenant IDhttps://myapps.microsoft.com/ your verified domain .onmicrosoft.com
If Google guest users try to use a link like https://myapps.microsoft.com or https://portal.azure.com, they'll get an error.
You can also give Google guest users a direct link to an application or resource, as long as the link includes your tenant information. For example, https://myapps.microsoft.com/signin/Twitter/ application ID?tenantId= your tenant ID
Step 1: Configure a Google developer project
First, create a new project in the Google Developers Console to obtain a client ID and a client secret that you can later add to Microsoft Entra ID.
- Go to the Google APIs at https://console.developers.google.com, and sign in with your Google account. We recommend that you use a shared team Google account.
- Accept the terms of service if you're prompted to do so.
- Create a new project: On the dashboard, select Create Project, give the project a name (for example, Microsoft Entra B2B), and then select Create:
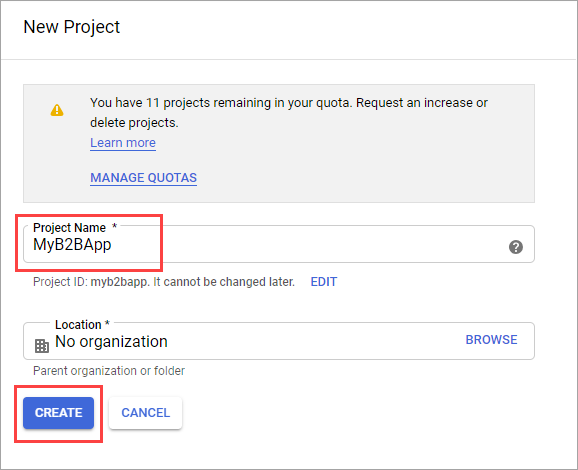
4. On the APIs and Services page, select View under your new project. 5. Select Go to APIs overview on the APIs card. Select OAuth consent screen. 6. Select External, and then select Create. 7. On the OAuth consent screen, enter an Application name:
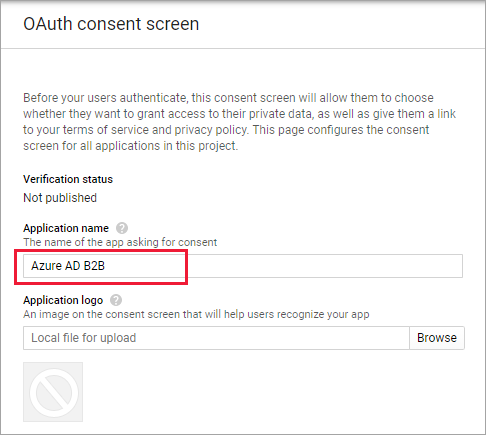
8. Scroll to the Authorized domains section and enter microsoftonline.com:

9. Select Save. 10. Select Credentials. On the Create credentials menu, select OAuth client ID:
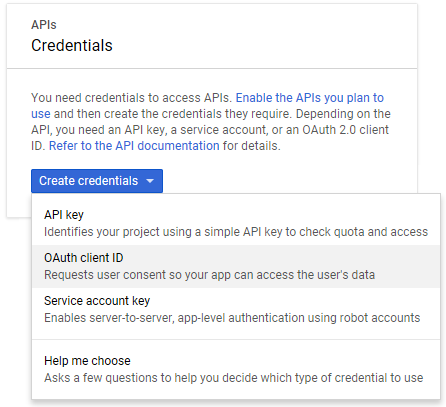
11. Under Application type, select Web application. Give the application a suitable name, like Microsoft Entra B2B. Under Authorized redirect URIs, enter the following URIs:
https://login.microsoftonline.comhttps://login.microsoftonline.com/te/ tenant ID /oauth2/authresp(where tenant ID is your tenant ID in Azure)
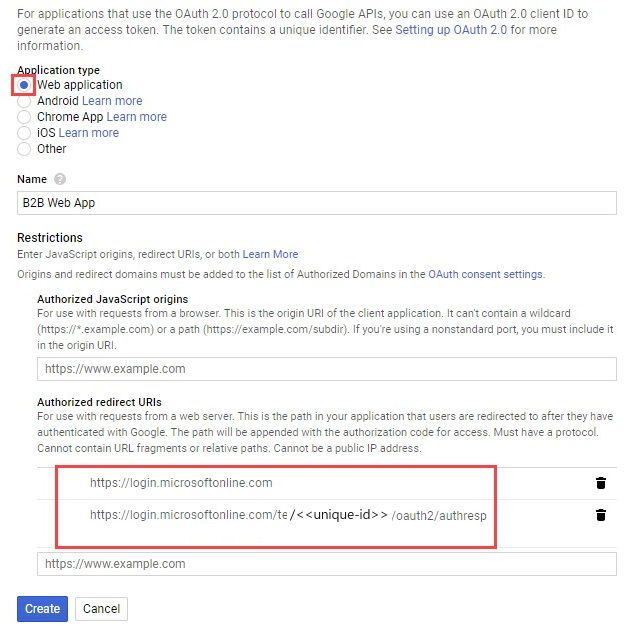
12. Select Create. Copy the client ID and client secret. You'll use them when you add the identity provider in the Azure portal.

Step 2: Configure Google federation in Microsoft Entra ID
You'll now set the Google client ID and client secret. You can use the Azure portal or PowerShell to do so. Be sure to test your Google federation configuration by inviting yourself. Use a Gmail address and try to redeem the invitation with your invited Google account.
To configure Google federation in the Azure portal
- Go to the Azure portal. On the left pane, select Microsoft Entra ID.
- Select External Identities.
- Select All identity providers, and then select the Google button.
- Enter the client ID and client secret you obtained earlier. Select Save:
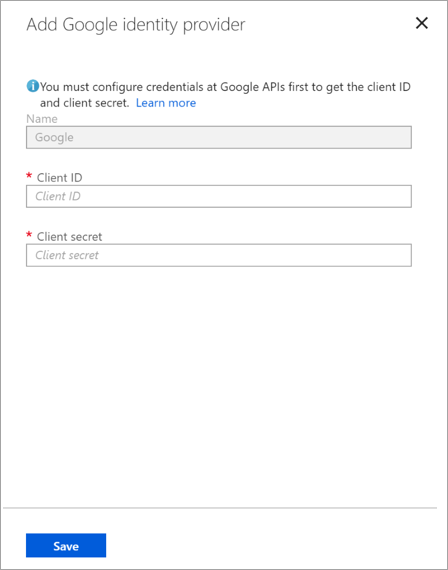
How do I remove Google federation?
You can delete your Google federation setup. If you do so, Google guest users who have already redeemed their invitation won't be able to sign in. But you can give them access to your resources again by deleting them from the directory and reinviting them.
To delete Google federation in Microsoft Entra ID
- Go to the Azure portal. On the left pane, select Microsoft Entra ID.
- Select External Identities.
- Select All identity providers.
- On the Google line, select the ellipsis button (...) and then select Delete.

5. Select Yes to confirm the deletion.
Add Facebook as an identity provider for external identities
You can add Facebook to your self-service-sign-up user flows (Preview) so that users can sign in to your applications using their own Facebook accounts. Allow users to sign in using Facebook, you'll need to enable self-service sign-up for your tenant. After you add Facebook as an identity provider, set up a user flow for the application and select Facebook as one of the sign-in options.
Note
Users can only use their Facebook accounts to sign up through apps using self-service-sign-up and user flows. Users cannot be invited and redeem their invitation using a Facebook account.
Create an app in the Facebook developers console
To use a Facebook account as an identity provider, you need to create an application in the Facebook developers console. If you don't already have a Facebook account, you can sign up at https://www.facebook.com/.
Note
Use the following URLs in the steps 9 and 16 below.
- For Site URL enter the address of your application, such as
https://contoso.com. - For Valid OAuth redirect URIs, enter
https://login.microsoftonline.com/te/ tenant-id /oauth2/authresp. You can find yourtenant-IDin the Microsoft Entra ID Overview screen.
- Sign in to Facebook for developers with your Facebook account credentials.
- If you haven't already done so, you need to register as a Facebook developer. Select Get Started on the upper-right corner of the page, accept Facebook's policies, and complete the registration steps.
- Select My Apps and then Create App.
- Enter a Display Name and a valid Contact Email.
- Select Create App ID. You have to accept Facebook platform policies and complete an online security check.
- Select Settings then select Basic.
- Choose a Category, for example Business and Pages. This value is required by Facebook, but not used for Microsoft Entra ID.
- At the bottom of the page, select Add Platform, and then select Website.
- In Site URL, enter the appropriate URL (noted above).
- In Privacy Policy URL, enter the URL for the page where you maintain privacy information for your application, for example
https://www.contoso.com. - Select Save Changes.
- At the top of the page, copy the value of App ID.
- Select Show and copy the value of App Secret. You use both of them to configure Facebook as an identity provider in your tenant. App Secret is an essential security credential.
- Select the plus sign next to PRODUCTS, and then select Set up under Facebook Login.
- Under Facebook Login, select Settings.
- In Valid OAuth redirect URIs, enter the appropriate URL (noted above).
- Select Save Changes at the bottom of the page.
- To make your Facebook application available to Microsoft Entra ID, select the Status selector at the top right of the page and turn it On to make the Application public, and then select Switch Mode. At this point, the Status should change from Development to Live.
Configure a Facebook account as an identity provider
Now you'll set the Facebook client ID and client secret, either by entering it in Microsoft Entra admin center or by using PowerShell. You can test your Facebook configuration by signing up via a user flow on an app enabled for self-service sign-up.
To configure Facebook federation in the Microsoft Entra ID screen
- Sign in to the Azure portal as the global administrator of your Microsoft Entra tenant.
- Under Azure services, select Microsoft Entra ID.
- In the left menu, select External Identities.
- Select All identity providers, then select Facebook.
- For the Client ID, enter the App ID of the Facebook application that you created earlier.
- For the Client secret, enter the App Secret that you recorded.

7. Select Save.
How do I remove Facebook federation?
You can delete your Facebook federation setup. If you do so, any users who have signed up through user flows with their Facebook accounts will no longer be able to sign in.
To delete Facebook federation in Microsoft Entra ID:
- Go to the Azure portal. In the left pane, select Microsoft Entra ID.
- Select External Identities.
- Select All identity providers.
- On the Facebook line, select the context menu (...) and then select Delete.
- Select Yes to confirm deletion.
Implement cross-tenant access controls
Cross-tenant access settings
These settings let your Microsoft Entra organization control collaboration with other Microsoft Entra organizations or Microsoft clouds.
-
Inbound access → Controls how external users (from other tenants) can collaborate in your organization.
-
Outbound access → Controls how your users can collaborate in other tenants.
Why useful?
-
Gives granular control over external collaboration.
-
Helps define trust levels, MFA/conditional access requirements, and which resources can be shared.
-
Ensures secure B2B collaboration without giving full tenant-level trust.
👉 In short:
Cross-tenant access settings = rules for inbound and outbound collaboration between your Entra tenant and other Entra tenants/clouds.
Manage inbound and outbound settings
By default, B2B collaboration with other Microsoft Entra organizations is enabled, and B2B direct connect is blocked. But the following comprehensive admin settings let you manage both of these features.
| Cross-tenant access setting name | Operations managed |
|---|---|
| Outbound access settings | Control whether users can access resources in an external organization. You can apply settings to everyone, or specify individual users, groups, and applications. |
| Inbound access settings | Control whether users from external Microsoft Entra organizations can access resources in your organization. You can apply these settings to everyone, or specify individual users, groups, and applications. |
| Trust settings (inbound) | Determine whether your Conditional Access policies will trust the multifactor authentication (MFA). You can also require compliant device, and hybrid Microsoft Entra joined device. And finally, allow or restrict user from an external organization if their users have already satisfied these requirements in their home tenants. |
| B2b direct connect | Set up a mutual trust relationship with another Microsoft Entra organization for seamless collaboration. This feature currently works with Microsoft Teams shared channels. |
Organizational specific configuration
Above you explored the default settings. These settings are applied to all external connections. However, you can configure specific collaboration settings on a per organization basis as well. In the cross-tenant access control screen choose Organizational settings then add the tenant. Once added you can configure the inbound and outbound settings.
Microsoft Cloud-specific configuration
What if your company has government contracts that need to connect to Microsoft Azure Government or Microsoft Azure China. Use the Microsoft cloud settings to connect to and configure the collaboration settings.
B2B Direct Connect
What is B2B Direct Connect?
-
A mutual trust relationship between two Microsoft Entra organizations.
-
Both sides must enable it in their cross-tenant access settings.
-
Once trust is set, users can access the other tenant’s resources using their own home credentials (SSO).
How it works today
-
Currently supported in Microsoft Teams shared channels.
-
A user in Org A can create a shared channel and invite a user from Org B.
-
The invited user can access that channel directly in their own Teams app, without switching tenants or re-signing in.
👉 In short:
B2B Direct Connect = trusted, two-way connection → enables SSO collaboration across orgs (today mainly in Teams shared channels).
Module 4
Implement and manage hybrid identity
Introduction.
What it is: Hybrid identity combines on-premises Active Directory with cloud-based Microsoft Entra ID to give unified authentication and authorization for apps and data, no matter where they’re hosted.
Why it’s needed: Companies are moving from only on-premises apps to a mix of on-prem + cloud apps. On-prem AD alone isn’t enough; you need Entra ID for secure hybrid access.
Plan, design, and implement Microsoft Entra Connect
What is Microsoft Entra Connect?
-
A bridge between on-premises Active Directory (AD) and cloud-based Microsoft Entra ID.
-
Ensures consistent identity across on-prem and cloud.
-
Enables hybrid identity features like Password Hash Sync (PHS), Pass-through Authentication (PTA), and Single Sign-On (SSO).
Key Capabilities of Entra Connect
-
Synchronization
-
Creates and updates users, groups, and objects.
-
Keeps identity info in sync (including password hashes).
-
-
Password Hash Synchronization (PHS)
-
Syncs a hash of the user’s AD password to Entra ID.
-
Enables cloud authentication without needing extra infrastructure.
-
-
Pass-through Authentication (PTA)
-
Users sign in with the same password for on-prem and cloud.
-
Authentication request is validated by on-prem AD.
-
-
Federation Integration
-
Optionally integrates with AD FS (Active Directory Federation Services).
-
Adds advanced features like certificate renewal, multi-AD FS server setups, etc.
-
-
Health Monitoring
-
Microsoft Entra Connect Health provides monitoring and alerts.
-
Helps troubleshoot synchronization and authentication issues.
-
✅ Bottom line: Microsoft Entra Connect is the core tool for implementing hybrid identity by connecting on-prem AD with Microsoft Entra ID securely and consistently.
Why use Microsoft Entra Connect?
Single Identity (Productivity)
-
Users sign in once and use the same credentials for both on-premises apps and cloud services (like Microsoft 365).
-
Reduces password fatigue and improves the user experience.
-
-
Unified Access (Hybrid Support)
-
Ensures seamless access to cloud + on-premises resources.
-
No need to manage separate accounts in different environments.
-
-
Simplified Deployment
-
One tool to handle synchronization and sign-in methods (PHS, PTA, or Federation).
-
Easier for IT admins to configure and maintain.
-
-
Modern Replacement
-
Replaces older identity integration tools (like DirSync, Azure AD Sync).
-
More reliable and feature-rich.
-
-
Included in Subscription
-
Comes at no extra cost—already part of your Microsoft Entra ID subscription.
-
✅ Microsoft Entra Connect lets organizations bridge on-premises AD with Microsoft Entra ID, giving users one identity and IT teams a simpler, modern tool to manage hybrid identity.
Select an authentication method
Identity = New control plane → It’s the main layer protecting cloud resources.
-
Authentication = Foundation → Decides how users securely access apps and data.
-
Choosing the right method ensures both security and usability.
Factors to Consider When Choosing
-
Time → How quickly can it be deployed?
-
Existing Infrastructure → Do you already have AD FS or other federation tools?
-
Complexity → How easy/difficult is it to configure and maintain?
-
Cost → Any extra infrastructure, licenses, or management overhead?
Key Authentication Methods in Microsoft Entra Connect
-
Password Hash Synchronization (PHS)
-
Easiest and fastest to set up.
-
Syncs a hash of user passwords to Entra ID.
-
Good for most organizations.
-
-
Pass-through Authentication (PTA)
-
Users authenticate directly with on-prem AD.
-
No passwords stored in the cloud.
-
Slightly more setup than PHS but still simpler than federation.
-
-
Federation (with AD FS)
-
Users are redirected to an on-prem federation server for authentication.
-
Best for organizations with complex requirements (custom policies, smartcards, 3rd-party MFA, etc.).
-
Requires more infrastructure and higher cost.
-
✅The authentication method you choose depends on your organization’s security needs, infrastructure, and resources. Many start with PHS or PTA, while larger enterprises with special requirements may adopt federation.
Cloud authentication
When using Cloud Authentication, Microsoft Entra ID manages user sign-in.
-
With Seamless SSO, users don’t need to reenter credentials when accessing apps.
-
Two main options: Password Hash Synchronization (PHS) and Pass-through Authentication (PTA).
🔑 1. Password Hash Synchronization (PHS)
-
What it is: Syncs a hash of the on-premises password to Microsoft Entra.
-
Best for: Organizations that mostly need access to Microsoft 365, SaaS apps, and Entra-based resources.
✅ Strengths
-
Effort: Easiest, fastest, lowest cost → no extra infrastructure needed.
-
User Experience: Works best with Seamless SSO (fewer sign-in prompts).
-
Advanced Scenarios:
-
Works with Microsoft Entra Identity Protection (leaked credentials, risky logins).
-
Required for Entra Domain Services and some Windows Hello scenarios.
-
-
Business Continuity: High availability in Microsoft’s cloud; can add a standby Entra Connect server.
⚠️ Limitations
-
Account state changes (like disabling a user) aren’t immediately enforced in the cloud → require next sync cycle.
🔑 2. Pass-through Authentication (PTA)
-
What it is: Password validation happens on-premises via lightweight agents.
-
Best for: Organizations with stricter security needs (must enforce on-prem account states in real time).
✅ Strengths
-
Effort: Requires installing lightweight agents (recommended 3 for HA).
-
User Experience: Works seamlessly with SSO (no repeated prompts).
-
Advanced Scenarios:
-
Enforces on-prem policies instantly → disabled, locked-out, expired passwords, or time-based restrictions.
-
-
Business Continuity: Redundancy with multiple agents ensures reliability.
⚠️ Limitations
-
Needs reliable on-premises infrastructure + internet connectivity.
-
Agents can’t be deployed in a perimeter/DMZ network.
-
Failover to PHS is manual, not automatic.
✅Use PHS if you want simplicity + less infrastructure.
-
Use PTA if you need real-time enforcement of on-prem security policies.
-
Some organizations deploy PTA + PHS as backup.
Federated authentication
Microsoft Entra ID hands off authentication to an external trusted system (like AD FS).
-
Best for organizations with advanced/custom authentication requirements.
✅ Strengths
-
Advanced Scenarios Supported:
-
Smartcard or certificate-based login.
-
On-prem or 3rd-party MFA solutions.
-
Use of legacy identifiers like DOMAIN\username (sAMAccountName).
-
3rd-party authentication providers.
-
-
User Experience: Flexible → can configure SSO for internal devices, but can also enforce stricter sign-in flows when needed.
-
Reusability: Organizations can reuse existing federation infrastructure investments.
⚠️ Limitations
-
Effort & Cost:
-
Requires a federation farm (multiple servers, load balancers, perimeter + internal topology).
-
Higher infrastructure cost & complexity than PHS/PTA.
-
-
Management:
-
Outside Microsoft Entra’s control → organization must maintain and secure federation servers.
-
More complex to operate & troubleshoot.
-
📊 Business Continuity
-
Requires high-availability setup with multiple federation servers.
-
Must be designed to handle authentication load securely.
✅ In short:
-
PHS → Easy, low-maintenance, good default for most.
-
PTA → Real-time enforcement, still simpler than federation.
-
Federation → Only if you need advanced/custom scenarios or already have AD FS infra.
Recommendations
Always enable Password Hash Synchronization (PHS) no matter which authentication method you use.
PHS gives high availability since it runs in Microsoft’s cloud, so users can still sign in even if on-premises systems fail.
In case of cyber-attacks or outages, organizations with PHS recover quickly, while those without face long delays.
It also improves security with Identity Protection, which checks for leaked or stolen passwords.
Microsoft Entra Connect design concepts
This section describes areas that must be thought through during the implementation design of Microsoft Entra Connect. It's a deep dive on certain areas and these concepts are briefly described in other documents as well.
sourceAnchor
sourceAnchoris a unique, immutable identifier for a user object.-
Once assigned, it cannot be changed during the object’s lifetime.
-
It ensures that the same user in on-premises Active Directory and Microsoft Entra ID (Azure AD) is recognized as the same identity.
Why it’s important
-
Links on-premises users with their cloud counterparts.
-
Prevents creating duplicate users during synchronization.
-
Supports identity federation scenarios.
Common Use Cases
-
New or Rebuilt Sync Server
-
If your synchronization server is rebuilt (e.g., disaster recovery),
sourceAnchorensures that users in Entra ID are correctly matched with on-premises users.
-
-
Moving from Cloud-Only to Synchronized Identity
-
When switching from cloud-only accounts to a hybrid model,
sourceAnchor“hard matches” existing cloud users to their corresponding on-premises users.
-
-
Federation Scenarios
-
In federated setups,
sourceAnchorcombined withuserPrincipalName (UPN)is used in authentication claims to uniquely identify a user.
-
✅ Key Point:
-
sourceAnchor=immutableId→ same concept, just two names. -
Immutable, unique, and essential for hybrid identity management
The attribute value must follow the following rules:
- Fewer than 60 characters in length
- Characters not being a-z, A-Z, or 0-9 are encoded and counted as three characters
- Not contain a special character: \ ! # $ % & * + / = ? ^ { } | ~ > < ( ) ' ; : , [ ] " @ _
- Must be globally unique
- Must be either a string, integer, or binary
- Shouldn't be based on user's name because names can change
- Shouldn't be case-sensitive and avoid values that vary by case
- Should be assigned when the object is created
Microsoft Entra ID uses the
userPrincipalName (UPN)to authenticate users.-
The UPN looks like an email address:
Microsoft Entra sign-in
1. How Sign-In Works
-
Microsoft Entra ID uses the
userPrincipalName (UPN)to authenticate users. -
The UPN looks like an email address:
2. Synchronization and Attribute Selection
When you synchronize your on-premises Active Directory (AD) with Microsoft Entra ID, you must decide which attribute from AD will provide the UPN value in Entra ID.
Important considerations:
-
UPN Syntax Must Be Valid
-
Follow RFC 822 format:
username@domain.com.
-
-
Domain Must Be Verified
-
The domain suffix (after
@) must match a verified custom domain in your Microsoft Entra tenant. -
Example: If your verified domain is
contoso.com, the UPN should beuser@contoso.com.
-
-
Default vs Custom Settings
-
Express Settings: Uses the default
userPrincipalNameattribute from AD. -
Custom Installation: Choose this if the default AD
userPrincipalNamedoes not match what you want users to use in Azure.
-
✅ Key Points
-
UPN is the main sign-in ID in Microsoft Entra.
-
Always ensure UPN values are valid and use a verified domain.
-
Use custom installation if you need a different sign-in name than the default AD UPN.
Custom domain state and User Principal Name
Users in on-premises AD have UPNs like:
-
When syncing to Microsoft Entra ID (Azure AD), the UPN suffix must match a verified domain in Entra ID.
-
Example: Your Entra directory has
contoso.onmicrosoft.comby default.-
If
contoso.comis not verified, John’s UPN would be automatically changed to:
-
-
Solution: Add and verify
contoso.comas a custom domain in Entra ID before syncing.
2. Non-Routable or Single-Label Domains
-
Some organizations use domains like
contoso.localor justcontoso. -
These cannot be verified in Entra ID.
-
Microsoft Entra Connect requires a verified routable domain to sync users with their intended UPN.
3. Default Domain Behavior
-
When you create a new Microsoft Entra directory:
-
A routable domain like
contoso.onmicrosoft.comis created automatically. -
If no other domains are verified, synced users’ UPNs are changed to this default domain.
-
4. Express vs Custom Settings
-
Express Settings:
-
Works for simple scenarios with routable and verified domains.
-
Will replace non-verified UPN suffixes with the default
onmicrosoft.comdomain.
-
-
Custom Settings:
-
Recommended if your environment has non-routable domains (
.local) or if you want to keep original UPNs. -
Allows you to select the attribute to be used as UPN for Azure sign-in after syncing.
-
✅ Key Takeaways
-
Always verify your routable domain in Microsoft Entra ID before syncing.
-
Non-routable domains cannot be verified; use custom settings for these cases.
-
Express settings are only safe if UPN suffixes match a verified domain.
-
Custom settings give you full control over which attribute becomes the UPN in Azure.
Topologies for Microsoft Entra Connect
This section describes various on-premises and Microsoft Entra ID topologies that use Microsoft Entra Connect sync as the key integration solution; it includes both supported and unsupported configurations.
| Common topology | Description |
|---|---|
| Single forest, single Microsoft Entra tenant | The most common topology is a single on-premises forest, with one or multiple domains, and a single Microsoft Entra tenant. For authentication, password hash synchronization is used. The express installation of Microsoft Entra Connect supports only this topology. |
| Multiple forests, single Microsoft Entra tenant | Many organizations have environments with multiple on-premises Active Directory forests. There are various reasons for having more than one on-premises Active Directory forest. Typical examples are designs with account-resource forests and the result of a merger or acquisition. When you have multiple forests, all forests must be reachable by a single Microsoft Entra Connect sync server. The server must be joined to a domain. If necessary to reach all forests, you can place the server in a perimeter network (also known as DMZ, demilitarized zone, and screened subnet). |
| Multiple forests, single sync server, users are represented in only one directory | In this environment, all on-premises forests are treated as separate entities. No user is present in any other forest. Each forest has its own Exchange organization, and there's no GALSync between the forests. This topology might be the situation after a merger/acquisition or in an organization where each business unit operates independently. These forests are in the same organization in Microsoft Entra ID and appear with a unified GAL. In the preceding picture, each object in every forest is represented once in the metaverse and aggregated in the target tenant. |
| Multiple forests: full mesh with optional GALSync | A full mesh topology allows users and resources to be located in any forest. Commonly, there are two-way trusts between the forests. If Exchange is present in more than one forest, there might be (optionally) an on-premises GALSync solution. Every user is then represented as a contact in all other forests. GALSync is commonly implemented through FIM 2010 or MIM 2016. Microsoft Entra Connect can't be used for on-premises GALSync. |
| Multiple forests: account-resource forest | In this scenario, one (or more) resource forest trusts all account forests. The resource forest typically has an extended Active Directory schema with Exchange and Teams. All Exchange and Teams services, along with other shared services, are located in this forest. Users have a disabled user account in this forest, and the mailbox is linked to the account forest. |
| Staging server | Microsoft Entra Connect supports installing a second server in staging mode. A server in this mode reads data from all connected directories but doesn't write anything to connected directories. It uses the normal synchronization cycle and therefore has an updated copy of the identity data. |
| Multiple Microsoft Entra tenants | There's a 1:1 relationship between a Microsoft Entra Connect sync server and a tenant. For each Microsoft Entra tenant, you need one Microsoft Entra Connect sync server installation. The AD tenant instances are isolated by design. That is, users in one tenant can't see users in the other tenant. Separation of users is a supported configuration. Otherwise, you should use the single Microsoft Entra tenant model. |
| Each object only once in a Microsoft Entra tenant | In this topology, one Microsoft Entra Connect sync server is connected to each tenant. The Microsoft Entra Connect sync servers must be configured for filtering so that each has a mutually exclusive set of objects to operate on. You can, for example, scope each server to a particular domain or organizational unit. |
High-Level Flow
-
Import → Objects are read from Active Directory (AD) or Microsoft Entra ID into staging areas.
-
Sync → Rules are applied to decide how objects map and flow inside the provisioning engine.
-
Export → Updates are written back to AD or Microsoft Entra ID.
Key Components
1. Connector Space (CS)
-
Each connected directory (e.g., AD forest or Microsoft Entra ID) has its own Connector Space.
-
Think of it as a temporary staging area where objects are first placed after being imported.
-
Nothing is finalized here—it’s just a holding zone before sync processing.
2. Metaverse (MV)
-
The central data store inside the provisioning engine.
-
Only one MV exists for the whole system.
-
Objects from Connector Spaces are either:
-
Projected → Created as a new object in the MV.
-
Joined → Linked to an existing MV object.
-
-
After rules are applied, MV objects can populate (export) to the other Connector Spaces.
3. Sync Rules
-
Define what gets synced and how.
-
Control:
-
Which objects flow (users, groups, contacts, etc.)
-
Whether an object is projected or joined into the MV.
-
Which attributes are copied, modified, or transformed.
-
4. Run Profiles
-
Pre-defined sets of steps that execute Import, Sync, and Export operations.
-
Automates the movement of objects/attributes between Connector Spaces and the MV.
-
Example:
-
Delta Import (import only changes since last run)
-
Full Sync (process all objects and rules)
-
Export (write changes to destination directory)
-
Analogy for Easy Understanding
-
Connector Space (CS): Like a warehouse dock—objects arrive here first.
-
Metaverse (MV): Like the central warehouse—where everything is organized.
-
Sync Rules: Like instructions for sorting—decide what goes where and how.
-
Run Profiles: Like a delivery schedule—define when and how items move.
✅ Key Point:
Microsoft Entra Connect acts as a traffic controller between your AD and Microsoft Entra ID. Connector Spaces hold data temporarily, the Metaverse is the central hub, rules govern movement, and run profiles automate execution.
Microsoft Entra cloud sync
A lightweight alternative to Microsoft Entra Connect sync, using a cloud provisioning agent instead of the full Connect app.
-
Purpose: Sync users, groups, and contacts from on-prem AD to Microsoft Entra ID.
-
Key Benefits:
-
Works with multi-forest disconnected ADs (e.g., mergers & acquisitions).
-
Lightweight agent = easy install, config managed in the cloud.
-
High availability via multiple agents.
-
Supports large groups (up to 50k members).
-
-
How it works:
-
Agent runs on-premises (or IaaS).
-
Cloud service orchestrates the sync.
-
Sync runs every 2 minutes.
-
👉 In short: Cloud Sync = lightweight, cloud-managed, multi-forest capable, high-availability synchronization from AD to Entra ID.
Implement manage password hash synchronization (PHS)
1. Purpose
-
PHS lets users use the same password for both on-premises Active Directory (AD) and Microsoft Entra ID (Azure AD).
-
It’s one of the hybrid identity sign-in methods (others include Pass-through Authentication and Federation).
2. How it Works
-
User password in AD:
-
Stored as a password hash (never in plain text).
-
-
Entra Connect process:
-
Entra Connect takes the AD password hash.
-
It applies an extra hashing process (so it becomes a hash of the hash).
-
This re-hashed password is sent securely to Microsoft Entra ID.
-
-
In Microsoft Entra ID:
-
The hash-of-hash is stored.
-
When the user signs in to the cloud:
-
They enter their password.
-
Entra ID hashes it the same way.
-
If it matches the stored hash-of-hash, the sign-in succeeds.
-
-
3. Key Security Points
-
The actual password or even the original AD hash is never sent to the cloud.
-
Only a re-hashed, non-reversible version is stored in Microsoft Entra ID.
-
Synchronization happens every 2 minutes (by default).
✅ In Short
Password Hash Sync =
-
Syncs a double-hashed version of AD passwords to Entra ID.
-
Ensures same password works on-prem and in cloud.
-
Secure (no plain text, no original hashes exposed).
Enable password hash synchronization
When you install Microsoft Entra Connect by using the Express Settings option, password hash synchronization is automatically enabled. If you use custom settings when you install Microsoft Entra Connect, password hash synchronization is available on the user sign-in page.

Password hash synchronization and Federal Information Processing standard
If your server is locked down according to Federal Information Processing Standard (FIPS), then MD5 is disabled.
To enable MD5 for password hash synchronization, perform the following steps:
- Go to
%programfiles%\Azure A D Sync\Bin. - Open miiserver.exe.config.
- Go to the configuration/runtime node at the end of the file.
- Add the following node:
<enforceFIPSPolicy enabled="false"/> - Save your changes.
For reference, this snippet is what it should look like:
   <configuration>
      <runtime>
        <enforceFIPSPolicy enabled="false"/>
      </runtime>
   </configuration>
Using PingFederate
Configure PingFederate with Microsoft Entra Connect to set up federation with the domain you want connected. The following prerequisites are required:
- PingFederate 8.4 or later.
- An TLS/SSL certificate for the federation service name that you intend to use (for example, sts.contoso.com).
After you choose to set up federation by using PingFederate in AD Connect, you're asked to verify the domain you want to federate. Select the domain from the drop-down menu.

Configure PingFederate as the federation server for each federated Azure domain. Then select Export Settings to share this information with your PingFederate administrator. The federation server administrator updates the configuration and provides the PingFederate server URL and port number so that Microsoft Entra Connect can verify the metadata settings.
Implement manage pass-through authentication (PTA)
Microsoft Entra pass-through authentication allows your users to sign in to both on-premises and cloud-based applications by using the same passwords. Pass-through authentication signs users in by validating their passwords directly against on-premises Active Directory.
Enable the feature
Enable pass-through authentication through Microsoft Entra Connect.
If you're installing Microsoft Entra Connect for the first time, choose the custom installation path. At the User sign-in page, choose Pass-through authentication as the Sign On method. On successful completion, a pass-through authentication agent is installed on the same server as Microsoft Entra Connect. In addition, the pass-through authentication feature is enabled on your tenant.

If you have already installed Microsoft Entra Connect by using the express installation or the custom installation path, select the Change user sign-in task on Microsoft Entra Connect, and then select Next. Then select Pass-through authentication as the sign-in method. On successful completion, a pass-through authentication agent is installed on the same server as Microsoft Entra Connect and the feature is enabled on your tenant.

Important
Pass-through authentication is a tenant-level feature. Turning it on affects the sign-in for users across all the managed domains in your tenant. If you're switching from Active Directory Federation Services (AD FS) to Pass-through authentication, you should wait at least 12 hours before shutting down your AD FS infrastructure. This wait time is to ensure that users can keep signing in to Exchange ActiveSync during the transition.
Explore pass-through authentication and seamless single sign-on (SSO)
Pass-through Authentication (PTA)
-
Users’ passwords are validated directly against on-premises AD when they sign in to Microsoft Entra ID.
-
Passwords are not stored in the cloud.
-
Lightweight PTA agents handle the authentication requests.
Seamless Single Sign-On (SSO)
-
Automatically signs in users who are logged in to their corporate network (domain-joined machines).
-
No extra passwords needed for cloud apps.
-
Works with PHS or PTA, but not with ADFS.
Key benefits
- Great user experience
- Users are automatically signed into both on-premises and cloud-based applications.
- Users don't have to enter their passwords repeatedly.
- Easy to deploy & administer
- No additional components needed on-premises to make this work.
- Works with any method of cloud authentication - Password Hash Synchronization or Pass-through Authentication.
- Can be rolled out to some or all your users using Group Policy.
How does sign-in on a web browser with Seamless SSO work?
Step-by-Step Sign-in Flow (Web Browser with Seamless SSO)
-
User accesses application
-
Example: The user opens Outlook Web App (
https://outlook.office365.com/owa/) from a domain-joined corporate device inside the corporate network.
-
-
Redirect to Microsoft Entra sign-in page
-
If not already signed in, the user is redirected to the Microsoft Entra ID login page.
-
-
User enters username
-
The user types in their UPN (username@domain.com).
-
At this point, no password is entered yet.
-
-
Kerberos challenge initiated (401 Unauthorized)
-
Microsoft Entra ID, using JavaScript in the page, triggers a 401 Unauthorized response to the browser.
-
This is a signal asking the browser for a Kerberos ticket.
-
-
Browser requests Kerberos ticket from AD
-
The browser requests a Kerberos ticket for the
AZUREADSSOACCcomputer account from the on-premises Active Directory. -
This special computer account represents Microsoft Entra ID.
-
-
Active Directory issues Kerberos ticket
-
AD finds the
AZUREADSSOACCaccount and sends back a Kerberos ticket, encrypted with that account’s secret key.
-
-
Browser forwards ticket to Microsoft Entra ID
-
The browser passes the Kerberos ticket to Microsoft Entra ID as proof of the user’s identity.
-
-
Microsoft Entra ID validates the ticket
-
Microsoft Entra ID decrypts the Kerberos ticket using the previously shared key (the key of
AZUREADSSOACC). -
The ticket contains the identity of the signed-in user.
-
-
Authentication decision
-
If everything checks out, Microsoft Entra ID:
-
Issues a token for the application OR
-
Prompts for additional factors (like MFA), depending on policies.
-
-
-
User gains access
-
-
Once the token is issued, the user is signed in and can access the application without typing a password.
Key Points to Remember
-
Works only on domain-joined (corporate) devices inside the corporate network.
-
Uses Kerberos authentication in the background.
-
The
AZUREADSSOACCcomputer account acts as the “bridge” between Active Directory and Microsoft Entra ID. -
From the user’s perspective → they only type the username; password entry is skipped.
How does sign-in on a native client with Seamless SSO work?
Step-by-Step Native Client Sign-in Flow with Seamless SSO
-
User opens a native app
-
Example: Outlook client on a domain-joined corporate device inside the corporate network.
-
-
App retrieves username
-
If the user isn’t signed in yet, the app gets the username directly from the Windows sign-in session (so the user doesn’t need to type it).
-
-
Contact Microsoft Entra ID
-
The app sends the username to Microsoft Entra ID.
-
It also retrieves the tenant’s WS-Trust MEX endpoint (used only for Seamless SSO).
-
-
Check for Integrated Authentication
-
The app queries the MEX endpoint to see if the Integrated Authentication endpoint is available.
-
This endpoint is what allows Kerberos authentication.
-
-
Kerberos challenge
-
If the integrated endpoint is available, Microsoft Entra ID issues a Kerberos challenge.
-
-
Retrieve Kerberos ticket
-
The app requests a Kerberos ticket from Active Directory for the
AZUREADSSOACCaccount (just like in browser flow). -
If successful, the ticket is sent back to the app.
-
-
Send ticket to Microsoft Entra ID
-
The app forwards the Kerberos ticket to the Microsoft Entra Integrated Authentication endpoint
Implement and manage federation
Federation = A trust relationship between two identity systems (like your on-premises Active Directory and Microsoft Entra ID in the cloud).
-
It allows users from one system to authenticate (prove who they are) and authorize (get access) in another system without creating separate accounts.
🖥️ Federation with Microsoft Entra ID
-
You can connect your on-premises Active Directory (using AD FS or PingFederate) to Microsoft Entra ID.
-
This means:
-
Users log in to cloud services (like Microsoft 365) using their on-premises username & password.
-
Authentication happens on your local servers, not in Microsoft’s cloud.
-
⚙️ How it Works
-
User signs in to a Microsoft cloud service (e.g., Outlook 365, Teams).
-
Instead of checking the password in Entra ID, the request is sent to your AD FS server (on-premises).
-
AD FS validates the user (using your Active Directory).
-
If valid, AD FS issues a security token back to Entra ID.
-
Entra ID then allows the user to access the cloud resource.
🚀 Benefits
-
Single Password: Users keep using their on-premises AD password for both on-premises and cloud.
-
Seamless Sign-in: If they are on the corporate network, they often don’t need to type their password again (SSO).
-
Control: Authentication stays in your hands (on-premises), so you can enforce stricter policies (like smartcard, custom MFA, etc.).
🛠️ Deployment Options
-
New AD FS farm: Set up fresh AD FS servers.
-
Existing AD FS farm: If you already have AD FS, Entra Connect will just configure the trust with Entra ID.
✅ In short:
Federation lets your users sign in to Microsoft Entra cloud services with their existing on-premises AD credentials. Authentication happens locally (on-prem AD FS), giving you full control while still providing SSO convenience to users.Requirement to deploy federation with AD FS and Microsoft Entra Connect
Deploying to an AD FS farm, you need:
- Local administrator credentials on your federation servers.
- Local administrator credentials on any workgroup servers (not domain-joined) that you intend to deploy the Web Application Proxy role on.
- The machine that you run the wizard on to be able to connect to any other machines that you want to install AD FS or Web Application Proxy on by using Windows Remote Management.
Set up your federation using Microsoft Entra Connect to connect to an AD FS farm

Specify the AD FS servers
-
These are the main federation servers that handle authentication.
-
They must be joined to Active Directory (your on-premises domain).
-
You can:
-
Start with 1 server for testing/pilot.
-
Add more servers later if you need high availability (load balancing, backup).
-
👉 Think of AD FS servers as the “brains” of the federation—they check user credentials.
2. Specify the Web Application Proxy (WAP) servers
-
WAP servers sit in the perimeter network (DMZ), exposed to the internet (extranet).
-
They handle external sign-in requests (e.g., users logging in from home, mobile, or outside the company network).
-
They pass these requests to your internal AD FS servers.
-
Like AD FS, you can start with 1 server and add more later.
👉 Think of WAP servers as the “gatekeepers” that safely connect external users to your AD FS servers.
3. Specify the service account for AD FS
-
AD FS needs a service account to run and talk to Active Directory.
-
Two options:
-
Group Managed Service Account (gMSA) → recommended, because it handles password management automatically.
-
Domain User Account → requires you to manage its password manually.
-
👉 This account is like the “identity card” AD FS uses to authenticate users against AD.
4. Select the Microsoft Entra domain to federate
-
You now set up the trust relationship between AD FS and Microsoft Entra ID.
-
This means:
-
AD FS will issue security tokens (proof of authentication).
-
Microsoft Entra ID will trust these tokens.
-
-
At installation, you can federate only one domain.
-
Later, you can federate more domains by re-running Microsoft Entra Connect.
👉 This is the “handshake of trust” between your on-prem AD FS and Microsoft Entra ID.
In simple terms:
-
AD FS servers = Authentication brain.
-
WAP servers = Secure internet-facing entry points.
-
Service account = Identity card for AD FS to talk to AD.
-
Domain federation = The trust setup between AD FS and Microsoft Entra ID
When you use Microsoft Entra Connect, you don’t just set up federation once—you can also manage and maintain it later through the wizard.
Here’s what you can do with Entra Connect tools for federation:
🔧 Federation Management Tasks in Microsoft Entra Connect
1. Repair the trust
-
Federation depends on a trust relationship between AD FS and Microsoft Entra ID.
-
If something breaks (certificate issues, configuration mismatch, etc.), users may not be able to log in.
-
Entra Connect can check the health of this trust and repair it automatically.
👉 Think of it as a “fix button” for broken federation connections.
2. Federate with Microsoft Entra ID using Alternate Sign-in ID
-
Normally, users log in with their User Principal Name (UPN) (e.g., user@contoso.com).
-
But sometimes, your on-premises AD might use a non-routable domain like contoso.local, which won’t work in the cloud.
-
In that case, you can let users sign in with another attribute, like email (mail attribute).
-
Entra Connect automatically configures AD FS claim rules to make this work.
👉 Useful when your on-prem domain naming doesn’t match your cloud domain.
3. Add a federated domain
-
You can add more domains to federation later (e.g., contoso.com, fabrikam.com).
-
Entra Connect updates AD FS claim rules so that tokens are issued correctly for multiple domains.
👉 This is helpful for multi-domain or multi-company setups.
4. Add an AD FS Server
-
If you need more capacity or high availability, you can add extra AD FS servers to the farm.
-
Entra Connect helps register them properly in the federation setup.
👉 Think of this as scaling up the federation brain.
5. Add an AD FS Web Application Proxy (WAP) server
-
Similarly, you can add more WAP servers (internet-facing) for load balancing and redundancy.
-
Entra Connect will configure them to work with your existing AD FS farm.
👉 This is scaling up the federation gatekeepers.
✅ In short:
Microsoft Entra Connect is not just for initial setup—it’s your ongoing federation management tool.
It lets you:
-
Fix broken federation trust
-
Support alternate sign-in IDs
-
Add more domains
-
Add more AD FS servers or WAP servers
What is Device Writeback?
Device Writeback allows devices that are registered in Microsoft Entra ID (cloud) to be synchronized back into your on-premises Active Directory (AD).
-
This is mainly used for device-based Conditional Access with AD FS.
👉 In short: It makes your cloud-registered devices (like laptops, mobiles, etc.) appear inside your on-prem AD, so AD FS can recognize them as trusted devices.
🛡️ Why is this useful?
-
Without device writeback, AD FS only knows about users, not their devices.
-
With device writeback:
-
AD FS can check both the user and their device before granting access.
-
This allows conditional access rules like:
-
“Only allow access from domain-joined or compliant devices.”
-
“Block access from unknown or unmanaged devices.”
-
-
👉 Extra security assurance: users not only need the right password, but they must also use a trusted device.
⚙️ What happens during setup?
When you enable device writeback, Microsoft Entra Connect prepares your AD forest by:
-
Creating new containers & objects (if they don’t exist):
-
CN=Device Registration Configuration,CN=Services,CN=Configuration,[forest dn] -
CN=RegisteredDevices,[domain-dn](where actual device objects are stored).
-
-
Synchronizing device objects:
-
Devices registered in Entra ID are written back to this RegisteredDevices container.
-
-
Setting permissions:
-
The Microsoft Entra Connector account gets the rights it needs to create and manage device objects in AD.
-
🏗️ Example Scenario
-
A user signs into Office 365 from their laptop.
-
The laptop is registered in Microsoft Entra ID.
-
Device writeback pushes that laptop object into on-prem AD.
-
When the user tries to access a federated app via AD FS:
-
AD FS checks: Is this device in RegisteredDevices? Is it trusted?
-
If yes → Access granted.
-
If no → Access blocked (or require MFA, depending on policy).
-
✅Device Writeback is what makes cloud device registrations visible to your on-prem AD, enabling device-based conditional access with AD FS for stronger security.
Trouble-shoot synchronization errors
Synchronization errors happen when identity data (users, groups, devices) is being synchronized from on-premises Active Directory (AD DS) to Microsoft Entra ID (Azure AD) and something goes wrong.
-
Errors can occur during any stage of sync:
-
Import – Pulling data from on-prem AD into Entra Connect.
-
Synchronization – Matching and processing data between AD and Entra ID.
-
Export – Sending data from Entra Connect to Microsoft Entra ID.
-
-
Most issues are seen during Export, when the data actually goes to the cloud.
🛠️ Common Causes of Sync Errors
Some scenarios that can trigger errors include:
-
Duplicate objects – e.g., two users have the same UPN or email.
-
Invalid attribute values – e.g., wrong characters in email or username.
-
Permission issues – Entra Connect account lacks rights to update certain objects in AD.
-
Object conflicts – e.g., a user is deleted in AD but still exists in Entra ID.
-
Network or connectivity issues – temporary inability to reach Entra ID.
📊 How to Identify Errors
-
Microsoft Entra Connect Health in the Azure portal provides a Synchronization Errors report.
-
The report shows:
-
Which objects failed
-
Which operation (Import, Sync, Export) failed
-
Error messages and recommendations
-
🔧 How to Fix Errors
-
Read the error details in the report carefully.
-
Fix the root cause in AD:
-
Remove duplicates
-
Correct invalid attributes
-
Restore missing objects
-
-
Ensure Entra Connect account permissions are correct.
-
Force a delta sync after fixing issues:
-
Check the export logs for remaining issues and repeat if necessary.
✅ In short:
Synchronization errors are normal but usually fixable. Use Entra Connect Health to see errors, fix them in AD, and then resync. Most errors occur during export to Entra ID, so pay extra attention there.
Errors during export to Microsoft Entra ID
The following section describes different types of synchronization errors that can occur during the export operation to Microsoft Entra ID using the Microsoft Entra connector. This connector can be identified by the name format being contoso.onmicrosoft.com. Errors during export to Microsoft Entra ID indicate that the operation (add, update, delete etc.,) attempted by Microsoft Entra Connect (Sync Engine) on Microsoft Entra directory failed.
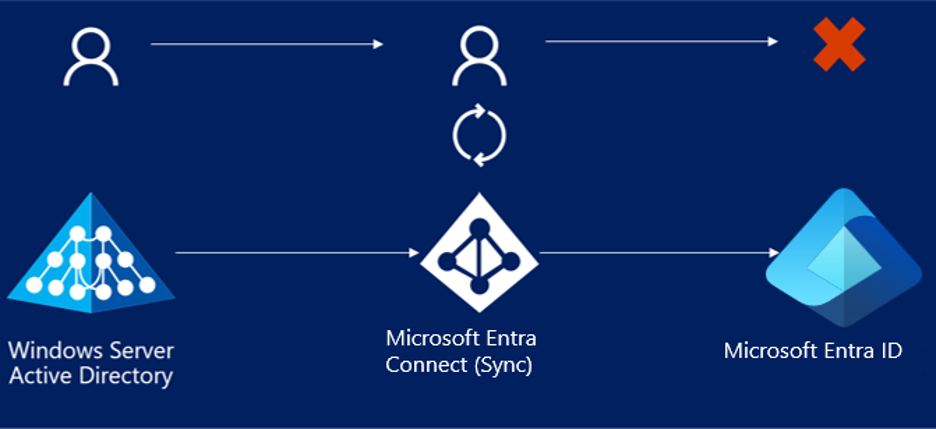
When Microsoft Entra Connect syncs objects from on-premises AD to Microsoft Entra ID, it tries to match objects in two ways:
-
Hard Match
-
Uses SourceAnchor (on-prem object ID) → matches immutableId in Entra ID.
-
If it finds a match → good! Sync continues.
-
-
Soft Match
-
If Hard Match fails, it tries ProxyAddresses or UserPrincipalName (UPN) to see if the object already exists in Entra ID.
-
If it finds a match without conflicting IDs → good! Sync continues.
-
❌ When does InvalidSoftMatch happen?
-
Hard Match fails (immutableId doesn’t exist).
-
Soft Match finds a match in Entra ID, but that object already has a different immutableId.
-
In other words: Entra ID sees two objects that look similar (same email/UPN) but come from different AD objects → cannot match them → sync fails.
⚠️ Common scenarios
-
Duplicate ProxyAddresses or UPN in on-prem AD
-
Example: Two users have the same email in AD. Only one gets synced.
-
-
User moved to another AD forest
-
New SourceAnchor is calculated → conflicts with existing Entra object.
-
-
User deleted in AD and re-created
-
New object has new SourceAnchor → conflicts with old Entra object.
-
-
Entra Connect reinstalled with a different SourceAnchor attribute
-
Existing objects stop syncing → InvalidSoftMatch errors.
-
📘 Example
-
Bob Smith exists in Entra ID with:
-
immutableId:
abcdefghijklmnopqrstuv== -
ProxyAddresses:
bob@contoso.com
-
-
Bob Taylor added in AD with:
-
immutableId:
abcdefghijkl0123456789== -
ProxyAddresses:
bob@contoso.com
-
What happens:
-
Hard Match fails → tries Soft Match.
-
Finds Bob Smith with the same ProxyAddress → but immutableId is different → InvalidSoftMatch error.
✅ How to fix InvalidSoftMatch
-
Identify conflicts
-
Use Entra Connect Health reports to see which objects are causing the error.
-
-
Decide which object keeps the value
-
Determine which user should keep the ProxyAddress or UPN.
-
-
Fix the duplicates in AD
-
Remove or change duplicate ProxyAddresses or UPNs from the object that shouldn’t have it.
-
Sometimes you may need to delete one object to resolve conflicts.
-
-
Let Entra Connect resync
-
After fixing duplicates, the next sync will succeed.
-
⚡ Key points
-
ImmutableId (SourceAnchor) should never change for a synced object.
-
InvalidSoftMatch usually happens because two different objects in AD appear to be the same in Entra ID.
-
Fixing duplicates in UPN or ProxyAddresses resolves most issues.
Object Type Mismatch
This error happens when two objects of different types (User, Group, Contact, etc.) in Microsoft Entra ID and on-prem AD have the same value for an attribute used in soft match, like ProxyAddresses or UPN.
-
Microsoft Entra ID does not allow duplicates, so the sync fails.
❌ Common scenario
-
A mail-enabled security group exists in Microsoft 365 with:
-
ProxyAddresses:
smtp: tax@contoso.com
-
-
A new user is created in on-prem AD with the same ProxyAddress:
-
ProxyAddresses:
smtp: tax@contoso.com
-
Result:
-
When Entra Connect syncs the new user, it sees a ProxyAddress conflict between a group and a user → ObjectTypeMismatch error.
⚡ How to fix ObjectTypeMismatch
-
Identify the conflict
-
Use Entra Connect Health reports to find which objects have duplicate ProxyAddresses or other attributes.
-
-
Decide which object keeps the value
-
Determine whether the user or group should retain the conflicting attribute.
-
-
Remove or update the duplicate
-
Edit or delete the attribute from the object that shouldn’t have it.
-
Make the change in the directory where the object originates (on-prem AD or directly in Entra ID).
-
-
Resync
-
Let Microsoft Entra Connect synchronize again.
-
Errors should clear within the next sync cycle (report updates every 30 minutes).
-
✅ Key points
-
ObjectTypeMismatch is caused by attribute duplication across different object types.
-
Most often involves ProxyAddresses or UPN.
-
Fixing the conflict in the source directory resolves the error.
Duplicate attributes
Attribute Value Must Be Unique
Description
Microsoft Entra schema doesn't allow two or more objects to have the same value of the following attributes. That is each object in Microsoft Entra ID is forced to have a unique value of these attributes at a given instance.
- ProxyAddresses
- UserPrincipalName
If Microsoft Entra Connect attempts to add a new object or update an existing object with a value for the above attributes that is already assigned to another object in Microsoft Entra ID, the operation results in the "AttributeValueMustBeUnique" sync error.
Possible scenarios:
Duplicate value is assigned to an already synced object, which conflicts with another synced object.
Example case:
- Bob Smith is a synced user in Microsoft Entra ID from on premises Active Directory of contoso.com
- Bob Smith's UserPrincipalName on premises is set as bobs@contoso.com.
- Bob also has following values for the proxyAddresses attribute:
- smtp: bobs@contoso.com
- smtp: bob.smith@contoso.com
- smtp: bob@contoso.com
- A new user, Bob Taylor, is added to the on premises Active Directory.
- Bob Taylor's UserPrincipalName is set as bobt@contoso.com.
- Bob Taylor has the following values for the ProxyAddresses attribute i. smtp: bobt@contoso.com ii. smtp: bob.taylor@contoso.com
- Bob Taylor's object is synchronized with Microsoft Entra ID successfully.
- Admin decided to update Bob Taylor's ProxyAddresses attribute with the following value: i. smtp: bob@contoso.com
- Microsoft Entra ID will attempt to update Bob Taylor's object in Microsoft Entra ID with the above value, but that operation will fail as that ProxyAddresses value is already assigned to Bob Smith, resulting in "AttributeValueMustBeUnique" error.
How to fix Attribute Value Must Be Unique error
The most common reason for the AttributeValueMustBeUnique error is two objects with different SourceAnchor (immutableId) have the same value for the ProxyAddresses and/or UserPrincipalName attributes. In order to fix AttributeValueMustBeUnique error
- Identify the duplicated proxyAddresses, userPrincipalName or other attribute value that's causing the error. Also identify which two (or more) objects are involved in the conflict. The report generated by Microsoft Entra Connect Health for sync can help you identify the two objects.
- Identify which object should continue to have the duplicated value and which object shouldn't.
- Remove the duplicated value from the object that shouldn't have that value. You should make the change in the directory where the object is sourced from. In some cases, you need to delete one of the objects in conflict.
- If you made the change in the on premises AD, let Microsoft Entra Connect sync the change for the error to get fixed.
Data validation failures
IdentityDataValidationFailed
Description
Microsoft Entra ID enforces various restrictions on the data itself before allowing that data to be written into the directory. These restrictions are to ensure that end users get the best possible experiences while using the applications that depend on this data.
Scenarios
The UserPrincipalName attribute value has invalid/unsupported characters. b. The UserPrincipalName attribute doesn't follow the required format.
How to fix Identity Data Validation Failed error
Ensure that the userPrincipalName attribute has supported characters and required format.
Federated Domain Change Error
Description
This case results in a "FederatedDomainChangeError" sync error when the suffix of a user's UserPrincipalName is changed from one federated domain to another federated domain.
Scenarios
For a synchronized user, the UserPrincipalName suffix was changed from one federated domain to another federated domain on premises. For example, UserPrincipalName = bob@contoso.com was changed to UserPrincipalName = bob@fabrikam.com.
Example
- Bob Smith, an account for Contoso.com, gets added as a new user in Active Directory with the UserPrincipalName bob@contoso.com
- Bob moves to a different division of Contoso.com called Fabrikam.com and their UserPrincipalName is changed to bob@fabrikam.com
- Both contoso.com and fabrikam.com domains are federated domains with Microsoft Entra ID.
- Bob's userPrincipalName doesn't get updated and results in a "FederatedDomainChangeError" sync error.
Large Object
Description
When an attribute exceeds the allowed size limit, length limit or count limit set by Microsoft Entra schema, the synchronization operation results in the LargeObject or ExceededAllowedLength sync error. Typically this error occurs for the following attributes
- userCertificate
- userSMIMECertificate
- thumbnailPhoto
- proxyAddresses
Possible scenarios
- Bob's userCertificate attribute is storing too many certificates assigned to Bob. These include older, expired certificates. The hard limit is 15 certificates.
- Bob's userSMIMECertificate attribute is storing too many certificates assigned to Bob. These include older, expired certificates. The hard limit is 15 certificates.
- Bob's thumbnailPhoto set in Active Directory is too large to be synced in Microsoft Entra ID.
- During automatic population of the ProxyAddresses attribute in Active Directory, an object has too many ProxyAddresses assigned.
How to fix
Ensure that the attribute causing the error is within the allowed limitation.
Admin role conflict
Description
An Existing Admin Role Conflict will occur on a user object during synchronization when that user object has:
- administrative permissions and
- the same UserPrincipalName as an existing Microsoft Entra object
Microsoft Entra Connect isn't allowed to soft-match a user object from on-premises AD with a user object in Microsoft Entra ID that has an administrative role assigned to it.
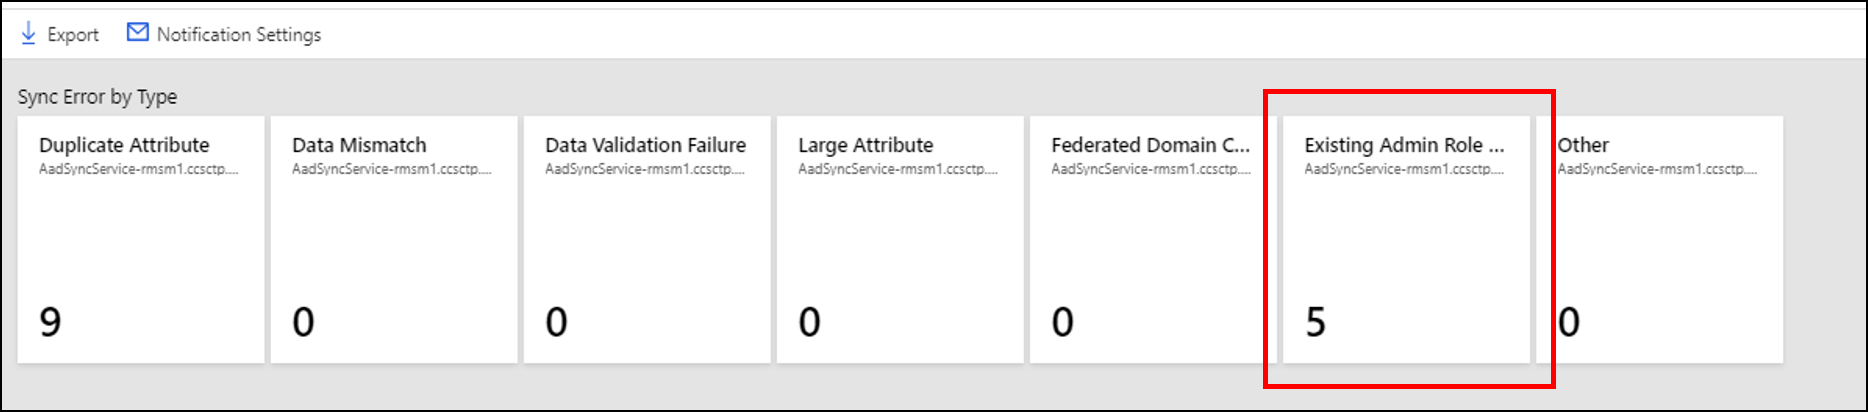
How to fix
To resolve this issue do the following:
- Remove the Microsoft Entra account (owner) from all admin roles.
- Hard Delete the Quarantined object in the cloud.
- The next sync cycle will take care of soft-matching the on-premises user to the cloud account (since the cloud user is now no longer a global GA).
- Restore the role memberships for the owner.
Note
You can assign the administrative role to the existing user object again after the soft-match between the on-premises user object and the Microsoft Entra user object has completed.
Implement Microsoft Entra Connect Health
What is Microsoft Entra Connect Health?
It’s a monitoring tool for your on-premises identity setup (Active Directory, AD FS, Entra Connect sync).
It helps you keep your hybrid identity environment healthy, secure, and running smoothly.
🔹 What it monitors
-
Active Directory Federation Services (AD FS)
-
Checks AD FS servers and Web Application Proxy (WAP).
-
Alerts if certificate is expiring, AD FS service down, or high failure rates.
-
-
Active Directory Domain Services (AD DS)
-
Monitors your Domain Controllers.
-
Alerts on replication issues, performance, or other AD problems.
-
-
Microsoft Entra Connect (Sync service)
-
Monitors synchronization from on-prem AD to Microsoft Entra ID.
-
Shows sync errors (like duplicate UPN, ObjectTypeMismatch, InvalidSoftMatch).
-
🔹 What you get in the portal
-
Alerts → Warnings about problems (expired certs, sync failures, service down).
-
Performance data → CPU, memory, sign-in load, replication.
-
Usage analytics → Sign-in counts, error rates, sync stats.
-
Error reports → Details of sync errors and how to fix them.
🔹 How to set it up
-
Download and install agents:
-
AD FS agent → on AD FS servers and WAP servers.
-
Sync agent → on the Entra Connect server.
-
AD DS agent → on domain controllers you want to monitor.
-
-
Sign in with an Entra admin account to register the agent.
-
Check the portal to see data coming in.
🔹 How it helps you
-
You can find and fix issues early (before users complain).
-
Sync problems (like conflicting accounts) are reported clearly.
-
AD FS sign-in issues are tracked (failed logins, token errors).
-
Gives one dashboard for everything (instead of checking each server manually).
✅ In short:
Microsoft Entra Connect Health = monitoring + alerts + troubleshooting for AD, AD FS, and Sync → all in one portal.
Microsoft Entra Connect Health agent installation
This section provides instructions for installing and configuring the Microsoft Entra Connect Health agents.
Requirements
Microsoft Entra ID Premium is installed.
You're a global administrator in Microsoft Entra ID.
The Microsoft Entra Connect Health agent is installed on each targeted server.
The Azure service endpoints have outbound connectivity.
Outbound connectivity is based on IP addresses.
TLS inspection for outbound traffic is filtered or disabled.
Firewall ports on the server are running the agent.
The agent requires the following firewall ports to be open so that it can communicate with the Microsoft Entra Connect Health service endpoints:
- TCP port 443
- TCP port 5671
The latest version of the agent doesn't require port 5671. Upgrade to the latest version so that only port 443 is required.
PowerShell version 4.0 or newer is installed.
FIPS (Federal Information Processing Standard) is disabled.
Install the agent
Download and install the Microsoft Entra Connect Health agent from the Download Center.
Install the agent for Active Directory Federation Service
Note
Your Active Directory Federation Server (AD FS) server should be different from your Sync server. Don't install the AD FS agent on your Sync server.
Before you install the agent, make sure your AD FS server host name is unique and isn't present in the AD FS service. To start the agent installation, double-click the .exe file that you downloaded. In the first window, select Install.
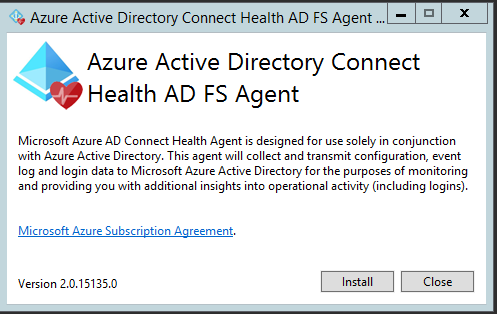
After the installation finishes, select Configure Now.
A PowerShell window opens to start the agent registration process. When you're prompted, sign in by using a Microsoft Entra ID account that has permissions to register the agent. By default, the global admin account has permissions.
After you sign in, PowerShell continues. When it finishes, you can close PowerShell. The configuration is complete.
At this point, the agent services should start automatically to allow the agent to securely upload the required data to the cloud service.
If you haven't met all of the prerequisites, warnings appear in the PowerShell window. Be sure to complete the requirements before you install the agent. The following screenshot shows an example of these warnings.
To verify that the agent was installed, look for the following services on the server. If you completed the configuration, they should already be running. Otherwise, they're stopped until the configuration is complete.
- Microsoft Entra Connect Health AD FS Diagnostics Service
- Microsoft Entra Connect Health AD FS Insights Service
- Microsoft Entra Connect Health AD FS Monitoring Service
Install the agent for Sync
The Microsoft Entra Connect Health agent for Sync is installed automatically in the latest version of Microsoft Entra Connect. To use Microsoft Entra Connect for Sync, download the latest version of Microsoft Entra Connect and install it.
To verify the agent has been installed, look for the following services on the server. If you completed the configuration, the services should already be running. Otherwise, the services are stopped until the configuration is complete.
- Microsoft Entra Connect Health Sync Insights Service
- Microsoft Entra Connect Health Sync Monitoring Service

Note
Remember that you must have Microsoft Entra ID Premium to use Microsoft Entra Connect Health. If you don't have Microsoft Entra ID Premium, you can't complete the configuration in the Azure portal.
Manage Microsoft Entra Health
Enable email notifications
You can configure the Microsoft Entra Connect Health service to send email notifications when alerts indicate that your identity infrastructure isn't healthy. This occurs when an alert is generated, and when it's resolved.
Note
Email notifications are enabled by default.
To enable Microsoft Entra Connect Health email notifications
- Open the Alerts dialog for the service for which you want to receive email notification.
- From the action bar, select Notification Settings.
- At the email notification switch, select ON.
- Select the check box if you want all global administrators to receive email notifications.
- If you want to receive email notifications at any other email addresses, specify them in the Additional Email Recipients box. To remove an email address from this list, select the entry and select Delete.
- To finalize the changes, select Save. Changes take effect only after you save.
Note
When there are issues processing synchronization requests in our back-end service, this service sends a notification email with the details of the error to the administrative contact email address(es) of your tenant. We heard feedback from customers that in certain cases the volume of these messages is prohibitively large so we're changing the way we send these messages.
Instead of sending a message for every sync error every time it occurs we'll send out a daily digest of all errors the back-end service has returned. This enables customers to process these errors in a more efficient manner and reduces the number of duplicate error messages.
Delete a server or service instance
Monitoring stops → No more alerts, performance data, or usage analytics will be collected from that server.
Health Agent is not uninstalled → The agent is still on the server, but it will throw errors because it’s no longer connected to the service.
Old data stays → Previously collected data is kept for some time (per Azure data retention policy).
To monitor again → You must uninstall and reinstall the Health Agent if you want to re-add that server.
Delete a server from the Microsoft Entra Connect Health service
Note
Microsoft Entra ID premium license is required for the deletion steps.
Microsoft Entra Connect Health for Active Directory Federation Services (AD FS) and Microsoft Entra Connect (Sync):
- Open the Server screen from the Server List dialog by selecting the server name to be removed.
- On the Server screen, from the action bar, select Delete.
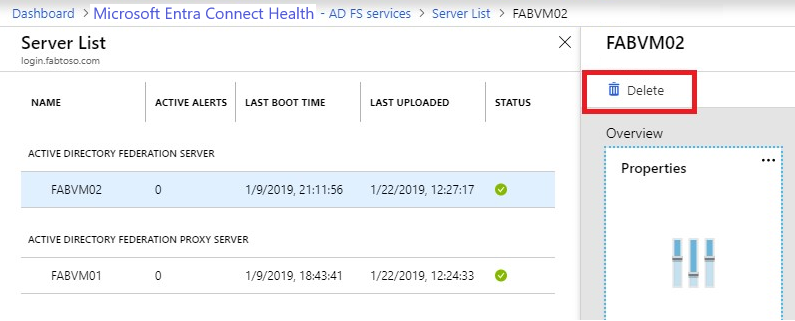
- Confirm by typing the server name in the confirmation box.
- Select Delete.
Microsoft Entra Connect Health for Microsoft Entra Domain Services:
- Open the Domain Controllers dashboard.
- Select the domain controller to be removed.
- From the action bar, select Delete Selected.
- Confirm the action to delete the server.
- Select Delete.
Delete a service instance from Microsoft Entra Connect Health service
Service is removed from monitoring → The entire service instance (like AD FS, Azure AD Connect, or AD DS) is no longer monitored in Connect Health.
-
Health Agent is not removed → The agent is still installed on servers. If not uninstalled, it may show errors.
-
Data is deleted → All monitoring data for that service instance is deleted according to Azure’s data retention policy.
-
To monitor again → You must uninstall, reinstall, and register the Health Agent on the servers if you want to start monitoring again.
🔹 Key Difference (compared to deleting a single server)
-
Delete server → Stops monitoring just that server.
-
Delete service instance → Stops monitoring the entire service (all related servers).
✅ In short:
Deleting a service instance removes the whole service from Connect Health monitoring, deletes all its data, keeps the Health Agents on servers (unless you manually uninstall them), and requires reinstall + re-register if you want to add it back later.
To delete a service instance from the Microsoft Entra Connect Health service
- Open the Service screen from the Service List dialog by selecting the service identifier (farm name) that you want to remove.
- On the Service screen, from the action bar, select Delete.
- Confirm by typing the service name in the confirmation box (for example: sts.contoso.com).
- Select Delete.
Manage access with Azure Role Based Access Control
Azure role-based access control (Azure RBAC) for Microsoft Entra Connect Health provides access to users and groups. Azure RBAC assigns roles to the intended users and groups, and provides a mechanism to share administrator duty within your directory. Always thing of the principle of least privilege when assigning access.
Roles
Microsoft Entra Connect Health supports the following built-in roles:
| Role | Permissions |
|---|---|
| Owner | Owners can manage access (for example, assign a role to a user or group), view all information (for example, view alerts) from the portal, and change settings (for example, email notifications) within Microsoft Entra Connect Health. By default, Microsoft Entra global administrators are assigned this role, and this can't be changed. |
| Contributor | Contributors can view all information (for example, view alerts) from the portal, and change settings (for example, email notifications) within Microsoft Entra Connect Health. |
| Reader | Readers can view all information (for example, view alerts) from the portal within Microsoft Entra Connect Health. |
All other roles (such as User Access Administrators or DevTest Labs Users) have no impact to access within Microsoft Entra Connect Health, even if the roles are available in the portal experience.
Access scope
All Service Instances (recommended)
-
Grants access to everything being monitored in Connect Health.
-
Example: If you give an admin access here, they can see all AD FS farms, Azure AD Connect servers, and AD DS services.
-
Best for: Global admins or central IT teams that need visibility across all identity services.
-
-
Specific Service Instance
-
Grants access only to a particular service instance (like a specific AD FS farm or Azure AD Connect server).
-
Useful when you want role-based segregation (e.g., one admin manages AD FS, another only monitors Azure AD Connect).
-
Best for: Delegated admins or teams responsible for just one service type.
-
🔹 How Permissions Work
-
A user gets access if they have it at either level:
-
If they have directory-wide access → they see all services.
-
If they don’t have directory-wide access but have instance-level access → they see only that service.
Allow users or groups access to Microsoft Entra Connect Health
The following steps show how to allow access.
Step 1: Select the appropriate access scope
To allow a user access at the all service instances level within Microsoft Entra Connect Health, open the main screen in Microsoft Entra Connect Health.
Step 2: Add users and groups, and assign roles
- From the Configure section, select Users.
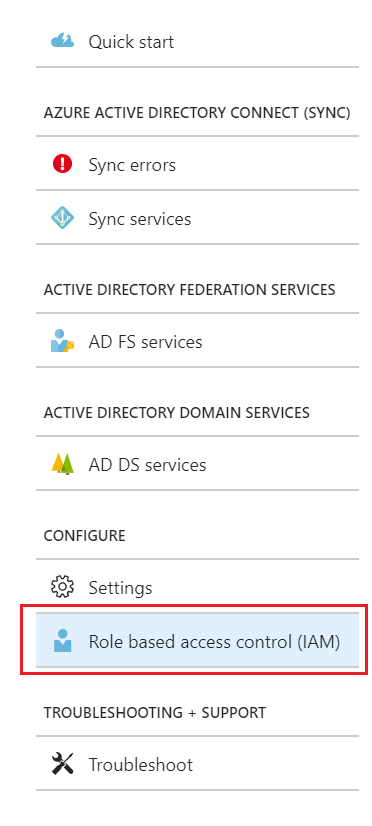
- Select Add.
- In the Select a role pane, select a role (for example, Owner).
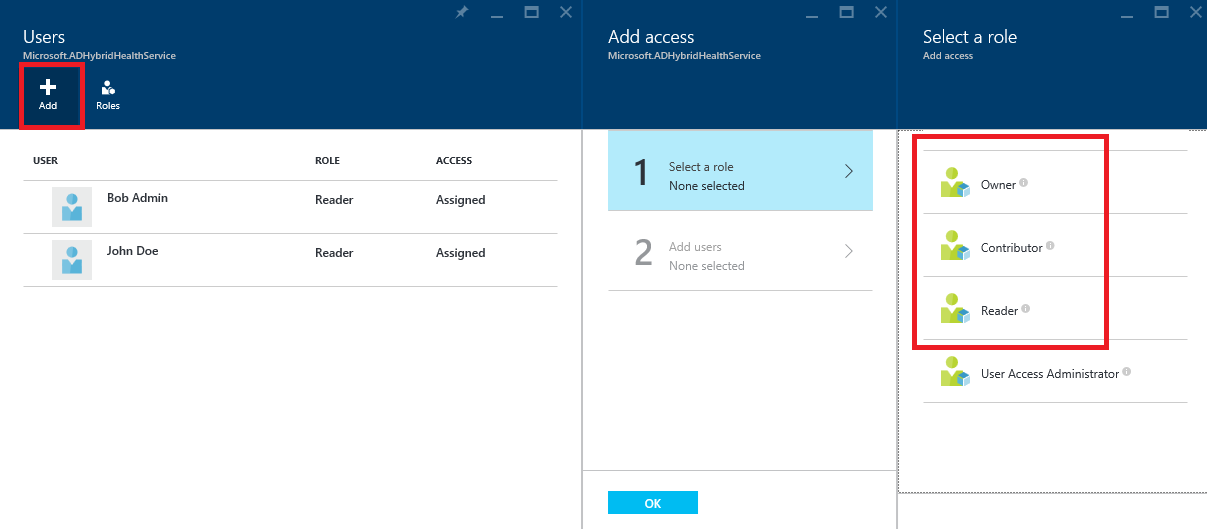
- Type the name or identifier of the targeted user or group. You can select one or more users or groups at the same time. select Select.
- Select OK.
- After the role assignment is complete, the users and groups appear in the list.
Now the listed users and groups have access, according to their assigned roles.
- The Invite Users feature isn't supported within Microsoft Entra Connect Health.
Step 3: Share the location with users or groups
- After you assign permissions, a user can access Microsoft Entra Connect Health by going here.
- On the screen, the user can pin the screen, or different parts of it, to the dashboard. Select the Pin to dashboard icon.
Remove users or groups
You can remove a user or a group added to Microsoft Entra Connect Health and Azure RBAC. Select the user or group with the secondary action, and select Remove.
Diagnose and remediate duplicated attribute sync errors
Overview
Taking one step farther to highlight sync errors, Microsoft Entra Connect Health introduces self-service remediation. It troubleshoots duplicated attribute sync errors and fixes objects that are orphaned from Microsoft Entra ID. The diagnosis feature has these benefits:
- It provides a diagnostic procedure that narrows down duplicated attribute sync errors. And it gives specific fixes.
- It applies a fix for dedicated scenarios from Microsoft Entra ID to resolve the error in a single step.
- No upgrade or configuration is required to enable this feature.
Problems
A common scenario
When QuarantinedAttributeValueMustBeUnique and AttributeValueMustBeUnique sync errors happen, it's common to see a UserPrincipalName or Proxy Addresses conflict in Microsoft Entra ID. You might solve the sync errors by updating the conflicting source object from the on-premises side. The sync error will be resolved after the next sync. For example, this image indicates that two users have a conflict of their UserPrincipalName. Both are Joe.J@contoso.com. The conflicting objects are quarantined in Microsoft Entra ID.
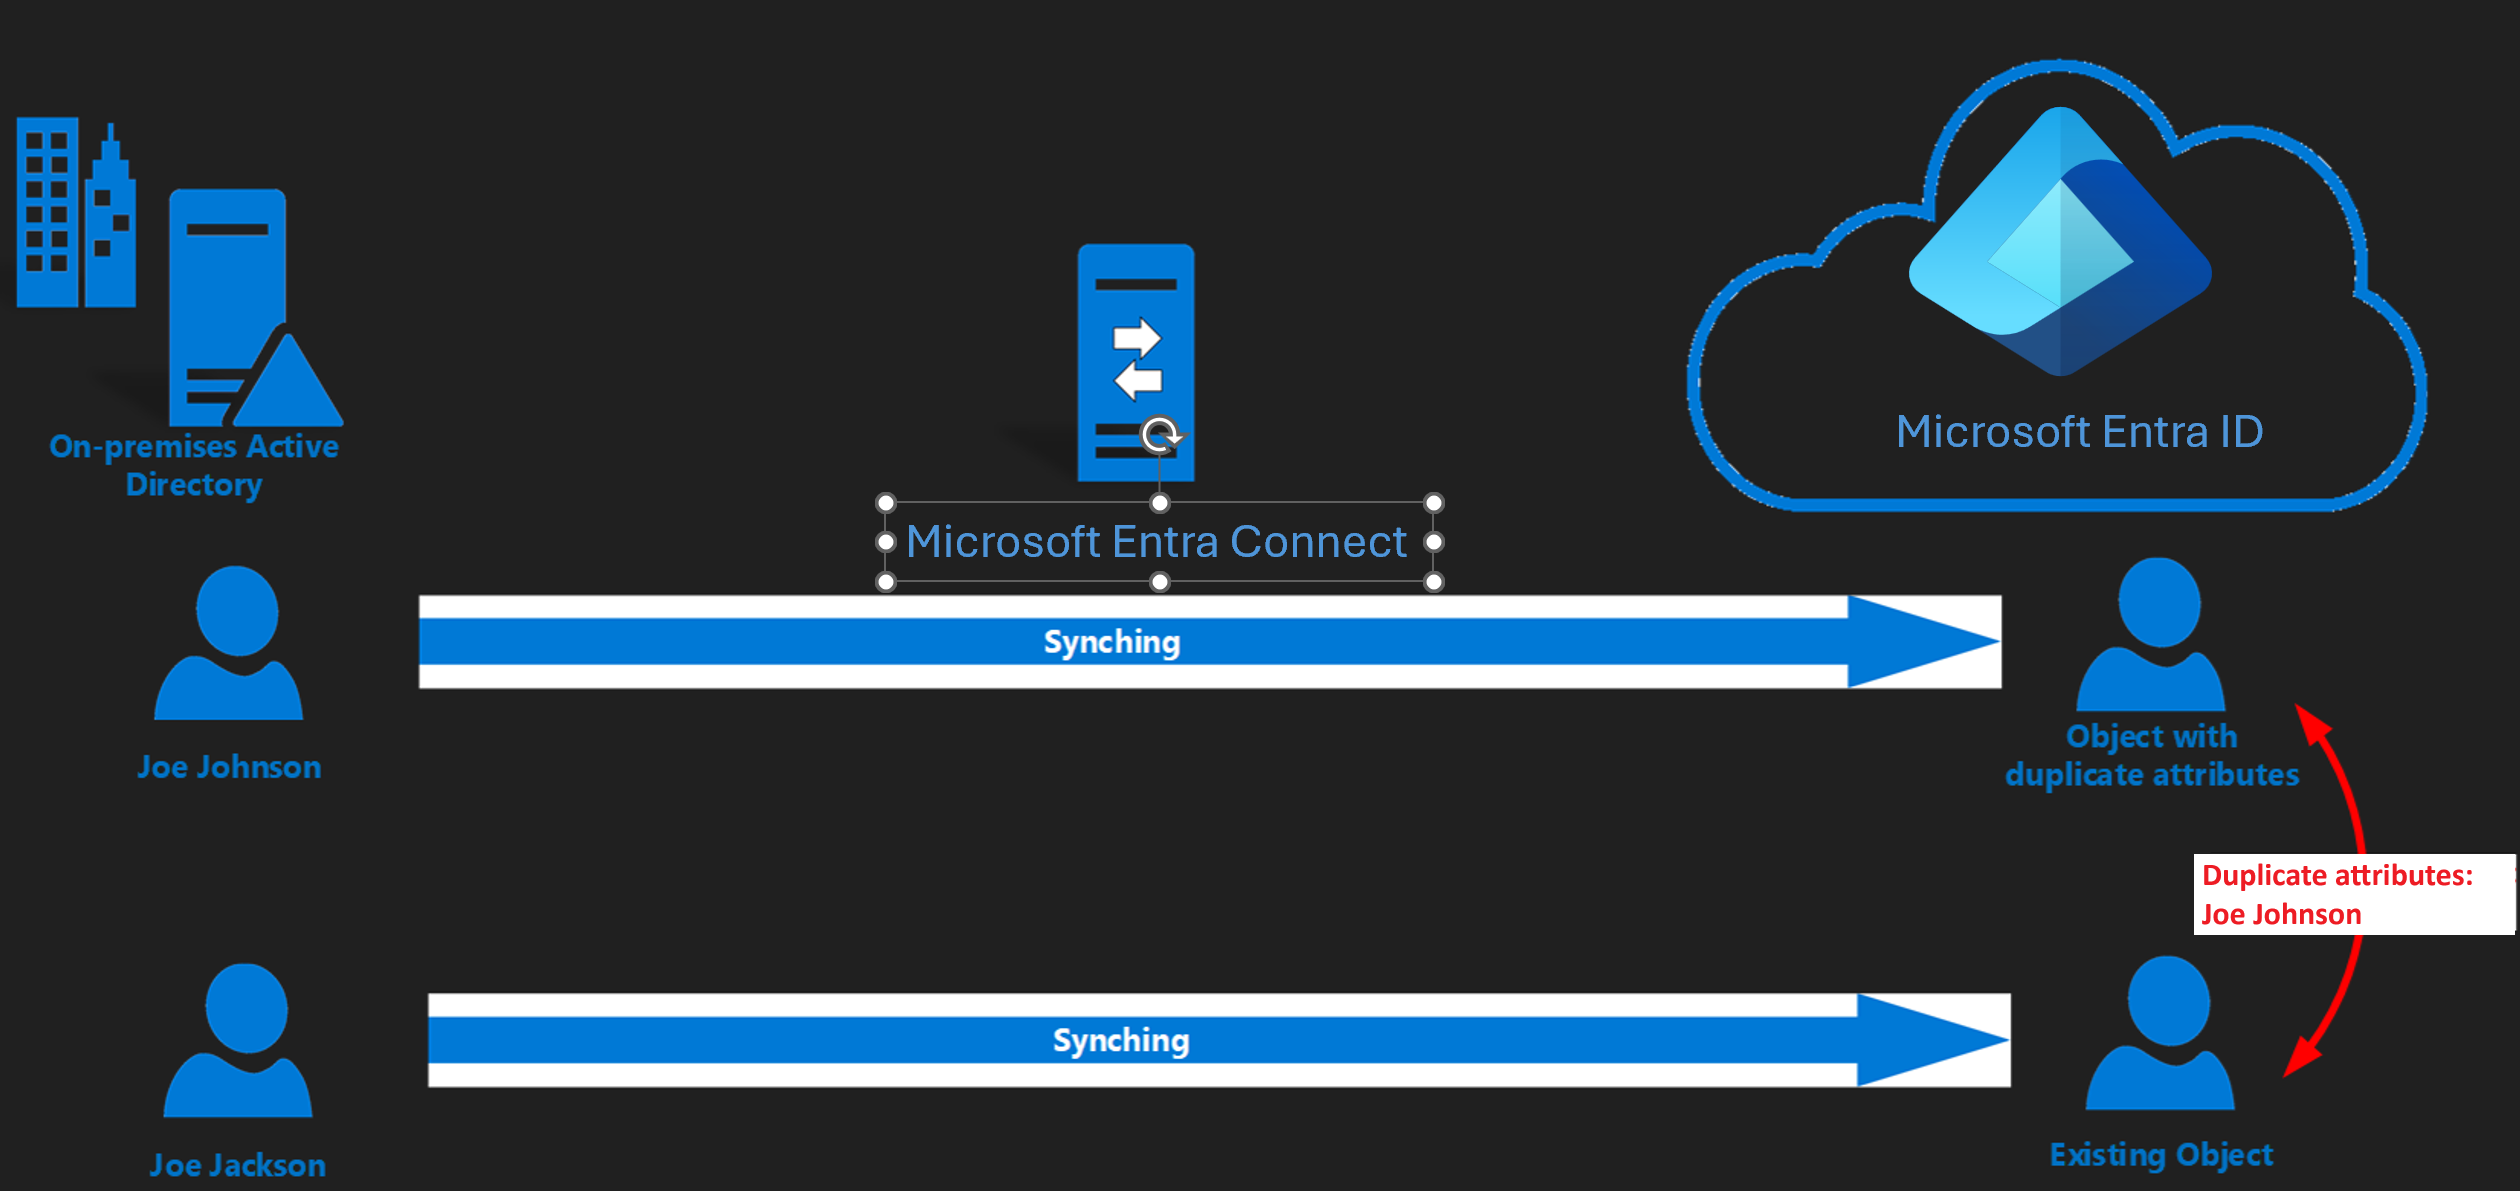
Orphaned object scenario
The Problem: Lost Source Anchor
-
Source Anchor (ImmutableID) is the permanent link between an on-premises AD object and its matching user in Microsoft Entra ID.
-
If that link is lost (e.g., object deleted, sync issue, or migration), the sync engine can’t recognize the existing user in Entra ID anymore.
Why this happens:
-
The user in on-premises AD was deleted, but that deletion never synced to Microsoft Entra ID.
-
Later, the object was restored or recreated in AD with a different Source Anchor (new ImmutableID).
-
Microsoft Entra Connect treats it as a new user, not the old one.
🔹 The Effect
-
The original cloud user in Entra ID still exists, with licenses and data (e.g., mailbox, OneDrive).
-
But the new on-premises user doesn’t sync to that old account.
-
Instead, you end up with a duplicate/conflict situation:
-
The existing cloud-only account.
-
The new synced account from on-premises.
-
-
Changes in AD no longer update the correct cloud account.
🔹 Example: Joe
-
Joe has a licensed account in Entra ID.
-
The original AD object for Joe was deleted or lost its Source Anchor.
-
A new AD object for Joe is created → it has a different Source Anchor.
-
Now Entra ID sees:
-
Old Joe (cloud-only, with license, mailbox, etc.)
-
New Joe (synced, but not linked to old Joe)
-
-
Result: Conflicts and duplication.
🔹 Why It’s a Big Deal
-
You can’t directly remap Source Anchor to fix this mismatch.
-
If left unresolved, Joe’s on-premises changes won’t flow to his original Entra account.
-
This can cause problems with login, licensing, and access to resources.
🔹 How to Handle
-
Decide which object is the "real" one
-
If you need to keep Joe’s original licenses and mailbox → keep the Entra ID object.
-
If you want to sync fully from AD → you may need to reassign the licenses and data.
-
-
Possible fixes
-
Use Hard Match (ImmutableID mapping) → set the new AD object’s ImmutableID to match the old Entra object.
-
Or, if that’s not possible → merge or migrate the data to the new synced object.
-
✅ In short:
If a user loses their Source Anchor, Entra ID sees them as a different person, even though it’s the same user. This leads to duplication and sync conflicts. The fix usually requires matching ImmutableID manually or reassigning/migrating licenses and data.
Diagnostic and troubleshooting steps in Connect Health
The diagnose feature supports user objects with the following duplicated attributes:
| Attribute name | Synchronization error types |
|---|---|
| UserPrincipalName | QuarantinedAttributeValueMustBeUnique or AttributeValueMustBeUnique |
| ProxyAddresses | QuarantinedAttributeValueMustBeUnique or AttributeValueMustBeUnique |
| SipProxyAddress | AttributeValueMustBeUnique |
| OnPremiseSecurityIdentifier | AttributeValueMustBeUnique |
Important
To access this feature a Contributor permission from Azure RBAC, is required.
Follow the steps from the Azure portal to narrow down the sync error details and provide more specific solutions:
From the Azure portal, take a few steps to identify specific fixable scenarios:
| Status | What does it mean? |
|---|---|
| Not Started | You haven't visited this diagnosis process. Depending on the diagnostic result, there's a potential way to fix the sync error directly from the portal. |
| Manual Fix Required | The error doesn't fit the criteria of available fixes from the portal. Either conflicting object types aren't users, or you already went through the diagnostic steps, and no fix resolution was available from the portal. In the latter case, a fix from the on-premises side is still one of the solutions. |
| Pending Sync | A fix was applied. The portal is waiting for the next sync cycle to clear the error. |
Check the Diagnose status column
-
In the sync error report, look at the Diagnose status.
-
If it says there’s a possible fix → you can try to resolve it directly in the portal.
-
-
Run diagnostics
-
Select Diagnose under the error details.
-
The portal will ask you a few questions to understand the issue (e.g., duplicate attributes, orphaned object).
-
Based on your answers, it will try to identify if it’s something fixable from the portal.
-
-
Check the result
-
If a Close button appears → there’s no quick fix available in the portal.
-
You must fix it on-premises (like updating UPNs, ProxyAddresses, etc.).
-
The error status will change to Manual fix required until you resolve it.
-
-
If it’s an orphaned object case or duplicate attribute → you may see an Apply Fix button.
-
-
Apply the fix
-
Click Apply Fix.
-
The error status updates to Pending sync.
-
-
Wait for next sync cycle
-
After Microsoft Entra Connect runs the next sync, the error should disappear from the list.
-

Comments
Post a Comment